
Performance
Video Performance* (5.25)*
The Panasonic PV-GS59 offers a single 1/6" CCD, with 800K gross pixels (290K effective pixels in 4:3 aspect ratio, 380K effective pixels in 16:9 aspect ratio). This camcorder is the top of the line one-chip MiniDV model from the company. The CCD is native 16:9, meaning it shoots at a higher resolution and captures more information in the 16:9 aspect ratio rather than at 4:3, as most camcorders do. This is the same chip found in the next model down, the PV-GS39.
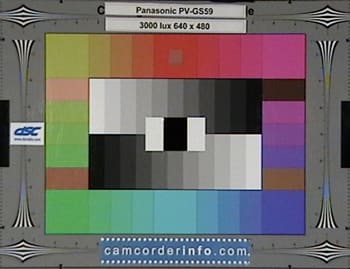
At 3000 lux, the PV-GS59 performed average for a MiniDV camcorder in this price range. The chief asset of the PV-GS59 seems to be its perfect adequacy in all regards; it did not wow us with color, sharpness, or noise suppression, but neither did it suffer unduly in any of these ways. The PV-GS59, and the PV-GS39 are the Ford Taurus, the Hershey chocolate bar, the Kansas of MiniDV camcorders (Kansans are now formally invited to post complaints at the bottom of this review).
The colors do tend to run together a little in the yellow-green portions of the spectrum, and the blue channel was weaker than the rest. It could not hope to compare to the three-CCD next model up, the PV-GS180. Noise was clearly evident, and higher than most competing camcorders. Fine detail capture was passable, even cromulent, but then again, we’ve seen better.
The PV-GS39, by comparison, was essentially the same – no surprises here considering it has the same innards as the PV-GS59. The JVC GR-D395 made for an interesting contrast. While it looked much sharper, due largely to the lack of noise, the colors were washed out, with a particularly pale red channel. Fine details looked slightly better than the PV-GS59, and the resolution scores (see below) confirm this.
The Sony DCR-HC36 was the next closest comparison. Color balance and vividness were Sony’s two main strengths. Unfortunately, noise was a problem. It’s not that the DCR-HC36 had more noise, per se, but the texture of the noise made it more noticeable. While the noise of the Panasonics appear as a general fuzz, Sony’s noise looks like a denim weave coursing across the screen, making it stand out more.
Finally, the Canon Elura 100 stepped up and showed them how to do it right. We love this little powerhouse of a camcorder, which produces incredible sharpness and vivacity for under $400. No other camcorder in its class can beat it for performance.
{column='Video Performance' models='Panasonic PV-GS59,Panasonic PV-GS39,Sony DCR-HC36,Canon Elura 100'}
Video Resolution* (9.7)*
The video from the PV-GS59 was tested for its resolution by shooting a standard ISO 12233 resolution chart. We then ran stills of that footage through Imatest imaging software. In 4:3 aspect ratio, the PV-GS59 produced 306.0 lines of horizontal resolution (with an average clipping of 0.67%) and 316.0 lines of vertical resolution, yielding an approximate resolution of 96696.0. In 16:9 aspect ratio, the camcorder produced 369.5 (with an average clipping of 0.55%) lines of horizontal resolution and 308.9 lines of vertical resolution, yielding an approximate resolution of 114138.55. As you can see, the resolution is higher in 16:9, as this is the chip’s native format. However, for consistency the score is based on its 4:3 aspect ratio. Please keep this in mind when comparing it to other camcorders.
Clipping occurs when a percentage of the image cannot be read by Imatest, in this case because certain pixels bottomed out (all channels registered zero). Clipping can cause some inaccuracies in scoring.
The chart below shows how the PV-GS59 fared against the competition. The PV-GS59 and PV-GS39 were statically the same. The Canon Elura 100 scored much better.
{column='Video Resolution' models='Panasonic PV-GS59,Panasonic PV-GS39,Sony DCR-HC36,Canon Elura 100'}
Low Light Performance* (4.75)*
Low light performance is based largely on imager size, as it ultimately dictates how much light is to be captured. A 1/6" chip is as small as you’ll find on a consumer camcorder, so we don’t expect much from the PV-GS59. But other factors can play a role, so let’s take a look.
At 60 lux, the PV-GS59 is a good deal darker than the image at 3000 lux – that comes as no surprise. While each of the colors is individually darker, the color differentiation has not suffered that much, which is a testament to the camcorder’s auto gain control. Noise, an unavoidable byproduct of gain, increases but does not overwhelm the image. The gain also tends to overrun some of the fine detail.
The Panasonic PV-GS39 is, again, about the same, though the greens and yellows appear slightly more saturated. The JVC GR-D395 tells the same story that it did in bright light. It handles fine detail a little better, and the image is brighter overall, but the colors are lacking. The Sony DCR-HC36 was darker than the PV-GS59, but the colors appeared more saturated, and are more likely to stand out if you are shooting against a dark background. Noise increased dramatically, much more so than the PV-GS59. Finally, the Canon Elura 100 produced a darker image with colors struggling to saturate and push through the darkness. Noise levels were high, though, and contributed to the dark look of the image. However, the camcorder is still much better at capturing fine detail than the Panasonic PV-GS59.
Like all 2006 Panasonics, the PV-GS59 offers manual gain in 1dB from 0dB to 18dB. At 60 lux, the auto gain had already placed the gain at about 12-13dB. At 15dB, the brightness increases, but the colors begin to wash. At the maximum 18dB, the picture is unusable; it is entirely washed out.
At 15 lux, the PV-GS59 lost most of the color information. Noise levels are very high, and easily overwhelm the fine detail. You could say that the camcorder hits its performance wall somewhere between 60 lux and 15 lux. There is little improving this image through manual controls, either. The gain is already maxed out at 18dB. You could try slowing down the shutter speed with MagicPix mode, but anything in motion, including the camera itself, will result in significant blurring.
The Panasonic PV-GS39 is once again essentially identical to the PV-GS59. The JVC GR-D395 lost even more of its color information, creating almost greyscale image. As with the PV-GS59, it is no longer a useable image. The Sony DCR-HC36 manages to hang on to a respectable amount of color for a 1/6" chip thanks to heavy saturation and gain. Noise levels are very high, but there is some fine detail retention. Finally, the Canon Elura 100 proved its worth by retaining a surprising amount of color and fine detail. Disappointing at 60 lux, it redeemed its good name here. Noise levels are high, and there are even trace amounts of blue noise, but it performs head and shoulders above the competition.
Overall, the Panasonic PV-GS59 is not a low light performer. If you plan a lot of night shots, either invest in a lighting kit or pursue a camcorder with a larger imager.
{column='Low Light Performance' models='Panasonic PV-GS59,Panasonic PV-GS39,Sony DCR-HC36,Canon Elura 100'}
Wide Angle* (9.0)*
Wide Angle measurements were taken of the PV-GS59’s 4:3 and 16:9 modes. In 4:3 mode, this model’s widest angle was 45 degrees, while it measured 57 degrees in widescreen mode (16:9). This additional screen capture indicates the PV-GS59 does offer true 16:9 widescreen.
Format
**
**
Compression* (8.0)*
The Panasonic PV-GS59 utilizes standard MiniDV video compression, a mature format that is superior to the MPEG-2 compression of most currently available DVD camcorders. MiniDV compresses video at a rate of 25 Mbps whereas MPEG-2 has a lower data rate of around 8.5 Mbps. Until DVD camcorder compression improves, MiniDV will be the superior format in terms of video quality. They are also an excellent value, and cost significantly less than DVD camcorders that offer similar feature sets. Stills from the GS59 are saved in the JPEG format.
Media* (8.0)*
The Panasonic PV-GS59 records video onto standard 6.35mm MiniDV tapes, and captures 640 x 480 stills to SD memory card. The camcorder does not ship with either MiniDV tape stock or an SD memory card, but these are very common media types that are available everywhere from pharmacies and supermarkets to electronics superstores.
Editing* (8.0)*
This camcorder does not ship with Panasonic’s proprietary editing software, but a wide range of non-linear editors are available, and all of them interface easily with MiniDV format camcorders. Avid FreeDV is a freeware version of Avid’s excellent video editing program and is available for both Windows and Mac-based systems, and new Macs ship with Apple’s iMovie. Both of these programs are powerful editing tools that offer all the functionality a beginning videographer needs, from transitions and fades to soundtrack layering. At the professional level, Avid, Adobe, and Apple all offer excellent non-linear editors.
Tour
**
**
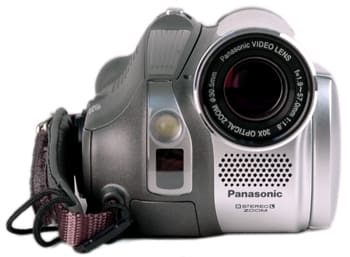
**The Front ***(7.0)*
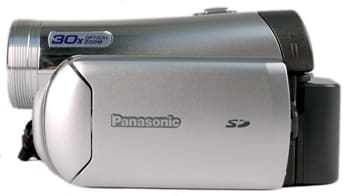
The Panasonic PV-GS59 is a low-slung camcorder that is wider than it is tall giving it proportions that stand out in a market where most camcorders tend to be taller than wide. As a result, this camcorder’s appearance may strike some people as unusual. The front of the PV-GS59 is topped by a Panasonic Video Lens with an impressive 30x optical zoom, a focal length equivalent to 1.9 to 57 mm, an Auto Iris of f/1.8 to f/3.9, and a filter diameter of 30.5 mm. Just below the lens is a Built-in Stereo Microphone, encased by a screen.
Directly to the left of the Built-in Stereo Microphone is an opaque rectangular window that houses the camcorder’s White Balance and Remote Control Sensors. In order to function properly, these sensors cannot be blocked, so care should be taken to keep the front of the camcorder free from obstructions like a stray finger. Just above the sensor window is a Built-in LED Light, which can be employed to illuminate subjects in very dark environments. The PV-GS59 manual claims the light is effective up to 4.9 feet from a subject, but it should only be considered as a last resort when no other lighting is available.
**The Right Side ***(8.85)*
The main feature of the right side of the Panasonic PV-GS59 is the MiniDV cassette compartment, which features an unusual side-loading design. This is certainly an improvement over bottom-loading camcorders, and in terms of convenience, is comparable to the more common top-loading tape compartments. In the middle of the right side of the camcorder is the Open/Eject switch, and pressing the switch forward pops the door open, and causes the tape eject mechanism to open outward. Above the Open/Eject switch, is a concave trough in the camcorder’s body where built-in playback speaker is located.
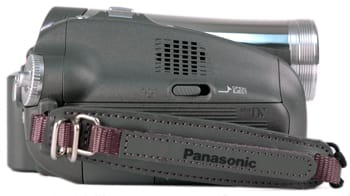
At the bottom edge of the right side is a hard plastic port cover which houses the USB and DV Input/Output ports for the PV-GS59. This is a dubious port placement. Not only are the ports hidden behind the hand strap, they can only opened from the camcorder’s underside which would require its removal from a tripod. The hand strap itself runs along the length of the PV-GS59’s body, and is angled slightly down towards the lens to provide an optimal shooting position. The hand strap is nicely padded and adjustable, and the low-profile of the camcorder body makes it very comfortable to hand hold. At the back end of the hand strap are two metal loops for the shoulder strap, and the lens cover can be looped to the hand strap’s front.
**The Back ***(6.0)*
The extendable Color Electronic Viewfinder is located on the back of the Panasonic PV-GS59, positioned at the upper left. The viewfinder has a dioptric adjustment knob, which is accessible on its top when extended. This adjuster is larger and easier to operate than those found on most consumer camcorders, which tend to be extremely small. The viewfinder’s eyepiece is made of hard gray plastic, and in this respect it is just as uncomfortable as those found on most consumer camcorder. The viewfinder’s one redeeming quality is that it can be used with little or no light leakage, an area where all too many consumer camcorder eyepieces fail.

The PV-GS59’s Battery Pack can be released via a tab on the underside of the camcorder body. When the battery is removed, a DC-in port is revealed on the inner-right edge of the battery compartment. This DC-in location necessitates removal of the battery, an inconvenience that could have been avoided by placing the port outside the battery compartment.
The camcorder’s Off/On switch is located on the top-right edge of the back, adjacent to the viewfinder. Just below and to the right of the On/Off switch is a tiny red LED power indicator light, and just below the LED is a raised Menu button.
Extending out from the right side, below the Menu button, is the primary interface for the Panasonic PV-GS59, a Mode Dial with a Joystick in its center. The Joystick protrudes slightly from the dial, and serves as an efficient means of navigating the menu and controlling manual adjustments. The Mode Dial is used to switch between Video Record, Video Playback, Still Image Record, Still Image Playback, and PC Modes. The Record button is located just to the left of the Mode Dial, and is a medium-sized oblong button marked with a red dot. A small, grey Light button controls the front-mounted video light, and is directly beneath the Mode Dial. All of these controls are within reach of the right thumb when the camcorder is hand held, making it possible to access all of the Panasonic PV-GS59’s adjustments using only the right hand – a rare feat in the world of camcorders.
**The Left Side ***(8.0)*
A 2.7" LCD screen occupies the bulk of the left side of the PV-GS59. The screen has a 16:9 aspect ratio, but it can also display video in 4:3 by pillar boxing the image (i.e. cropping the left and right side of the screen). The LCD screen opens to 90 degrees from the camcorder body, can be rotated through 270 degrees when open, and can be folded into its cavity with the screen out. The LCD screen’s hinge is unusually flimsy – much less robust than the hinges found on higher-end Panasonics and most other consumer camcorders. This is disappointing because Panasonic camcorders are generally well-built, and we hope the LCD hinge on the PV-GS59 is anomalous rather than a harbinger of lowering standards by the manufacturer.

Inside the LCD cavity are a few features of interest. Along the bottom edge of the cavity is the SD memory card slot cover, which can be opened with a fingernail along where it meets the left side of the camcorder. The card slot loads from the bottom of the camcorder, making it yet another feature inaccessible while mounted on a tripod. A tiny SD card indicator light is inset in the LCD cavity to the left of the slot. Near the rear edge of the cavity is the Auto/Manual Mode switch, which also functions as a Manual Focus toggle. Just above this switch is the camcorder’s Reset button, recessed to make it unlikely that it would be pressed accidentally.
The Top* (8.0)*
On top of the Panasonic PV-GS59, near its back edge, is the Photo Shot button, used to capture still images to SD card. The Zoom Toggle is located just ahead of the Photo Shot button, and has a rocking lever design that is raised slightly above the top plane. This lever doubles as a volume control when reviewing footage in playback mode.
Auto / Manual Controls
**
**
Picture & Manual Control
Automatic Control (5.0)
Panasonic camcorders usually feature solid Automatic image adjustments, though there are a few areas in which they struggle. Auto mode is engaged via the Auto/Manual toggle switch in the LCD cavity. Engaging Auto mode locks most controls on the PV-GS59 from manual control. This camcorder also features a suite of Scene Mode settings that automatically control the image in various challenging or unusual shooting situations. The Scene Modes include: Sports, Portrait, Low Light, Spotlight, and Surf & Snow Modes. While in Auto Mode, it is also possible to use some of the camcorder’s automatic controls via the Manual Control Menu and these include Backlight Compensation, Fade On/Off, Information, Soft Skin Mode, MagicPix, Perform Blank Search, and Recording Check Start.
The PV-GS59’s performance in Auto Mode is mixed. Auto focus functioned well in most situations, but the camcorder had difficulty focusing in low light, low and high-contrast environments, and with detailed images like foliage shot from a distance. These are all scenarios that would give any camcorder trouble in Auto Mode trouble, and the PV-GS59 was not a standout. Auto exposure works well, and the camcorder makes adjustments very quickly, especially when moving between evenly-lit environments.

The LCD cavity houses the Auto Mode / Manual Mode / Focus
Predictably, the camcorder had difficulty with more complex scenes, such as framings involving mixed lighting or high contrast ranges. The PV-GS59 frequently exposed for the brightest or most centrally framed object rather than the subject of interest, and this is another common problem area for camcorders in Auto Mode. The white balance adjustment performed well. Our offices are lit by a combination of natural light and overhead fluorescents. These lighting sources combine to create a notoriously tough mix of bluish and greenish light, but the PV-GS59’s auto white balance reproduced colors in the office better than most consumer camcorders we’ve tested. Overall, this Panasonic’s Auto Mode performs adequately, but not as consistently as Sony camcorders which excel in the quality of their Auto image adjustments.
Overall Manual Control (7.0)

Panasonic builds camcorders that offer excellent manual and focus controls. Aperture, shutter speed, gain, and white balance can all be adjusted on the PV-GS59. These controls can be djusted using the joystick, which also provides a fast means of navigating through menu options. With the exception of manual focus (accessed by pressing Auto/Manual switch in the LCD cavity downwards), all of the camcorder’s manual controls can be reached with the thumb of the right hand. Becoming a PV-GS59 power user does require some practice, in contrast to Sony’s nearly idiot-proof LCD touch screen interface. If you do learn to race through menus on this camcorder, you’ll be rewarded with a level of image control that no competing camcorder maker offers.
Packing a huge number of features into a small camcorder like the PV-GS59 is a big challenge, and Panasonic’s solution is arguably the best on the consumer market for manual control. An ideal interface is one that provides instant access to manual controls like gain, shutter speed, and focus which is why prosumer and high-end camcorders feature so many external buttons and controls. With small surface areas, consumer camcorders can only accommodate a relatively small number of external controls, forcing manufacturers to miniaturize, innovate, or just discard manual control features.
The PV-GS59 uses a joystick that moves in five directions: up, down, left, right, and in. Pressing in on the joystick displays the Manual Control Menu, which occupies the lower right corner of the LCD screen. This is an icon-driven menu, and getting to know the icons will be the steepest part of the manual control learning curve for new users. The menu is split into five sub-menus in Manual Mode, and four Auto Mode, and each "page" or submenu is a disc with icons arranged up, left and right. Icons are selected by pressing the joystick towards the position they appear on the menu, and pressing down toggles through the pages.
Controls for Fade and Backlight Compensation are on page 1, along with an Info icon which accesses a brief on-screen explanation of how to use the joystick. Page 2 accesses Soft Skin Mode, Page 3 controls MagicPix (night mode), and page 4 includes Record Check and Blank Search features. Controls for Iris/Gain, White Balance, and Shutter Speed – the most important manual controls – are puzzlingly on page 5. We would prefer these controls to be on page 1, where they could be accessed more quickly.
Settings for Gain, Aperture, and Shutter Speed are set by stepping through an incremental scale. This is an effective way to set manual controls, but it takes time to move through the settings. For example, moving through the iris range from closed to open entails pressing the joystick thirty times! Ultimately, this is a minor complaint since no other consumer camcorder line matches the versatility of Panasonics. Manual focus is the one primary manual control that is not automatically accessed via the joystick. This adjustment must be switched to on, independent of other controls in Manual Mode, by pressing down on the Auto/Manual select switch in the LCD cavity. When Manual Focus is on, it appears as the menu’s page 6, and can be adjusted with the joystick.
The PV-GS59 also has a text-based Administrative Menu, accessed by pushing the Menu button near the Mode Dial on the camcorder’s back. This menu controls features that do not typically require adjustment during a shoot, including aspect ratio, Scene Modes, and Image Stabilization on / off.
*

Zoom (7.0)*
The Panasonic PV-GS59 features a powerful 30x optical zoom placing it among a small handful of camcorders with optical zooms of 30x or higher. The zoom toggle on this camcorder is excellent, and it is nicely positioned to allow easy operation while the camcorder is being hand-held. I was able to use the zoom toggle comfortably with either my middle or index finger. The toggle has a rocking lever design which allows fine control over zoom speed, and is better than the slider design found on the more expensive Panasonic PV-GS180’s zoom toggle. Zoom speed control within optical territory is excellent, but there is an unavoidable "speed bump" at the optical/digital zoom boundary making it impossible to zoom smoothly through 30x.
Zoom Power/Ratio (10.0)
The Panasonic PV-GS59 has 30x optical zoom placing it in the top tier of consumer camcorders in terms of zoom power. The zoom function can be set to optical zoom only in an effort to avoid the image degradation that occurs with digital zoom enabled. It is also possible to cap digital zoom at 50x, providing some additional power without the danger of significant impact on image quality, or it can be permitted to reach the camcorder’s 1000x digital zoom maximum.
Focus (5.0)
Manual Focus on the PV-GS59 is activated via the Auto/Manual switch in the LCD cavity. This switch has two fixed positions, up for Auto Mode and middle for Manual Mode. From the Manual Mode position, pressing downward once enables Manual Focus, and adds a sixth Manual Focus page to the Manual Control Menu. The Manual Focus page is reached by simply pressing in on the joystick and toggling ahead to page six. As with other manual controls, the joystick is used to adjust focus, left brings the focal point closer to the lens and right focuses on more distant objects. The joystick works relatively well in this capacity, allowing for fast and accurate adjustments. As a focal controller, the joystick ranks below a genuine focus ring but ahead of touch pads or touch screens. The focal control on the PV-GS59 has no numerical gauge or even a scale to indicate where in the focal range you are, making it likely you’ll waste some time getting your bearings by searching back and forth.
The camcorder’s Auto Focus snapped quickly into sharp focus in most well-lit situations, but struggled where most camcorders run into trouble. In low contrast and low light, the PV-GS59 breathes as it searches for the most likely subject of the frame. The camcorder had similar problems in high contrast situations, and where the subject of the shot was closer but more dimly lit than the background, the camcorder tended to select the background as its focal point. In more challenging shooting situations like these, manually focusing the camcorder is the only way to achieve a sharp image.
Exposure (Aperture) (6.0)
The PV-GS59 offers highly effective control over exposure according to what Panasonic refers to as "F Numbers" rather than F Stops. When in Manual Control Mode, exposure control is enabled by selecting the left icon on the fifth page of the Manual Control Menu. Once selected, a small Iris Control diagram appears on the LCD indicating that the iris can be adjusted by pressing left (-) and right (+) on the joystick. The iris settings are: Open (F1.8), F2.0, F2.4, F2.8, F3.4, F4.0, F4.8, F5.6, F6.8, F8.0, F9.6, F11, F14, F16 and Closed, and each stop is separated by an intermediary partial (half?) stop.
Panasonic’s Gain function is effectively a continuation of the Iris scale. After the camcorder has reached Open, continuing to press the joystick right adds brightness to the image by enabling the camcorder’s Gain function with settings at 0dB, 3dB, 6dB, 9dB, 12dB, 15dB, and 18dB. As with Iris, there is one un-numbered partial step in-between each Gain setting on the PV-GS59.
*Shutter Speed (7.0) *
The PV-GS59’s Manual Shutter Speed adjustment is accessed from page five of the Manual Control Menu, and when enabled a simple diagram replaces the menu page. As with the Iris diagram, one indicates that shutter speed is controlled be pressing the joystick left (–) and right (+). The camcorder provides a wide range of shutter speed settings at 1/60, 1/100, 1/120, 1/180, 1/250, 1/350, 1/500, 1/750, 1/1000, 1/1500, 1/2000, 1/3000, 1/4000, and 1/8000 of a second. This is an excellent range of fast shutter speed settings, but the PV-GS59 does not enable manual control over shutter speeds below 1/60. MagicPix is an automatic control feature that adjusts the shutter speed below 1/60, but it can only be turned on or off.
Shutter speed is another manual control that requires the user to step through the range, and as a result does not allow fluid scrolling which would increase the speed at which users can make shutter speed adjustments. In a consumer camcorder market where most manufacturers leave full manual shutter speed control out, this is a minor criticism. Panasonic deserves credit for not only including excellent shutter speed control, but making it relatively easy to use.
White Balance (7.0)
White Balance control for the Panasonic PV-GS59 is also reached from page 5 of the Manual Control menu. Once selected, the joystick is used to scroll between several white balance presets and Manual White Balance. The Auto presets for white balance are: Auto, artificial light, and sunlight. While these preset options are quite limited, Panasonic has provided an excellent Manual White Balance control. When the Manual White Balance option has been selected, setting it is accomplished by pressing the joystick up until the white balance indicator icon stops blinking. Setting white balance manually on the PV-GS59 is fast, and yields excellent results.
Gain (7.0)
As noted in the description of this camcorder’s Exposure/Aperture controls, Iris and Gain are both accessed by selecting the Iris option on page 5 of the Manual Control menu. Panasonic has placed Iris and Gain adjustments on a seamless continuum that ranges from Closed shutter all the way to Open shutter with 18dB Gain, so there isn’t a separate gain control or menu. As the user presses right on the joystick and steps up past the Open shutter setting, the image continues to brighten as Gain augments the image. You know you’ve entered gain territory when the Iris indicator reads Open on the LCD’s left side, and the dB indicator begins to climb. There is one step between each numerical gain level. The gain settings available on the PV-GS59 are 0dB, 3dB, 6dB, 9dB, 12dB, 15dB, and 18dB.
Other Manual Control (0.0)
There are no additional manual controls on the Panasonic PV-GS59, but the quality of the manual control feature set is better overall than manual controls on other comparably priced camcorders.
Still Features
Still Features* (6.5)*

Still camera features on the PV-GS59 are limited, so this camcorder should not be regarded as more than a snapshot device. The maximum still image resolution is 640 x 480, and images are captured in JPEG format to SD memory card. The camcorder provides two compression setting options, High and Normal. Stills are captured by pressing the Photo Shot button, which is located on top of the camcorder just behind the Zoom Toggle. There is no on-board flash, and an SD card is not shipped with the camcorder. The PV-GS59 features "RapidFire Consecutive Photoshot" mode, which is Panasonic’s name for burst mode on this camcorder. When in burst mode, the camcorder can capture up to 10 still images in quick succession.
The manual controls and Scene Modes of the PV-GS59 are available during still capture making for a highly adjustable image. While the camcorder’s manual controls are available in still mode, it’s hard to imagine many users taking the time to tweak a 640 x 480 snapshot. Another still feature with questionable widescreen mode achieves a 16:9 aspect ratio by cropping the already meager image. The resulting 16:9 stills have a resolution of only 640 x 360. The camcorder produces a digital clicking noise when images are captured, and the sound effect can be turned on or off.
Still Resolution* (1.0)*
The PV-GS59’s stills were tested for their resolution by shooting a standard ISO 12233 resolution chart and running those stills through Imatest imaging software. In all, the PV-GS59 produced a resolution of 95105.4075 (with an average clipping of 1.71%). For more information on clipping, read the Video Resolution section above).
The chart below shows how the PV-GS59 compared to the competition.
{column='Still Resolution' models='Panasonic PV-GS59,Panasonic PV-GS39,Sony DCR-HC36,Canon Elura 100'}
Still Performance* (3.25)*
With a still size limited to 640 x 480, the PV-GS59 indicts itself as a poor substitute for a dedicated still camera from the outset. Looking at the image, it’s hard to imagine ever wanting to use this feature. Color performance is uneven, with too much red and a very poor green channel. Noise levels are intense, which is hard to accept when the lighting is this strong. In short, avoid taking stills with this camcorder unless you are doing so for emergencies or archival purposes.
The Panasonic PV-GS39 offers the same still features and the same lousy performance. The JVC GR-D395 was less noisy and looked a little sharper, but like its video, the colors were washed out. There were also traces of blue noise in the image. The Sony DCR-HC36 had equally poor color balance, erring on the side of blue. Noise was high for 3000 lux, but not as high as the PV-GS59. All of these camcorders shot at a maximum size of 640 x 480, so we can’t fault them much. With that sort of restriction, the manufacturer is hardly advertising the camcorder as a still camera replacement.

Only the Canon Elura 100 had a higher still resolution, 1152 x 864. Though the stills are bigger, Canon probably should have left well enough alone. Yes, the image is far sharper and more detailed than any other these other camcorder’s stills. The color performance, however, is abysmal – completely washed out.
It all comes down to a very simple dictum. If you want stills, use a still camera. If you want video, read on, dear friends, read on.
{column='Still Performance' models='Panasonic PV-GS59,Panasonic PV-GS39,Sony DCR-HC36,Canon Elura 100'}
Handling and Use
**
**
Ease of Use* (6.5)*
Panasonic’s PV-GS59 is an easy camcorder to use, but it’s not as easy as Sony camcorders like the DCR-HC36 with its touch-screen based menu. The PV-GS59’s ease of use should be evaluated in the context of its considerable manual adjustability and multitude of features, which far surpass those offered on the striped-down Sony. Put another way, there are easier camcorders to use in absolute terms, but none offer such easy and effective control over an equivalent suite of manual adjustments.
External controls on the PV-GS59 are generally well positioned with a few exceptions. The Menu button is placed on the back of the camcorder’s body in the midst of other manual controls like the Photo Shot button and the Mode Dial, but it is placed just out of reach of a user’s right thumb during hand-held shooting. I managed to reach the Menu button, and all the Manual controls by keeping the hand strap slightly loose. Doing this enabled me to adopt a few slightly different grip positions without having to use my left hand at all. In other words, while it is possible to reach all of the PV-GS59’s right-thumb controls, it’s not exactly easy. But beggars can’t be choosers; only Panasonic’s interface design permits this level of one-digit control while other camcorders require two hands.
Navigating the Administrative Menu is easy because it’s a full text menu with clear descriptions of all the options. The joystick enables users to move through the menu directionally. Pressing up or down steps from option to option within the menu pages; pressing left and right moves between menu levels, and pressing in on the joystick selects a menu option.
The Manual Control menu display is not immediately intuitive as it uses symbols to signify options (a space-saving tactic). With practice, though, this menu can become an extremely efficient way to customize the camcorder’s image. Panasonic has included a new Info icon, which explains the purpose of each symbol. The Info feature should help first-time users, but making truly efficient use of the Manual Control menu requires a user to take the time to memorize Panasonic’s iconography.
As previously noted, adjustments that occur across a range like Iris can only be navigated in steps, by nudging left or right on the joystick multiple times. This is a functional way of making adjustments, but it can be time-consuming. Iris and Gain together constitute upwards of 50 incremental settings, so moving from a nearly closed iris to the high-end gain takes time. We think a better solution would have been for Panasonic to allow users to scroll through settings by holding the joystick because it would make moving through manual control settings faster. Some additional on-screen guides, such as a focal distance indicator would also be a welcome additional to an otherwise well-conceived interface.
In sharp contrast, Sony’s camcorder menus are accessed via a touch screen LCD. This makes Sony menus very easy to navigate and understand (as long as the camcorder’s user can read and point at the screen), but we think it is a flawed interface. Manual control guides often obscure much of the LCD screen, blocking the picture you're trying to adjust. It’s also very difficult to make fine adjustments to controls like manual focus when the only way to adjust it is by pointing to "buttons" on a screen. Almost any external control such as a joystick or touchpad is a better means of making technical picture adjustments. Touch screens also pick up finger grease which can obscure the image, and we have concerns about the durability of touch screens over time. Finally, a touch screen LCD precludes use of the viewfinder while making camera adjustments, which is both constraining and taxing on battery life.
Handling* (8.5)*
The PV-GS59’s joystick is the primary controller for image adjustments and playback, and with practice, it is a highly efficient means of navigating the camcorder’s menu hierarchy. Yet it is an interface that requires some practice. The icon-driven Manual Control Menu requires that a user know what each symbol means, or be willing to fall back on the Info function, a guide located on page 1.
We are fans of the joystick because it is easier to manipulate than a four-way touchpad controller, and far superior to the "touch membrane" still found on a few camcorders, such as the Hitachi DZ-GX3300A. We also like the fact that the joystick is rear-mounted to face the user rather than located out of site in the LCD cavity. And despite the fact that it’s not as idiot proof as Sony’s LCD touch screens, the joystick provides a much better manual control interface.
The zoom toggle is a well-implemented rocking lever that is a pleasure to use, and comparable to the excellent zoom toggles found on Sony camcorders. It is well-placed, but users with larger hands may find its placement slightly awkward – a problem that is common on consumer camcorders which by definition are one-size-fits-all. The Menu Button’s placement is also a bit awkward, located just above the left of the Mode Dial. It is just out of comfortable reach of the right thumb when hand-holding the camcorder. These complaints are generally minor in the context of the PV-GS59’s considerable capabilities, however.
Portability* (7.5)*
The Panasonic PV-GS59 measures 69 mm x 82 mm x 120 mm (2-11/16" x 3-1/4" x 4-3/4") and weighs in at .41 kg (.9 lb). It’s not a compact camcorder, and won’t slip easily into a pants pocket but it’s slightly smaller than average for a comparably priced camcorder. Some users will find its barrel-like profile preferable to the more common taller-than-wide designs when it comes to dropping the PV-GS59 into a bag or purse.
LCD/Viewfinder* (6.5)*
The Panasonic PV-GS59 uses 2.7-inch widescreen LCD display, a feature that is absent on the step-up PV-GS180 with only a 2.5-inch 4:3 screen. Unfortunately, the most notable aspect of this LCD screen is the unorthodox hinge mechanism attaching it to the camcorder’s body is. Rather than the very solid hinge found on higher-end Panasonics, this one is comprised of two flimsy plastic arms. When testing camcorders, we always take note of how strong the LCD hinge is, and this one felt weaker than the vast majority we’ve come across this year. A weak LCD hinge is a liability, because it’s a delicate instrument that spends much of its life extended from the camcorder’s body. We hope Panasonic spends a few extra bucks to upgrade the hinge on next year’s iteration of the PV-GS59.
In other respects the LCD functions normally, and opens to 90 degrees from the camcorder body, swivels through 270 degrees, and may be flipped 180 degrees so that subjects facing the camcorder can see themselves on the screen. When the LCD is positioned towards the camcorder’s lens, the image is automatically flipped to appear upright. The LCD can also be folded screen-side-out into the LCD cavity for monitoring from the side.
The problematic hinge
The Panasonic PV-GS59 is also equipped with an Electronic Color Viewfinder that can be extended about an inch to provide extra clearance from the camcorder body. Unlike many consumer camcorders (Sony comes immediately to mind) manual controls are all available when using the viewfinder, providing users with the option of shooting without the power-hungry LCD screen. The eyepiece of this viewfinder resembles those found on most other consumer camcorders, and is made of a hard plastic that is not comfortable to rest one’s eye against. The one aspect of the eyepiece that is slightly superior to most on the market is that it can be used with little or no light leakage by resting one’s eye directly against its surface. This is a feature that could be useful in bright sunlight when the LCD screen is overpowered, enabling a users to assess the image more effectively. The EVF has a dioptric adjustment lever that is accessible when it is fully extended. This lever is larger and easier to use than many of the undersized adjusters on the market.
**

Battery Life*** (10.5)*
We tested the PV-GS59’s CGR-DU06 battery for shooting duration by leaving the camcorder recording continuously without engaging any of the manual controls. The EIS was turned off, and all controls left in auto. The tape was changed once during this process, and we plugged in the DC power to do so. In total the battery lasted for an outstanding 105 minutes and 25 seconds.
Audio / Playback / Connectivity
Audio* (4.5)*
The PV-GS59 includes an on-board, front-mounted stereo microphone, positioned under the lens, and does not provide a means of monitoring audio – there is no headphone jack. Panasonic has reserved higher-level audio functionality such as external mic and headphone jacks for its more expensive 3-chip camcorders, starting with the PV-GS180.
Audio control options are found in the Basic and Advanced submenus of the Administrative Menus. The Wind Cut Option is located in the Basic Menu, and it is a Low Cut digital filter that ameliorates the buffeting noise of wind hitting the camcorder’s microphone screen. Wind Cut reduces overall sound quality so it should only be used when needed. Two audio options are located in the Advanced submenu. Audio can be recorded at 12 or 16 bit sampling rate, and in order to make use of the camcorder’s audio dub feature, 12 bit mode must be selected. (Audio dubbing is a feature that can only be used with the optional remote control). The other audio option available in the Advanced submenu is called Zoom Microphone, and has the effect of linking recorded audio volume to the zoom. When the camcorder is zoomed out, and recording a wide image, audio levels are lowered, and when zoomed in, audio levels are raised. The effects of Zoom Mic might be useful in some situations, but there is a risk of unnaturally modulated sound levels if its being used on a shoot with a significant amount of zooming in and out. Panasonic warns that this feature "may not work effectively if the surrounding noise is too loud," no doubt due to the risk of over-modulating sound.
VCR Mode* (6.5)*
VCR or Playback Mode is used to play back footage on the LCD screen or an external monitor, and to transfer footage to a PC-based editing system. Playback Mode is engaged via the mode dial, and is controlled via the joystick. Standard VCR controls for Play, Stop, Pause, FF and Rewind are mapped in the lower left Manual Menu region of the LCD, and the joystick is well-suited for playback control. The audio playback volume of the onboard speaker can be adjusted using the zoom toggle to either raise or lower sound levels.
To play back still images, the Mode Dial must be turned to Memory Card Playback Mode. Options for still playback are controlled with the joystick, which allows slide show playback, image deletion, single image display, and stepped viewing of successive images. The joystick options are mapped in the LCD’s lower left as in all of the camcorder’s modes. The multipurpose zoom toggle has a function in Memory Card Playback Mode as well. Pressing it once to the left, prompts the camcorder to display six still images as thumbnails on the screen. In thumbnail display mode, the joystick is used to move through the pages, and pressing in on the joystick displays a selected image.
Ports* (4.75)*
The Panasonic PV-GS59 has several port areas, allowing users to connect the camcorder to a variety playback or capture systems. An AV out port is located at the front of the camcorder’s lower left side. The AV port is covered by a durable plastic port cover that is released by pulling a small tab on the camcorder’s underside. A second port cover on the bottom of the camcorder’s right side, and it’s also released from below by a small tab. This port protects the DV (FireWire) and Full Speed USB ports. This port cover’s placement is somewhat awkward because it’s underneath the hand strap, and the open port cover and strap must be held aside in order to access the ports it conceals. Like the AV port, this one cannot be opened if the camcorder is affixed to a tripod. The SD card slot is mounted along the camcorder’s bottom edge, and opened from the LCD cavity making its location doubly inconvenient. The DC power jack is located inside the battery slot, another awkward port placement. This means that the camcorder cannot use plug-in power without shutting down and removing the battery. We generally prefer that all ports be located conveniently enough that they don’t require shutting the camcorder down or removal from a tripod for access, and in these respects, the PV-GS59 falls short of our expectations.
Other Features
**
**
Widescreen/16:9 Mode* (7.5)*
The PV-GS59 records video in 16:9 natively, and is equipped with a 2.7-inch widescreen LCD screen. The camcorder can also record video in standard 4:3, and in 4:3 mode, the image on the LCD display is pillar-boxed or cropped at the sides. The aspect ratio is set in the Administrative Menu’s Basic submenu by selecting the Aspect option. True "native" 16:9 feature is a great feature, and many 1-chip (and even 3-chip) camcorders still only shoot 4:3 natively, cropping and zooming the image to achieve a 16:9 look. Native 16:9 camcorders lose no information in widescreen mode, and thus produce a considerably better picture than the crop-and-zoomers.
Scan Rates/24p* (0.0)*
The only available scan rate on the PV-GS59 is 29.97 fps. For 24P or other frame rate options, consumers should expect to enter into a higher price range and deal with 3 CCD machines.
Other Features* (7.5)*
Fade On/Off - This setting lets the user of the PV-GS59 fade in and fade out images at the beginning and end of a given shot. For users who plan to work with their footage in a non-linear editor, there is no reason to use an in-camcorder feature like this, but it’s an effective solution when that is not an option.
Backlight Compensation - The Backlight Compensation is an automatic control that increases the overall brightness of the recorded image. It is an option that is meant to compensate for the fact that camcorders in Auto Mode take the whole image into account when calculating exposure, leaving subjects in bright environments (beaches, ski slopes…) underexposed. BLC is a brute force adjustment that simply cranks up the brightness of the whole image, and manually controlling exposure will usually yield better results.
Soft Skin Mode - Soft Skin Mode is located on page 2 of the Manual Menu and gives "Skin Tones" a softer look that is intended to produce more flattering results, helping to reduce the prominence of blemishes and wrinkles. It should be noted that feature is only beneficial to certain skin tones – not all. The fact that this camcorder is calibrated to interpret a certain color range as skin tone is not uncommon, and something we hope manufacturers will work on in the future.
MagicPix - Panasonic’s MagicPix feature is essentially an automatic slow shutter speed adjustment, and is intended for low light situations where use of gain or the Video Light is unfeasible undesirable. Because MagicPix slows the shutter speed below 1/60, it produces video with a stuttering look that Panasonic calls "time-lapse-like." Focal depth can be adjusted in this mode, but other manual controls such as white balance, shutter speed, and scene mode settings are not available. Panasonic also notes that this MagicPix slows the CCD’s up to 30x its usual speed, may produce artifacts on the image in the form of white dots. Image stabilization is disengaged when this feature is engaged. **
Wind Noise Reduction Function - Wind Noise Reduction (or wind cut) is a feature that reduces the buffeting effects of wind noise on the microphone’s windscreen. The feature utilizes a low cut filter that cuts out some sound, reducing the overall quality or recorded audio so it should only be used when necessary.
Web Camera Feature - The Panasonic PV-GS59 works as a Web Camera when it’s connected to a PC via the USB.
Comparisons / Conclusion
Comparison
Panasonic PV-GS39**

The Panasonic PV-GS59, with an MSRP of $379, costs $30 more than its step-down cousin the PV-GS39, and as you’d expect with camcorders so close in cost, there are only a few differences between the two camcorders. The PV-GS59 has a front-mounted remote control sensor, and while the remote is not included in the box (it’s an optional purchase) it does open up the ability to do in-camcorder audio dubbing. The PV-GS59 also has a: "High-Speed" rather than Full-Speed USB port and Panasonic’s Motion DV Studio/Quick Movie Magic software is included. In terms of their imaging capabilities, these camcorders are virtually identical. Is the $30 worth the few bells and whistles thrown into the PV-GS59 package? Maybe, but it would have been more so if the remote controller HAD been included rather than just the sensor.

The JVC GR-D395 and Panasonic PV-GS59 are very close in price, and share many features - which is not surprising since both companies are owned by Matsushita, and include more manual controls on their than other manufacturer. The JVC’s optical zoom is 32x vs. 30x, and it offers a few features found on the PV-GS59 including the excellent Data Battery power meter. But the Panasonic does well where the JVC falls short. It handles better, with its rear-mounted joystick interface, its tape compartment is not bottom-loading, it has a more comfortable hand strap and superior zoom toggle, and its manual control feature set is better, with f-stop exposure adjustment vs. an EV-based scale. The Panasonic PV-GS59 is a more refined camcorder, and its initial MSRP of $379 is only a few dollars more than the GR-D395 at $370.

The Canon Elura 100 with a $399 MSRP is the best sub-$500 we’ve seen in a long time. Its 1/5" CCD is bigger than the 1/6" chip on the PV-GS59, and turned in stunning video performance that trounces its peers. The Elura also offers some options missing from the PV-GS59 - like a mic input, and analog-to-digital pass-through. While the overall manual control feature set on the Panasonic is stronger, we think the combination of better video, an external mic capability, and the option to bring in analog footage more than makes up for this. The PV-GS59’s MSRP is $20, but the microphone jack alone puts the Canon on value par with the Panasonic. Advantage: Elura 100

Panasonic and Sony have very different philosophies when it comes to producing consumer camcorders. The PV-GS59 encapsulates Panasonic’s belief that its better to give users a serious tool with a strong manual control feature set permitting a high degree of image control, while not abandoning users who prefer to leave the driving up to the camcorder’s Auto Mode. Meanwhile, the DCR-HC36 is a classic implementation of Sony’s belief that most camcorder users don’t need – or want – manual control over the image. It’s an easy to use camcorder that bests the Panasonic in Auto Mode, but doesn’t provide much in the way of manual control, and has a weaker 20 x optical zoom vs. 30x on PV-GS59. We think the Panasonic is a better camcorder overall, because manual control will usually yield a better picture than Auto. Unless you know you’ll only use your shoot in Auto Mode, choose the $379 PV-GS59 over the $399 Sony DCR-HC36.
Who It’s For
Point-and-Shooters *(5.0)*
This is a decent camcorder for point-and-shooters, but its Auto performance is not spectacular. Sony’s DCR-HC36 performs slightly better in Auto Mode (which Sony calls Easy Mode) and offers better automatic controls like spot metering. Its LCD interface is also simpler to use than the Panasonic’s joystick making it a better choice for Auto-only shooting.
Budget Consumers* (8.0)*
In terms of bang for the buck, the PV-GS59 is an excellent choice given how much manual control power it packs into its $379 package. Panasonic’s one chip camcorders all provide the best manual control feature set you can find in a sub-$400 camcorder, and offer solid video and Auto Mode performance. An even better value, for a few dollars more, is Canon’s Elura 100 which adds a mic in, better video performance and analog-to-digital pass through.
Still Photo / Video Camera Hybrid* (3.0)*
This camcorder, and its Panasonic one-chip cohort can only capture stills at a maximum 640 x 480 resolution, placing them at the low end of camcorders with a still image capability. The PV-GS59 is not a strong hybrid camcorder.
Gadget Freaks* (3.5)*
Gadget freaks won’t find a large number of unusual or unique features on the PV-GS59, but it does have a great manual control feature set for the price. This makes for highly tweakable images, and should provide plenty of entertainment for those who like to know every nook and cranny of their digital devices.
Manual Control Freaks* (7.0)*
Panasonic might call manual control freaks their core constituency – and the PV-GS59 will not disappoint users who sneer at the notion that Auto Mode can yield a decent picture. In the one-chip camcorder arena, no manufacturer offers a more compelling combination of manual control, handling and video performance than Panasonic in its PV-GS 29/39/59 family.
Pros/ Serious Hobbyists* (5.0)*
These users are similar to manual control freaks in terms of the importance they place on manual controls, but these users may find the lack of an external microphone input to be a fatal flaw in this camcorder. Without the ability to attach an external mic and capture professional quality audio, the PV-GS59 can’t qualify as a professional tool. This group of users will find Panasonic’s three-chip camcorders of greater interest, but may also want to take a look at the Canon Elura 100.
Conclusion
The PV-GS59’s greatest strength is what makes all the Panasonic camcorder great: outstanding manual controls and handling. How then, can one choose among them? "Very carefully," we reply. The PV-GS39, PV-GS59, and PV-GS180 - all in a row in the product line - are like a balancing act of features. The company clearly didn’t want to give anybody too much or the differentiation gets pretty thin between all seven MiniDV camcorders.
So… it breaks down like this: The PV-GS39 ($349) and PV-GS59 ($379) have the same core specs, including a single 1/6" 800K CCD, widescreen LCD, and 30x zoom. The PV-GS59 gives you the extra benefits of: compatibility with a remote (not included) that gives you more playback options, a faster USB connection, editing software, and audio dubbing. All this for less than fifty bucks more.
Moving up from there to the PV-GS180 ($599) is a big difference. Rather than a single CCD, you get three 1/6" 800K chips. This makes for an enormous improvement in video quality, and just about worth the significant price increase. But you definitely lose out on some things. In order to justify the pricing structure in the 3CCD tier of camcorders, Panasonic actually shrunk the LCD to 2.5 inches (non-widescreen). Also, the zoom shrinks to 10x, which is pretty standard amongst higher-end camcorders. But wait… compare that with the inclusion of a mic input and it just about evens out.
Of course, shopping does not take place in a manufacturer’s bubble, and we must mention yet again what an enticing model Canon offers this year with the Elura 100: outstanding video performance, a mic input, and a great low price.
The PV-GS59 has a lot to offer, but it simply can’t take the competition. Either spring for the upgrade to the PV-GS180 or take a good, long look at the Canon Elura 100.
Specs/Ratings
{{manufacturer_specs_table}}{{raw_scores_table}}
Meet the tester
John Neely
Editor
John Neely is a valued contributor to the Reviewed.com family of sites.
Checking our work.
Our team is here for one purpose: to help you buy the best stuff and love what you own. Our writers, editors, and lab technicians obsess over the products we cover to make sure you're confident and satisfied. Have a different opinion about something we recommend? Email us and we'll compare notes.
Shoot us an email