
Introduction
Product Tour
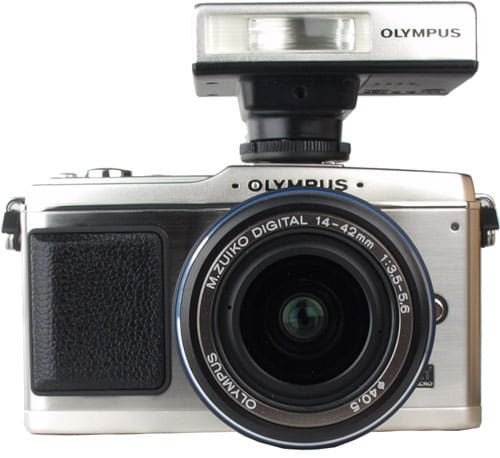
The Olympus E-P1 comes in two styles, a silver body with black grip and lens (shown here) and a white body with a tan grip and a silver lens.
Front
Back
Sides
Bottom
Top
**Size Comparisons **
**In the Box **
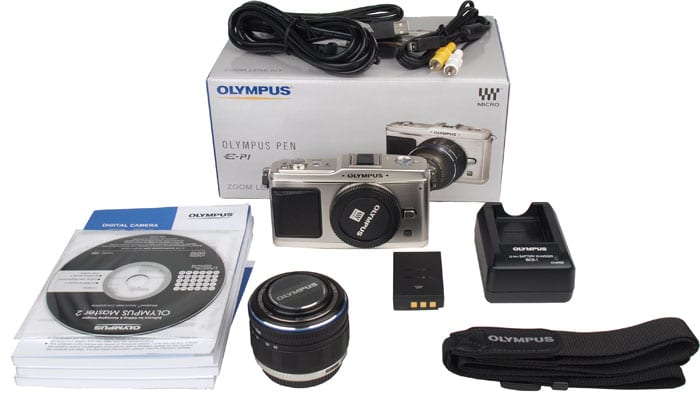
• Camera with body cap
• 14-140mm lens
• Camera strap
• PS-BLS1 Lithium ion battery
• PS-BCS1 charger
• USB cable
• AV cable
• Olympus Master 2 software CD-ROM
• Instruction manuals (English, French and Spanish)
Color
**Color Accuracy ***(20.51) *
The Olympus E-P1 delivered exceptional color accuracy in our testing, outscoring all of the other cameras in our comparison group by a significant margin. We test color accuracy by shooting the X-Rite ColorChecker chart under controlled studio lighting and analyzing the resulting photos using Imatest software. We determine which color mode produces the lowest color error, and use those results for scoring purposes; for the E-P1, as with other Olympus SLRs we've tested, the most accurate mode is Muted. Click here for more on how we test color
When shooting in Muted mode, the images are just slightly undersaturated, at 97.11%, while Natural mode is slightly oversaturated at 102.50%, with more color shift in the blues and purples. Portrait mode raises saturation another small increment to 103.30%, with a minor boost to reds and some color shift in light blue. Vivid lives up to its name at 116.90% saturation, with significant color shifts in blues and reds, though not much effect on the other shades.
The chart below shows same-size sample crops from our test shots taken with each camera in its most accurate mode. The leftmost column shows the ideal value from the ColorChecker chart.
NOTE: Because of the way computer monitors reproduce colors, the images above do not exactly match the originals found on the chart or in the captured images. The chart should be used to judge the relative color shift, not the absolute captured colors.
As shown in the comparison chart above, the E-P1 improves on the color accuracy of its already excellent brand mate, the Olympus E-620, to lead the pack in this test.
Color Modes*(4.00)*
The E-P1 offers a limited selection of 'film modes': Vivid, Natural, Muted, Portrait and Monotone. In addition to their effect on color, image parameters including contrast, sharpness and saturation can be adjusted for each film mode. These options are explained fully in the Picture Effects section.
In the chart below you'll find same-size crops taken from our test shots of the ColorChecker chart in each film mode.
NOTE: Because of the way computer monitors reproduce colors, the images above do not exactly match the originals found on the chart or in the captured images. The chart should be used to judge the relative color shift, not the absolute captured colors.
Long Exposure*(7.98)*
We typically find cameras with smaller sensors score lower in our long exposure testing, since it takes into account both color accuracy and image noise, always an issue with Four Thirds and Micro Four Thirds cameras. The E-P1 is no exception, with results that are in line with the Olympus E-620 and better than the Panasonic GH1, but below the standard set by the APS-C format Canon T1i and Nikon D5000.
Our long exposure test involves shooting the ColorChecker chart with low 20 lux illumination at five shutter speeds ranging from 1 second to 30 seconds, once with long exposure noise reduction turned off and once with it on. The test shots are analyzed using Imatest software for color accuracy and image noise. Click here for more on how we test long exposure.
As seen in the chart below, color error remains relatively low and consistent until we get to the 30 second exposure, with the noise reduction filter not affecting results in a significant way. The graph shows color error levels, so shorter bars indicate better results.
As for noise levels, they start out high and skyrocket with noise reduction off at the 30 second mark, though at least the noise reduction system finally shows some effect at that point.
The E-P1 score here is nearly identical to the Olympus E-620, and notably higher than the Panasonic GH1, which suffered from huge color errors in this test.
Noise
Noise*(5.04)*
This camera has considerable image noise issues, raising a red flag for anyone likely to make sizable enlargments or crop an image tightly. The good news is that the noise reduction system is effective up to ISO 800. However, at higher ISO settings it's overwhelmed and, what's more, clobbers image detail badly (see the Sample Photos section for side-by-side examples shot at each noise reduction level). Why Olympus decided to include an ISO 6400 level at all is a mystery, since the noise levels here make it all but unusable.
The other factor that affects the noise levels in Olympus cameras is the inability to turn off dynamic range enhancement, which Olympus calls 'gradation' adjustment. There are four settings for gradation, Auto, Normal, High Key and Low Key, but 'Off' isn't on the menu, and digitally manipulating dynamic range inevitably adds noise to an image. We shot with the Normal setting, since this does the least damage.
Our noise reduction testing involves shooting the color chart under bright 3000 lux illumination at each standard ISO level and each available noise reduction setting, then running the test photos through Imatest to derive image noise scores. Click here for more on how we test noise.
The chart below shows the image noise levels across the ISO range, at all noise reduction levels. The noise levels at ISO 100 and 200 are about what we've seen with other Four Thirds and Micro Four Thirds cameras, but the rapid escalation that starts at ISO 800 is more severe than competitive models we've tested.
This graph shows levels for each of the component parts of the overall noise: red, green, blue, yellow and luma (gray). If one of these components is significantly higher than the others it can create noticeable problems, but thats not the case here.
Turning noise reduction off provides the highest level of detail ordinarily, though with the E-P1 the level of noise this produces will obscure whatever detail lurks among the speckles anyway.
Here's what happened when we cranked the noise reduction system to its highest level for each of our comparison cameras. The Panasonic GH1 actually had more difficulty than the E-P1 at high ISO levels under these test conditions.
Our overall score takes into account all noise reduction levels and ISO settings offered, which didn't help the E-P1 with its astronomical noise levels at ISO 6400.
ISO*(6.00)*
Available ISOs range from 100-6400, which can be to set 1/3 EV or 1 EV increments. ISO bracketing is available, an unusual feature and one that comes in handy when shooting with a relatively noisy camera and trying to see how much sensitivity you can get away with. ISO bracketing saves three versions of a single exposure, one below the set value, one above, with increments of 0.3 EV, 0,7 EV or 1 EV.
There is an Auto ISO system which can be set with a default value (to be used if it allows an acceptable exposure) and an upper limit, so you can avoid overly high settings when shooting with Auto ISO.
NOTE: The images above are not used in our testing or scoring, but are included here to show real-world examples of the differences between cameras at the various ISO settings.
Resolution
Resolution*(11.43)*
Results here were very impressive; as with our color accuracy testing, the E-P1 achieved the highest score among our comparison cameras in resolution. We test three performance areas here, sharpness, distortion and chromatic aberration, though we don't include the distortion results in the section score for interchangeable lens cameras. We used the kit lens (a 14-42mm f/3.5-5.6) to shoot a slanted-edge test chart at three focal lengths (the widest, highest zoom and the midpoint), each at three aperture settings. We then use Imatest to analyze the test photos at eighteen points across the image to provide a solid overall performance assessment. Click here for more on how we test resolution.
Distortion
The kit lens was exceptionally free from distortion at the 27mm and 42mm lengths. Only at the widest angle was there a perceptible problem, with 1.86% barreling.
*Chromatic Aberration
*We found some color fringing problems at 14mm and 27mm, though they were localized around the midpoint between the center of the lens and the edges. Elsewhere chromatic aberration was less noticeable
Sharpness
This was a particular strength of the E-P1, surpassing any of the comparison cameras, particularly the disappointing Nikon D5000 and Canon T1i results. The highest readings came in the center of the lens, shooting at 14mm, f/9, with the results around the edges at the same settings nearly as high.
The chart below offers same-size crops taken at each focal length and aperture setting, from the five locations shown in the key diagram.
Shooting at the widest angle setting, the center remains very crisp until the lens is stopped all the way down, and the outer corners are also nicely sharp, with only a faint horizontal color edge visible.
Center sharpness at 27mm is not as high as at 14mm but still very good, and chromatic aberration is not a significant issue.
The center spot is still exceptionally sharp even at the highest telephoto setting, and the outer edges hold up very well except at the smallest apertures.
Picture Quality & Size Options*(12.60)*
The E-P1 supports several variations for medium and small image size settings when shooting in the native 4:3 aspect ratio.
There are four JPEG compression settings: Super Fine (compressed at 1/2.7), Fine (1/4), Normal (1/8) and Basic (1/12). RAW files are recorded at full 4032 x 3024 resolution no matter what the aspect ratio setting, with the aspect ratio selection saved along with the image.
Dynamic Range*(4.60)*
As with the Olympus E-620, the E-P1 has problems with dynamic range, meaning you can expect to lose details in the very bright and very dark areas of high-contrast images. The E-P1 did perform significantly better than the E-620, but compared to the other cameras in our test group, these results are disappointing.The chart below shows the test result at each ISO setting; a wider bar indicates superior performance. Click here for more on how we test dynamic range.
The following chart shows the dynamic range result for each camera shooting as ISO 200. The pattern shown here holds true throughout the tested ISO range.
The Panasonic GH1 results proves that a Micro Four Thirds camera can deliver acceptable dynamic range, but Olympus hasn't gotten the hang of it yet, as the following score comparison illustrates.
Image Stabilization*(6.84)*
The in-camera image stabilization system, which relies on movement of the image sensor rather than the lens-based stabilization used by Nikon and Canon, effectively counteracted the blurriness caused by shaking hands in certain situations, particularly when there was a substantial amount of movement while shooting. We test image stabilization by mounting the camera in a computer-controlled rig that produces repeatable movement patterns, both horizontally and vertically, and shoot a sloped-edge test chart at all available shutter speedswith image stabilization on and with it off. We use Imatest to determine the resolution scores for our test images, then compare the IS on and IS off results. Click here for more on how we test image stabilization.
There are three available settings for the image stabilization system (in addition to Off, of course). I.S. 1 (used in our testing) attempts to compensate for shake both horizontally and vertically. I.S. 2 limits itself to vertical stabilization, so a horizontally panned shot will have a smooth blurred background. Similarly, I.S. 3 uses horizontal-only stabilization, to be used when panning vertically.
Even if you are shooting with a non-Micro Four Thirds or Four Thirds lens, you can still use the image stabilization system by manually entering the focal length of the lens you're using.
The chart above shows how effectively the image stabilization system reduces blur when the camera is moved at relatively low speeds. The system had a slight negative impact on sharpness at speeds above 1/60 second, when the camera was moving horizontally, but there's a significant gain at 1/30 second, the speed where most of us start to have trouble holding the camera steady when shooting with available light indoors. When the camera was shaken vertically, the IS system had minimal effect.
Raising the level of shake meant a better result with image stabilization turned on across the board, when the camera was moving horizontally. Again, the system was far less effective counteracting vertical movement.
The E-P1 scored well in our image stabilization testing, delivering more effective handheld shooting assistance than any of the other cameras in our comparison group.
The following table shows representative same-size crops taken from our test images, demonstrating the effect of the image stabilization system when the camera is moving horizontally, at both low and high shake levels.
White Balance
White Balance*(10.53)*
The E-P1 achieved a high score in this section thanks to the standout performance of its automatic white balance system, particularly under daylight and fluorescent lighting, The custom white balance reading accuracy was good, but not exceptional.
We test both the camera's automatic and custom white balance systems by shooting the ColorChecker chart under the carefully controlled incandescent, fluorescent and daylight illumination provided by an X-Rite Judge II lightbox. The test photos are analyzed for color accuracy using Imatest, and the amount of color error from the known values of the chart patches determines the white balance results. Click here for more on how we test white balance.
Automatic White Balance (14.32)
Incandescent lighting (the type produced by standard tungsten household lightbulbs) always throws off automatic white balance systems, and the E-P1 was no exception. However, the results under fluorescent lights, which often produces greenish results, and daylight are exceptional.
The E-P1 delivered the most accurate results in our test group under daylight illumination, with photos just a shade warmer than the original chart values.
Under incandescent illumination the E-P1 was more accurate than all but the GH1, though none of the cameras tested was free from the warm orange hue we know so well from looking at indoor family snapshots.
Fluorescent light can throw an auto white balance system for a loop, as it did with the Olympus E-620, but colors in photos taken with the E-P1 under compact white fluorescents were nearly flawless.
Custom White Balance (6.74)
Taking a custom white balance reading eliminated the visible color shift under incandescent lighting, and produced good results overall. Our accuracy standards are very high for custom white balance, though, since we expect any interchangeable-lens camera to produce excellent results after taking a manual reading. Note that while shorter bars still indicate superior results in the chart below, the scale of the chart is different from those above because the error values are smaller.
The E-P1 received an adequate but unexceptional score for custom white balance, though it did far surpass the disappointing result from the other Olympus camera included here. And overall, it stands up well to the competition.
White Balance Settings*(9.50)*
The E-P1 offers eight white balance presets (including a welcome three choices for different fluorescent lighting types) plus auto, manual setting and direct color temperature entry in degrees Kelvin.
Taking a manual white balance reading is relative simple, but there's a hitch. The camera has a single programmable function button which can be assigned to a variety of tasks, including such useful options as depth of field preview and choosing from My Mode camera settings. However, if you want to take a white balance reading, the Fn button has to be assigned to the task: you hold down Fn, point at a white or gray surface and press the shutter to take a reading. There's no menu-based workaround to this boondoggle.
The option to set a white balance directly in degrees Kelvin usually seems like a pretty esoteric professional procedure, but with settings changes displayed interactively on the Live View display, it becomes practical even for the light-meter impaired. You do need some manual dexterity to enter the reading, though: you have to bring up the quick menu, select custom white balance, then hold the exposure compensation button on top of the camera while turning one of the control dials. Not an undertaking for the fumble-fingered.
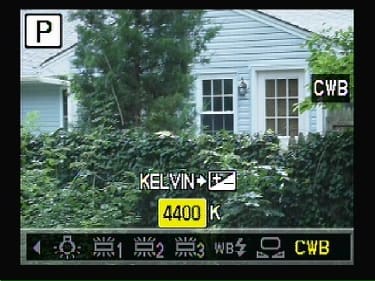
*The Live View image reflects changes as you
dial in a white balance setting.*
Whether you arrive at an initial white balance setting by choosing a preset, taking a manual reading or choosing a numerical value, the results can be tweaked along the amber-blue and green-magenta axes, with 15 settings available for each. Unfortunately, the effects of these changes aren't previewed live on-screen as you make them, which makes this capability much less useful than it could be. You can press the AEL/AFL button and take a test shot to preview the white balance result while adjusting the settings, but that's time-consuming and cumbersome.
Another interesting white balance feature is the four-thumbnail display available in Live View, displaying small preview versions of the current subject with different white balance choices. You can select the thumbnail that looks best and press OK to confirm the setting.
Finally, white balance bracketing is provided, storing three images with different white balance settings with a single press of the shutter. The bracketing values for amber-blue and green-magenta values can be set separately, with 2-, 4- or 6-step increments.
Sample Photos
Sample Photos
Still Life Examples
In the table below are shots of our still life taken with each comparison camera at all available ISOs. Clicking on any image will bring up a full-size version in a separate window.
NOTE: The images above are not used in our testing or scoring, but are included here to show real-world examples of the differences between cameras at the various ISO settings.
Noise Examples
The following table consists of full-size crops taken from the shots of our still life taken with each comparison camera at all available ISOs.
NOTE: The images above are not used in our testing or scoring, but are included here to show real-world examples of the differences between cameras at the various ISO settings.
Playback
Playback Mode*(11.25)*
The E-P1 offers a wide variety of playback displays. Most are accessed by repeatedly pressing the Info button and stepping through the variations in sequence. Magnified views are available immediately by turning the sub dial, or you can pre-position the magnification point by first pressing the Fn key.
Any playback view in the Info-button toggle sequence can be removed via the custom menu.
During image playback, pressing up on the rear control dial jumps 10 frames back, while pressing down jumps 10 frames forward.
When playing back movies, you can adjust the volume, fast forward or rewind. Pressing up or down on the four-way jumps to the begnning or end of the clip respectively. Pressing OK pauses playback and, while paused, you can step frame by frame forward or back using the left and right buttons. Altogether, it's an intuitive and full-featured control system.
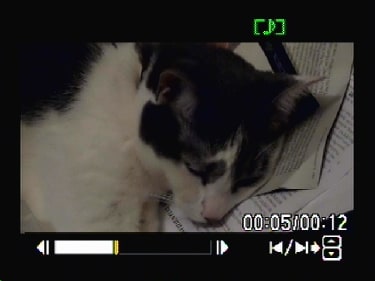
*You can jump to the beginning or end of a video clip
and move forward or back one frame at a time.*
By default, the photo you just shot is displayed on the LCD for 5 seconds, but this can be to anywhere from 1-20 seconds, in 1-second increments. You can also set the camera to enter playback mode after each shot, which means you can linger over the loveliness of your last shot as long as you like and, equally important, erase it immediately if you choose (deleting an image isn't possible during image review).
The system for deleting images is worth a mention, since it's unusually flexible. You can erase a single image, all images on the card, or select a group of shots and erase them together. You can also change the way image delete works, eliminating the Yes/No confirmation screen that adds an extra step to the process.
Slide show capabilities have been enhanced for the E-P1, with five original soundtracks (dubbed Melancholy, Nostalgic, Love, Joy and Cool) and the option to include just stills, just movies or both. The relative level of the music and sound recorded with the still or movie can be adjusted, as can the length each still is displayed. There is only a single quick-fade transition effect.
In-Camera Editing*(9.25)*
The in-camera editing options are pretty sparse. Working with JPEG files you can use Shadow Adjust to brighten the foreground in a heavily backlit image, but there's no control over the level of processing to be performed. There's automatic red-eye fix, image rotation and image trimming, though only two landscape and two portrait sizes are supported, making this capability pretty much worthless. Images can also be trimmed to a different aspect ratio but, again, the lack of sizing flexibility is a limitation. Files can be resized to lower resolution versions. As for color adjustments, you can turn a picture black and white or sepia, and saturation can be adjusted to one of 11 levels. Finally there's e-Portrait processing, a kind of digital spackle that attempts to detect a face in a photo, then smooths out complexion flaws.
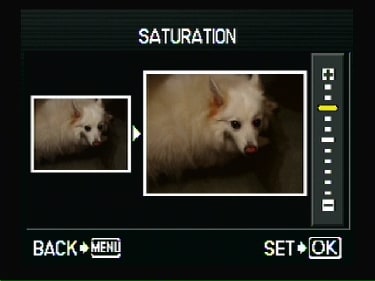
*You can preview the effects of saturation
adjustments as you make them..*
Raw files can be processed in the camera, though the system is a bit strange. You change the camera settings -- white balance, for example, or film mode -- then enter playback mode, find the RAW file and choose RAW Data Edit. The camera then processes the stored RAW file using the camera settings currently in effect, and saves the results as a JPEG. It's better than nothing, but feels clumsy and doesn't provide interactive adjustment control.
One interesting benefit of the in-camera RAW file processing, though, involves the Art Filters. Ordinarily Art Filter effects are applied when you shoot an image and that's that -- you don't have a copy *without *the odd filter effects if you change your mind or want to experiment further. If you take a shot in RAW mode without using a filter, though, you can later set the camera to an Art Filter mode, pull up RAW file processing and create a separate JPEG with the effect applied. Would have been nice if this tidbit were included in the manual, of course, but it works.
A potentially useful option is adding a sound bite (up to 30 seconds) to an image in playback. This can be handy for noting when and where a shot was taken without reaching for a pen and paper. You can also create audio captions which will play back during a slide show. It would be better, though, if you could add the sound while shooting, instead of having to enter playback mode and then record the audio.
Our favorite image manipulation feature is definitely the multiple exposure capability, which can be used while shooting or during playback. In editing mode, up to three RAW images can be overlaid, with precise control over the density of each. If combining three images leaves you wanting more, you can save the result as a new RAW file, then combine that with additional images.
Software*(5.00)*
The E-P1 ships with Olympus Master 2 software for both Windows and Mac, plus a 30-day trial of Olympus Studio 2 for both systems and a trial version of ArcSoft Print Creations for Windows.
Direct Print Options*(4.00)*
Computer-free PictBridge printing, with the camera connected directly to a compatible printer, is more full-featured and flexible than most cameras. As for creating a DPOF file for placing service bureau orders, the available options are basic but the system is clear and easy to use.
Hardware
Sensor*(2.00)*
The Micro Four Thirds format takes a three-pronged approach to creating compact interchangeable-lens cameras: remove the SLR mirror system, use a smaller lens mount and a smaller sensor. The E-P1 sensor has a gross resolution of 13,060,000 pixels and an effective resolution of 12,300.000 pixels. It measures 17.3mm x 13.0mm, with a native 4:3 aspect ratio. Micro Four Thirds and standard Four Thirds format cameras use the same size sensor and, as the illustration below shows, this is considerably smaller than the typical APS-C format sensor used in digital SLRs.
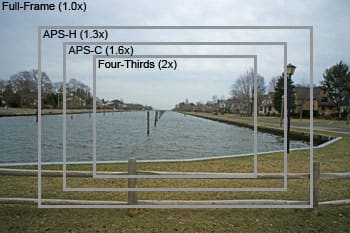
Compactness does have its downsides. Cramming over 12 million pixels onto a small sensor has consistently produced higher image noise in our testing than in standard SLRs. It also increases the apparent lens magnification effect, from the 1.6x found on most digital SLRs to a full 2x. Mount a 14-42mm lens, like the one included in the E-P1 kit, on a digital SLR and it will shoot like a 22-67mm lens. The same lens on the E-P1 is a 28-84mm equivalent: you get more telephoto effect but less wide angle coverage.
The E-P1 uses a filter vibration system to automatically remove dust in front of the sensor every time you turn the camera on.
Viewfinder*(0.00)*
The E-P1 does not offer a built-in viewfinder, optical or electronic. There is an optical viewfinder accessory, the VF-1 ($100) that mounts on the hot shoe and displays the view seen through the 17mm pancake lens, but that's clearly a specialty item and cold comfort for camera-to-the-eyeball shooters.
LCD*(4.90)*
The LCD is a 3-inch model with 230,000-dot resolution. It's not going to thrill anyone with beautiful image playback the way the 920,000-dot screens on higher-end Nikons and Canons might, but it does have an interesting advantage in the use of Olympus HyperCrystal technology. The screen lets some of the light through the outer colored layer and bounces it back from behind, leading to a brighter display in difficult sunny conditions. Even then, shooting on a bright August afternoon wasn't going well until I boosted the brightness all the way up in the setup menu. That did the trick, though: even direct sunlight on the camera back didn't leave me shooting blind.
Both the brightness and the color temperature of the LCD can be adjusted using the setup menu, each with values of ±7. There's also a Live View boost option which will automatically adjust the brightness to match the surroundings.
LCD Panel
The monochrome information LCD mounted on the top of many high-end SLRs is understandably missing from the slender E-P1.
Flash*(3.75)*
One casualty of the compact E-P1 design: there's no built-in flash. Of course, point-and-shoots that make the E-P1 look like a behemoth by comparison somehow manage to shoehorn in some form of flash, pop-up or otherwise, but Olympus decided to go without. We think that's a mistake: sometimes a flash is the only way to grab a shot, plus even a small built-in unit can be valuable as a fill flash when shooting outdoors.
The camera is compatible with a number of Olympus flash units, including the newly introduced FL-14 ($200), a petite unit meant to complement the E-P1 design. It's very small, at 5.6 ounces, which is good news when it comes to portability. However, for $200 and the trouble of carrying an external flash, I'd far prefer a mount that lets me bounce the flash, a feature sadly lacking in the FL-14.
Flash sync speed can be set between 1/60 and 1/180 second, in 1/3 EV increments.
The optional FL-14 flash is small but lacks bounce capability.
When you do mount an external flash, you get the same assortment of flash modes offered in Olympus SLRs.
For compatible flash units, flash intensity can be adjusted manually, to one of seven levels. Flash bracketing is also available, shooting a three-shot sequence (the metered value, one lower and one higher) at increments of 0.3 EV, 0.7 EV and 1.0 EV.
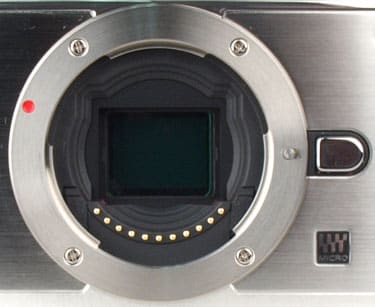
Lens Mount*(8.00)*
The Micro Four Thirds lens format is about 6mm narrower than Four Thirds format lenses, and has a different electrical contact pin configuration. While the format has been out for nearly a year now, the list of fully compatible available lenses is still pretty short: Olympus currently offers a grand total of two, the 14-42 kit lens and a 17mm f/2.8 pancake lens ($299.99). Panasonic offers a wider selection, including an ultrawide 7-14mm (14-28mm equivalent) and a 45-200mm telephoto zoom (90-400mm equivalent on a 35mm camera). The Panasonic lenses designed for the G-series cameras should be fully compatible with the E-P1, but we haven't been able to test this.
Caption
There are adapters available to attach non-Micro Four Thirds lenses to Micro Four Thirds bodies, which deliver varying degrees of compatibility. A Four Thirds lens mounted using the Olympus adapter should still support metering and autofocus, though not continuous autofocus. Standard OM series lenses can also be attached with an adapter, but they can't autofocus and while Olympus says 'Yes' to metering capability in the manual, it also says in a footnote 'Accurate metering not possible.' Presumably inaccurate metering works, if that does you any good.
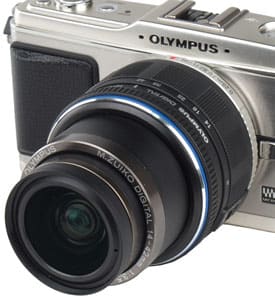
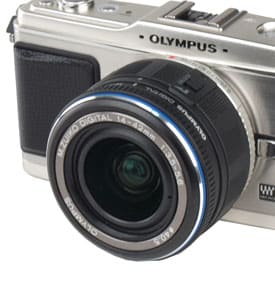
Holding the Unlock latch and twisting the barrel makes the E-P1 more travel-friendly..
The kit lens is a modest 3x zoom ranging from 14-42mm (equivalent to a 28-84mm on a 35mm camera), with a maximum aperture of f/3.5-5.6. The ingenious touch here is the way the lens telescopes to make it more portable. When not shooting, sliding a switch on the lens barrel and rotating it collapses the depth of the lens to about half its original measurement (making it look about as deep as a pancake lens). When it's time to shoot again, simply turning in the opposite direction quickly restores the lens to full size. It's an exceptionally useful feature, saving roughly 1.25 inches in camera depth and enhancing portability in a bag or even a substantial jacket pocket. The E-P1 is still no point-and-shoot, but it's as close as an interchangeable lens camera has gotten so far.
The shots below demonstrate the zoom range at widest angle, maximum telephoto and smack dab in the middle.
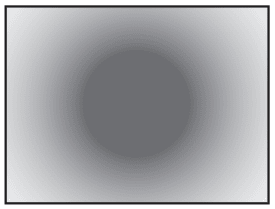
A digital shading compensation option attempts to brighten the outer edges of an image to correct for light drop-off that can occur, particularly with wide-angle lenses. This is an on/off control, without additional fine adjustment.
Battery*(6.00)*
The E-P1 uses the small rectangular BLS-1 Lithium-ion rechargeable battery, which Olympus estimates will last approximately 300 shots. Charging time for a completely discharged battery is about 3 hours 30 minutes.
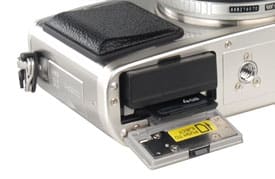
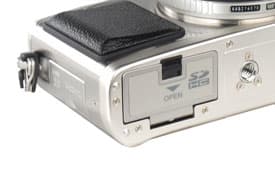
The battery and SD memory card share a securely latched compartment.
Memory*(3.00)*
Olympus, developers and chief promoters of the antiquated xD memory card format, saw the light (fueled largely by the need to provide fast, high-capacity storage for 720p video) and support SD/SDHC memory cards for the E-P1. Let's hope this is a trend that extends to the rest of the Olympus camera line.
Jacks, Ports & Plugs*(4.50)*
The port for connecting provided USB and standard-def AV cables is proprietary, the HDMI port for connecting directly to a high-def TV is industry-standard, though like the rest of the camera world the hard-to-find mini HDMI cable is not included.
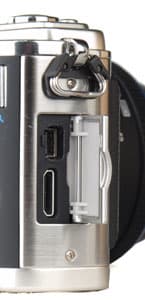
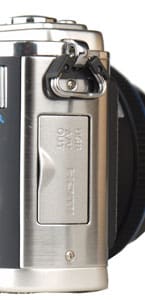
*The proprietary USB and standard mini HDMI
ports are protected by a metal door.*
Controls
Shooting Modes*(12.00)*
The E-P1 sticks with the basics, including the scene recognition-enabled auto mode that's becoming increasingly popular in consumer SLRs. Having two control dials is useful here. In program mode, either dial can be used for program shift. In aperture-priority or shutter-priority mode, either dial changes the selected parameter and, in full manual mode, the main dial controls shutter speed, the sub dial adjusts aperture value.
The camera can be reset to factory defaults via the first shooting menu, but it can also be set to one of two stored configurations (called Reset 1 and Reset 2). It's a useful way to quickly tailor the camera to your preferences for a particular type of shooting, though the way it's handled is confusing: why not call these Custom Settings or Custom Modes and give them an appropriate menu slot, instead of burying them in the Reset section.
Equally bizarre is the My Mode function, which allows you to store two groups of settings as My Mode 1 and My Mode 2. To access these, you must first store the current camera settings as either My Mode 1 or My Mode 2, then choose whether you want to have My Mode 1 or My Mode 2 available, then have the Fn programmed to My Mode, and finally hold down the Fn button while pressing the shutter to invoke the settings. A good concept, but a baffling, overly complex implementation.
A more straightforward shooting option is anti-shock, which adds a delay of between 1/8 and 30 seconds between the moment you press the shutter and the time a photo is taken. This is valuable in shooting situations which demand an absolutely steady camera, such as microphotography or astronomical imaging.
Live View*(3.50)*
With no optical or electronic viewfinder at your disposal, Live View is the only view when shooting with the E-P1. Fortunately the screen handles well in outdoor light, though the view does get grainy (particularly if you bump up the adjustable brightness level). While the display gets unattractive when shooting in low light, at least it doesn't have the aggravating image stutter problem when moving the camera quickly which we found on the Panasonic GH1.
The EP-1 offers a variety of Live View shooting displays, which toggle in order when you press the Info button:
If you don't use all of the available displays, you can turn all but the original Information Display off via the custom menu, making it faster to switch between the remaining displays.
Scene Modes*(8.00)*
The E-P1 offers nineteen scene modes, a generous selection for those interested in tailoring the camera to the shooting situation without mucking around with manual controls.
The Panorama shooting mode has promise. You can pan either horizontally or vertically, and the sequence can include up to 10 images, which basically gives you a 360-degree view. There are some odd twists to this feature, though. As shown below, the camera displays on-screen rectangular guides for framing each shot in sequence. However, it doesn't actually show a shadow image of the previous frame when shooting the next frame, a common feature when shooting panoramas with point-and-shoots. You can't stitch together the images you shoot in the camera either, another familiar, if not universal, point-and-shoot feature. Finally, you have to tell the camera which direction you'll be panning before taking the shots. I forgot to change this setting while carefully panning around Times Square one afternoon and, no matter how I tried to finagle it in Olympus Master 2 software, never could get the obnoxious French tourists in the first shot to appear to the left of the creep in the obscene T-shirt, where they belonged.
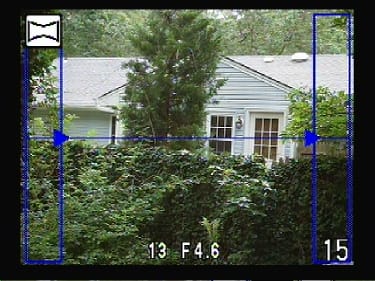
*You'll need to remember where your last shot
left off if you want to shoot a panorama.*
The E-P1 also features the six Art Filters that have become standard equipment on Olympus SLRs. These virtual filters have a dramatic effect on the scene you're shooting, and there's no way to control the intensity of the effect. And if you're shooting JPEGs, you have the shot with filter effect, but no unaltered version available if you change your mind. There are workarounds to this problem. Shooting RAW + JPEG provides an unaltered RAW file and a filter-enhanced JPEG. You can also shoot RAW alone and add the Art Filter effect by using in-camera RAW processing.
The Art Filters take a few seconds to apply, so there will be a delay between shots. They're also available while shooting video, but that processing cuts down on your frame rate, often substantially.
The first time I saw the Art Filter effects I was not a believer, but after shooting with the feature on a few cameras, I have to admit that there are times when they can transform an ordinary shot into something more interesting, particularly the Pop Art and Grainy Film effects.
Picture Effects*(6.00)*
Sticking with the tried and true system employed in the E-30 and E-620 SLRs, the E-P1 provides five Picture Modes plus the option to tweak the settings and create a custom version. In addition to affecting color hues, the Picture Modes can be adjusted for contrast, sharpness and (except for Monotone) saturation, with five steps for each setting. The Monotone mode offers a toning effect (sepia, blue, purple and green) along with virtual filters that mimic the effect of shooting with colored filters with black and white film. A yellow filter, for example, makes clouds appear more prominently.
The multiple exposure capabilities of the E-P1, which are available both while shooting and as an in-camera editing effect, are fun to use and can produce handsome results. While shooting, two consecutive shots can be combined to create a single image. You can also use a RAW file stored on the memory card as one of the two images to be combined, allowing you to keep a library of component parts available for your multiple exposure experiments. By default, each image is set to half brightness, but this can be overridden so each image is reproduced with its full brightness value. For getting a precise alignment of multiple exposure frames, shooting in Live View displays a semi-transparent view of the first frame while you line up the second. If two frames aren't enough to suit your needs, you can shoot in RAW mode and use the newly taken multiple exposure as one part of a new multiple exposure combination. Overall, though, there is more flexibility to the multiple exposure function in playback mode.
Focus*(15.50)*
Autofocus is a key area that separates the Panasonic Micro Four Thirds cameras from the Olympus E-P1. The Panasonics focus remarkably quickly, providing the first practical system for shooting moving subjects in Live View mode. The E-P1, like the Live View SLRs we've tested, takes its own sweet time achieving autofocus, and that's a big problem. Attempting to shoot sports or active children with this camera is an exercise in futility.
Another area where we expected difficulties, though, turned out to be a non-issue. There is no autofocus assist lamp on the E-P1, so we assumed the worst. When we started shooting in our lab under minimal illumination levels, though, we found that the camera focused successfully down to just a few lux of illumination. Unless you're planning to take pictures in pitch darkness, you should be just fine.
The E-P1 uses eleven targets for auto-focus, laid out in the following pattern:
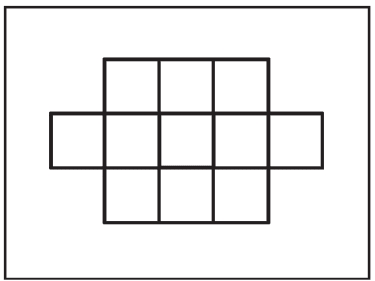
The E-P1 autofocus areas.
When shooting in All Target mode, the camera automatically chooses one of these 11 areas. When in Single Target AF mode, the user can position the one autofocus target to be used by moving an on-screen indicator with the four-way control (very simple) or combining the two control dials (one for horizontal movement, one for vertical and way too complicated). Changing the autofocus target is a pain , though, no matter how you approach the task. You can re-select single-target mode from one of the menus, then reposition the focus point, which is a slow procedure. Or you can turn off the direct-access function of the control dial (ISO, autofocus mode, white balance and drive mode) and use it solely to move the autofocus target, requiring you to muck around with menus every time you want to change a basic setting. On the Olympus E-620 and E-30 there's a dedicated autofocus target button, simple and effective. Leaving it off the E-P1 was a mistake.
Oh, and there's one autofocus-related option for that poor over-used programmable Fn button too. You can register a default autofocus position with a few clumsy button presses, which will be reset whenever you press Fn, if you've chosen that as the Fn button function.
Face detect adjusts focus and metering based on the subject the camera locks onto. There are several ways to access face detect mode, including the standard menu system, the Live Control menu, the Super Control panel and setting the programmable Fn button to face detect. The Fn option automatically changes additional settings when it launches face detect, setting metering to evaluative, gradation to auto, autofocus mode to single AF and autofocus area to multipoint.
Shooting with the kit lens, we found manual focus works very smoothly, with the ring sensitive enough to move quickly but geared well enough to maintain accuracy. And with the Live View display, the option to have a zoomed display pop up automatically when you move the focus dial in manual mode allows true precision.
Exposure*(4.25)*
Exposure compensation is available in a ±3 EV range, in 1/3, 1/2 or 1 EV increments. For no apparent reason, this is a narrower range than the Olympus E-620 and E-30, both of which offer ±5 EV flexibility.
Autoexposure bracketing is available in a three-shot sequence, at intervals of 0.3, 0.7 and 1.0 EV.
If you find that your shots consistently come out too light or dark for your taste, you can enter an exposure shift value of ±1 EV, in 1/6 EV increments, to be applied consistently in each metering mode.
Olympus offers a dynamic range compensation system mysteriously called 'gradation,' with four settings. There is the default Normal setting and Auto, which evaluates regions of the image separately and adjusts each of them individually. For extreme situations, there are also Low Key for maintaining shadow detail for dark subjects, and High Key to keep highlights from blowing out for brightly lit subjects. What's missing in this set of options is good old Off, our mode of choice when keeping image noise to a minimum is a high priority.
Speed and Timing
Shot to Shot (2.98)
Olympus promises a continuous shooting rate of approximately 3 frames per second, and our testing proved them right on the money at 2.98 fps. Unfortunately, we score on performance rather than honesty, and 3 frames per second is nothing to brag about in today's SLR market, as shown in the comparison chart below.
Drive/Burst Mode (6.00)
There is a single burst mode, at a promised 3 shots per second. While there is no hard limit to how many photos you can take in a row, the speed slows drastically after about a dozen shots, both for JPEGs and RAW images.
Depth of Field Preview*(1.00)*
There is an effective depth of field preview function, but it doesn't have its own dedicated button, which poses a problem. Depth of field preview can only be accessed if you've assigned this capability to the programmable Fn button -- the same one you need to use if you want to take a custom white balance reading.
Metering*(7.00)*
Olympus incorporates two unusual metering modes in the E-P1, designed to deal wth extremely bright or dark scenes.

The patterns for center-weighted (left) and spot (right) metering
Shutter Speed*(10.00)*
Available shutter speeds range from 1/4000 second to 60 seconds (versus the typical 30 second maximum), plus bulb for extended exposures.
There is also a shutter release delay function called anti-shock, which adds a user-selectable delay of between 1/8 and 30 seconds after pressing the shutter. This is useful for extremely precise imaging tasks, such as astronomy and microscopic photography.
Self-Timer*(2.50)*
There are two self-timer modes. Strangely, both are silent, without the comforting 'beep, beep, beep' that lets you know the shutter's been pressed and the camera's on the job. Also missing: the option to use a wireless remote control with the E-P1 (there is a compatible cabled USB remote, priced at $57).
Design & Handling
Handling*(8.00)*
This is a well designed camera, not just for its distinctive retro look but also the way it feels in your hands. The body is relatively small compared to an SLR, but not insubstantial like so many little point-and-shoot models. There's a rounded, raised right edge on the camera back and a padded, textured grip with a slight angle to it on the front. Taken together, they make for a solid right-hand grip that feels perfectly secure. I just about never shoot one-handed, but I'm willing to make an exception with the E-P1. Of course, you're more likely to maneuver with two hands, and the nicely knurled zoom and focusing rings of the kit lens are easy to handle, with just the right amount of resistance to allow precise control.
Controls*(10.25)*
There aren't many buttons on the E-P1, but thanks to the two well-designed Live View menus and the availability of two convenient control dials, that works out fine. The main control dial does double duty as a four way controller for direct access to key settings, which proved practical, without a lot of accidental turning. As for the ridged sub dial, it's well positioned for easy access with your thumb, clicks slightly as you turn it to help with fine adjustments, and has just enough resistance to prevent turning it accidentally.
In addition to the Fn button, the left side of the four-way controller (set to autofocus mode by default) can also be reprogrammed to access metering mode, flash mode, image stabilizer settings and turning the LCD backlight off.
When you're shooting in program, aperture-priority, shutter-priority or manual mode, you can change the default operations of the two dials in several ways. For example, while shooting in program mode both dials are used to adjust program shift by default. If you prefer, though, you can leave the sub dial to handle program shift and use the main dial for exposure compensation instead. We found that particular combination uncomfortable (the main dial moves too easily, leading to accidental exposure adjustments), but you might love shooting that way, and the E-P1 offers lots of customization flexibility. You can even swap the effect of rotating the dials, if right-left makes more sense to you than left-right for a particular function.
Menu*(7.00)*
The E-P1 uses three menu systems: Live Control menu along the right and bottom edges of the Live View screen, a full-screen Super Control Panel superimposed on the Live View display and a traditional full-screen tabbed menu.
*The Live Control menu puts controls at your fingertips
without obscuring the on-screen view.*
Pressing the OK button while shooting brings up the Live Control menu, a strip along the right side of the screen that displays common settings and a strip along the bottom that shows the options available for that setting. The main dial can be used for moving vertically through the menu (by spinning it or pressing up and down), the sub dial or pressing right and left on the main dial provides horizontal navigation. The available settings include white balance, drive mode, image stabilization, aspect ratio, image size, flash, ISO, metering, autofocus, face detect, and autofocus target.
With the Live Control menu displayed, pressing the Info button brings up the Super Control panel, a full-screen menu system with nearly all available shooting options available. Putting all your options on screen at once makes them easier to navigate than the Live Control menu strip, but there's a hitch: since there's no optical viewfinder, you can't leave this full-screen menu live while shooting, the way you can with an SLR or the electronic viewfinder-equipped Panasonic GH1.
The full-screen menu system is used for shooting settings not included in the Live View control schemes plus the host of infrequently changed options.
Manual & Learning*(4.50)*
The 164-page instruction manual begins with a 24-page basic guide combining a reasonable explanation of how you set up the camera and squeeze off your first shots with mind-bogglingly dense diagrams of the Super Control panel and Live View screens that may sap newbies of the will to go on. For those hearty souls who do continue, the main manual does well with some topics, including an appropriate mix of illustrations, diagrams and dry but functional text, but leaves many important concepts very poorly explained. Art Filters, for example, are given a cursory listing on page 5, with no explanation of what any of them do, and never reappear in the manual. The gradation setting is an Olympus-only term for dynamic range adjustment, but we only learned that after calling our friends at Olympus and asking. Similar lapses crop up frequently, capped off by an index that's dangerously close to useless. Want to know about sound recording? The camera can do it, but the index doesn't include the words 'sound' or 'audio.' Want to find out what resolution settings are available? Don't look up 'resolution' or 'image size' -- it's listed under 'number of pixels.' Your best bet is to download a PDF version of the manual and use the software search function to find what you're seeking: it's available for download directly from Olympus by clicking here.
Video Color & Noise
**Video: Color Performance***(4.81)*
The Olympus E-P1 didn't wow us with accurate colors in our video testing. In fact, the camera measured the worst color accuracy of the video-capable DSLRs we've tested. The E-P1 managed a color error of 7.28 and a saturation level of 87.07% in our bright light test. These numbers come from our test footage with the Camera set to the Natural Picture Mode. We also tested the E-P1 using its other Picture Modes, but none of them offered a significant improvement to color accuracy. Click here for more on how CamcorderInfo.com tests color performance.
If you look at the charts above, you can see the E-P1 produced a slight blue-ish tone in our test footage. The saturation is good and the colors are vivid, but certain tones were not reproduced faithfully. The Color Error Map shows that the camera specifically had trouble with greens, yellows, browns, and light blues. Certain pinks, reds, and purples were rendered more accurately.
Fortunately, the camera has a lot of color controls and color modes, so you can fine tune the color settings to your match your personal preference. Below are the pre-set Picture Modes available on the E-P1. There is no default setting, but we used the Natural Picture Mode as Auto in all of our testing.
None of the above Picture Modes had significantly better color accuracy than the Natural setting. Vivid had a higher saturation level, obviously, while Muted had lower saturation. Using Portrait mode resulted in nearly identical saturation and color accuracy numbers as the Natural setting. In addition to these Picture Modes you can also customize your own settings by controlling contrast, sharpness, saturation, and color tone. The E-P1 also has a number of Art Filters that alter the color of your video. You can view frames taken from our Art Filter video testing here.
Compared to the other video-capable DSLRs, the Olympus E-P1 didn't do very well with color accuracy. The other cameras (whose images are shown above) all had color errors around 4.15. The Canon T1i had the most vivid colors (with a saturation level of around 110%), while the Nikon D5000 captured an overexposed image in auto mode. The close-up color comparisons below give you a better idea how specific colors captured by the E-P1 stack up against the competition.
**Video: Noise Performance***(10.78)*
The Olympus E-P1 averaged 0.5175% noise in our bright light testing, which is worse than the competition, but still a very good score. All of the video-DSLRs that have come through our labs have done incredibly well with this test. The Nikon D5000 was the lowest in this group (just 0.1925% noise), while the Canon and Panasonic both measured around 0.35%. Even though the E-P1 was worse than the other DSLRs with this test, its numbers were still better than the average mid-range HD camcorder. Click here for more on how CamcorderInfo.com tests noise performance.
Looking at the crops above, you can notice that the other cameras appear to have cleaner images than the E-P1. This may be partly due to the E-P1's higher noise levels, but it could also be a result of increased artifacting. For its credit, the E-P1 does manage to produce a very sharp image for a camera that captures 1280 x 720 video. Its footage appears significantly sharper than the Nikon D5000, which is the only other camera in this set to top out with a video resolution of 1280 x 720. The Canon T1i and Panasonic GH1 both have options for recording Full HD (1920 x 1080) video.
The E-P1 is equipped with a Noise Reduction feature as well as a Noise Filter setting, both of which are designed to limit the amount of noise produced by the camera. We found no change in the noise levels when testing the camera with Noise Reduction engaged. Setting the Noise Filter to standard, however, the camera reduced the noise levels by 0.1%, bringing the average noise down to 0.4175%.
Video Motion & Sharpness
Video Low Light
**Video: Low Light Sensitivity***(1.67)*
The low light sensitivity on the Olympus E-P1 wasn't terrible, but its performance wasn't anything special. The camera needed 20 lux of light to reach 50 IRE on our waveform monitor—a light level that is similar to what the Panasonic GH1 and Canon T1i required in the same test. The E-P1's kit lens opens to a widest aperture setting of f/3.5, which isn't very wide. Using a faster lens that allows for wider aperture settings would likely increase the camera's low light sensitivity. This is one of the benefits of using a camera with an interchangeable lens system. Click here for more on how CamcorderInfo.com tests low light sensitivity.
The E-P1 records all video using a 30p frame rate, so we didn't have any alternate rates to try out in this test. The Panasonic GH1 offers three frame rate options (1080/24p, 1080/30p, 720/60p) and the Canon T1i offers two (1080/20p, 720/30p). The table below shows the low light sensitivities of these other DSLR cameras when using their alternate frame rates.
**Video: Low Light Color Performance***(7.69)*
The E-P1 managed better color accuracy in low light than it did in our bright light testing. The camera's colors also looked a bit more saturated and vivid in low light than they did in bright light. This is likely due to the camera's white balance handling our low lights better than our bright lights. The camera registered a color error of 4.7 in our low light test (compared to 7.28 in our bright test). The saturation level was a solid 91.54%. Click here for more on how CamcorderInfo.com tests low light color performance.
As you can see with the comparisons below, the E-P1 isn't alone with its good colors in low light. All the video-DSLRs we've tested have produced very deep, accurate colors in low light. The E-P1 actually has the worst color accuracy of the bunch, although not by much. All the cameras shown below did very well with this test.
Even though all the cameras did well with this test, there are some significant differences with each camera's low light images. The Nikon D5000 continued to overexpose its image, while the Canon T1i severely underexposed its low light image (both cameras allow for manual exposure adjustment, so the image brightness can be altered if you desire). The Panasonic GH1 under-exposed its image a bit as well, but not as much as the T1i. The Olympus E-P1 actually shows the most even gradient in the greyscale portion of our test chart. None of the blacks or whites bleed together and the entire chart is distinct and clear.
**Video: Low Light Noise Performance***(4.75)*
In low light, the Olympus E-P1 had problems with noise. The camera averaged 2.28% noise in our testing, which is more than twice the amount of noise we measured on the Canon T1i and roughly four times the amount of noise recorded by the Panasonic GH1 and Nikon D5000. Suffice to say, this is a lot of noise—and it is definitely noticeable in the E-P1's low light image (see below). Click here for more on how CamcorderInfo.com tests low light noise performance.
In the images above, you can clearly see the fine layer of noise captured by the E-P1. Compare this to the crisp and clean image from the Panasonic GH1 right next to it. The Nikon D5000 shows some discoloration and artifacting in its image, although it is still cleaner than the E-P1. The Canon T1i also has some splotchy discoloration (particularly noticeable in the green patches), but its image has much less noticeable noise than the E-P1's.
Using the E-P1's Noise Filter setting did help lower the noise levels in low light. The camera managed to cut the amount of noise in half, bringing the number down to 1.13% with the Noise Filter set to standard(still higher than the competition) . Strangely, the camera's Noise Reduction feature didn't do anything to reduce noise levels (which brings us to believe the Noise Reduction setting doesn't work with video mode). So, if you want lower noise levels on the E-P1's video, don't forget to turn the Noise Filter on.
Compared to many consumer HD camcorders, the E-P1's noise levels aren't that bad. Models like the Canon HF20 and JVC GZ-X900 both produced similar levels of noise in our low light testing. It's just the fact that the Olympus E-P1 performed so much worse than the other DSLR cameras we've tested that makes it stand out. Video-DSLRs usually produce very low levels of noise.
Video Features
**Video: Compression***(6.00)*
The Olympus E-P1 uses Motion JPEG (MJPEG) compression to record video. This is the same compression system used by Nikon with the D5000 and D90, and it is also a compression option available on the Panasonic GH1 (the GH1 can do AVCHD recording as well). MJPEG is a bit outdated for a video compression codec, but it does have its benefits. The files are compatible with almost any media player or editing program, and playing MJPEG videos is less taxing for a computer than AVCHD files (which is the most common compression system for HD camcorders).
The E-P1 records HD video at a 1280 x 720 resolution and standard definition video at 640 x 480. While 1280 x 720 is technically high definition, it isn't Full HD, which is defined as 1920 x 1080 recording. The Canon 5D Mark II, Panasonic GH1, and Canon Rebel T1i all offer some sort of Full HD recording option. The Nikon D5000, as with the Olympus E-P1, does not.
There is a 2GB file size limit on the E-P1, which means no single video file can exceed 2GB in size. If you're planning on filming long, continuous shots with the camera, this size limit may be a problem. A 2GB file is roughly 10 minutes of video shot with the E-P1, although the length of a 2GB file can vary greatly depending on what you're shooting.
**Video: Manual Controls***(4.25)*
The Olympus E-P1 doesn't have the range of manual controls that are available on some video-capable DSLRs. In video mode, only direct control over exposure, aperture, and white balance are available. There are also Picture Modes and Art Filters that can be used in video mode, some of which we discussed earlier in the Video: Color section of this review. This means there is no manual control for shutter speed or ISO in video mode.
Auto Mode
The camera's scene modes aren't available in video mode, but there are a few auto features worth mentioning. Most important is the E-P1's continuous autofocus function, which is something many video-DSLRs lack. With autofocus set to continuous, the camera will maintain focus while video recording is taking place. You don't have to press a button or rotate a lens ring to refocus—the camera will do it for you (like a regular camcorder).
The problem is, this autofocus mechanism is loud and isn't very smooth. You can hear the internal focus motor move every time you point the lens at a new subject. It isn't quite as good as the continual autofocus on the Panasonic GH1 (the only other video-DSLR to include this feature), and it doesn't come close to matching the ease at which a regular camcorder provides a live autofocus. Still, it is an extremely useful feature for any video-recording device to have, so we applaud Olympus for including it on the E-P1.
The E-P1's image stabilization can be used in video mode, but only the I.S.1 setting is functional (even if you set it to I.S.2 or I.S.3).
Zoom Controls and Zoom Ratio
The kit lens for the E-P1 is an M. Zuiko Digital ED 14-42mm lens, and it offers a 3x optical zoom. The zoom is controlled by rotating the inner lens ring on the camera's lens. Of course, if you want more zoom you can always mount a different Micro Four Third lens onto the E-P1.
Focus
As we mentioned earlier, the E-P1 is outfitted with a continuous autofocus feature in video mode. You can also set the camera to manual focus (controlled using the lens ring) or a single push focus. To focus with a single push, you press the camera's shutter button half-way down just as you would to focus a still photo. Face detection does not work with video mode.
Exposure, Aperture, and Shutter Speed
Exposure and aperture can both be set manually on the E-P1, but neither can be controlled while video recording is taking place. You can set exposure in any shooting mode, while aperture can only be controlled manually in Aperture-priority mode. It's good that Olympus allows for aperture adjustment as it is probably the most useful feature for shooting video because it allows you to control depth of field. The aperture range on the E-P1's kit lens is f/3.5 - f/22. Exposure can be adjusted from -3 to +3 in 1/3, 1/2, or 1 EV increments.
Shutter speed cannot be controlled manually on the E-P1. Some of the Art Filters do alter the camera's shutter speed to produce slow shutter effects and the like, but nowhere on the camera can you manually set a shutter speed for video recording.
ISO/Gain and Other Controls
You cannot manually control ISO or gain in video mode on the E-P1, but there are plenty of Picture Modes that can be used to adjust color. Here is a link to sample images taken with the available Picture Modes on the camera—Natural, Vivid, Muted, and Portrait. You can also make a customized Picture Mode by directly setting color tone, sharpness, saturation level, etc.
In addition to the Picture Modes there are a number of Art Filters that can be used in video mode. These Art Filters not only make changes to color, but also adjust things like shutter speed and sharpness in order to create a unique effect. The Art Filters available are Pop Art, Pale & Light Color, Soft Focus, Light Tone, Grainy Film, and Pin Hole. Soft Focus and Grainy Film appears to lower the E-P1's shutter speed to roughly 1/4 of a second, while Pin Hole lowers the shutter even more (to around 1/2 or even 1 second).
Setting a manual white balance on the E-P1 is possible, but the process is not intuitive. You must first choose custom white balance from the camera's menu, then hold down the Fn button and snap a photo of a white or neutral image. This image is then used to calibrate the camera's white balance settings. The camera also offers a number of auto white balance presets, all of which can be used in video mode.
You can capture still photos while shooting video on the E-P1, but the photo will be whatever size your video resolution is set at. The camera's Noise Filter setting did a good job lowering noise levels in video mode and it can be set to low, standard, and high. Strangely, the Noise Reduction feature didn't do anything to improve the E-P1's noise levels in video mode.
The E-P1 has a built-in stereo microphone that is mounted on the front of the camera, just above the lens. Even though this isn't much in the way of audio features, it is actually more than some video-capable DSLRs offer. The Nikon D5000 and Canon T1i can only record monaural audio with their built-in mics. The E-P1 only has one audio control—the microphone can be turned on and off.
The built-in mic on the E-P1 may be difficult to find if you don't already know where it is. The mic is positioned as two small holes on either side of the 'Olympus' logo on the front of the camera. This placement is actually quite good: it's out of the way from wandering fingers, and it isn't that close to buttons or switches. Still, as with all DSLRs, the mic is going to pick up mechanical noises associated with the camera's function—there's no question about it. So, if you truly care about having good sound, we recommend using an entirely separate audio recording device when shooting with the E-P1.
Normally, we talk about DSLRs as being poorly implemented for video recording. They are usually much heavier and bulkier than the average consumer camcorder, and their design often makes long periods of hand-held shooting impossible. The E-P1, however, is roughly the same weight as a high-end HD camcorder, and its body is so compact that it can actually be wielded using one hand. This makes it the most portable video-capable DSLR we've seen so far.
Now, even though the E-P1 is compact, it is still a long way from being pocket-portable. The camera would be uncomfortable and heavy in a pants pocket, and it would be much better suited in a small camera bag or attached to a neck-strap. The E-P1 weighs 531g fully loaded (with its lens and battery pack). For comparison, the Sony HDR-XR520V—one of the bulkier consumer camcorders on the market—weighs 590g. This means the E-P1 is in the same weight range as many top-of-the-line camcorders.
Weight and size, however, are just two aspects we must take into account when discussing the E-P1's handling as a video recorder. The camera's lack of a viewfinder may be off putting to many traditional videographers (especially those who don't want to rely on a glossy LCD screen during a sunny day of shooting). The fact that the LCD doesn't rotate or pivot is also makes recording video more of a hassle. If the camera is on a tripod, or if you're trying to shoot at an odd angle, the stationary LCD requires you to crane your neck or contort your body in an unfriendly manner. Both the Nikon D5000 and Panasonic GH1 feature rotatable LCDs.
The E-P1 does feel very good in your hand, especially if you're used to old-style SLRs. The body is durable and strong, and, as we said before, it is possible to control the E-P1 with one hand. We also like the dedicated Video Mode on the E-P1, which makes things simple. Some cameras let you record video in every mode—an option that offers more versatility, but also makes things more confusing.
Canon Rebel T1i Comp
Performance
The key considerations here are resolution, where the Canon T1i scored very poorly and the Olympus E-P1 impressed, and image noise, where the Olympus had problems and the Canon, while not outstanding, was perfectly respectable. Both cameras deliver highly accurate color reproduction. The T1i offers a slightly faster burst rate (though it's still no speed demon) and a wider dynamic range (but again is not at the top of the SLR heap). There is a speed difference when it comes to autofocus though: while Live View autofocus performance is a bit faster for the E-P1, shooting with the viewfinder on the T1i keeps up with moving subjects neither Live View system can manage.
Components
The T1i has a beautiful 3-inch 920,000-dot LCD plus an optical viewfinder, where you have to rely on the lower-res 230,000-dot Olympus LCD for all your photo composition needs -- it does work better in the sunlight than most LCDs, but it's still a limitation, both in the way you see the scene and the way you steady the camera when shooting. Access to the wide range of Canon lenses is another major consideration, compared to the very limited (though admittedly growing) range of Micro Four Thirds lenses on the market. And like most consumer cameras, the Canon T1i has the built-in flash that Olympus omitted from the E-P1.
Handling
The Olympus E-P1 holds a substantial edge here. Canon's Rebel cameras tend to feel overly light and insubstantially built, where Olympus delivers a winning combination of solid metal construction, a compact but not puny body and a well-designed grip that's easy to hold securely and maneuver freely.
Controls
The fact that the Canon offers 15 megapixel resolution versus the 12.3-megapixel Olympus is potentially misleading: the Olympus takes much sharper pictures. The extended ISO range of the Canon does go to 12,800 versus 6400 for the Olympus, and that ISO 6400 setting is pretty near unsable. The Canon menu system is slightly preferable, but both cameras put key controls within easy reach, and the fact that the Olympus offers two control dials versus the single dial on the Canon will be particularly welcome to manual-exposure shooters. The E-P1 also offers a much wider array of scene modes, plus Art Filters and in-camera multiple exposures, along with an innovative on-screen level gauge that displays tilt both side-to-side and front-to-back.
NOTE: The images above are not used in our testing or scoring, but are included here to show real-world examples of the differences between cameras at the various ISO settings.
Nikon D5000 Comparison
Performance
Like the Canon T1i, the Nikon D5000 came up short in our resolution testing, with sharpness nowhere near the Olympus E-P1 results. On the other hand, the D5000 has very low image noise, an area where the E-P1 is weak. Burst mode speed and autofocus performance are both much faster for the Nikon, making it a better choice for sports and fast-action photography. It also has a much wider dynamic range, so it will hold onto detail better in high-contrast scenes.
Components
The hinged screen on the Nikon D5000 swings out from the body and pivots up and down, providing flexibility to shoot at different angles and a steady stance when shooting video. The D5000 also offers the optical viewfinder and pop-up flash missing from the E-P1. The standard Nikon lens mount is an advantage over the less well-supported Micro Four Thirds format. The compact size of the Olympus, though, has its own unique appeal.
Handling
Both of these cameras are exceptionally comfortable. The Nikon is a nicely balanced SLR, relatively small but with a well-shaped grip and that useful hinged LCD. We also like the way the rear screen automatically rotates when you hold the camera vertically. As for the Olympus, it has an entirely different but still very workable feel, smaller than an SLR but larger than a little point-and-shoot, with a solid righthand combination of curved thumb rest and front grip pad to ensure a secure hold.
Controls
The Nikon D5000 offers a much higher burst rate (4 frames per second versus 3 fps for the Olympus) and a wider exposure compensation range. When you factor in the extended settings, the ISO range is the same, as is the fastest 1/4000 second shutter speed. Both cameras offer a wide selection of scene modes and, while the Nikon in-camera editing functions are much more extensive, the Olympus Art Filters are fun tools for experimentation, and the on-screen dual-direction level gauge is genuinely useful.
NOTE: The images above are not used in our testing or scoring, but are included here to show real-world examples of the differences between cameras at the various ISO settings.
Olympus E620 Comp
Performance
For the most part, the strengths and weaknesses of the two cameras run parallel, with one interesting exception: the E-620 scored very poorly in our white balance testing, while the E-P1 did exceptionally well, particularly in auto WB mode. Both cameras posted excellent color accuracy results and scored very well in resolution testing, and both had real problems with image noise and dynamic range. The only major performance advantage of the E-620 is in burst mode shooting, where it fired off a full 4 frames per second versus just under 3 fps for the speed-challenged E-P1.
Components
The E-P1 screen is slightly larger at 3 inches (versus 2.7 for the E-620), but the E-620 screen is hinged at the left side to provide shooting-angle flexibility and protection when traveling. The E-620 provides the two key components missing in the E-P1 package, a pop-up flash and an eye-level viewfinder, though we found the Live View screen on the E-P1 was free from the difficulties keeping up with fast movement that detracted from the E-620 shooting experience.
Handling
It's interesting that, while the E-P1 is clearly smaller than the E-620, it was the SLR that felt too small in our hands, with a short front grip better suited for more petite fingers. That said, there's nothing fundamentally wrong with the E-620 camera design, and the build quality is impressive. Overall, though, the E-P1 is both a pleasure to show off and an easier camera to manage, with an intelligently designed combination of textured front grip and sculpted rear thumb rest that provide a nice, secure handhold.
Controls
The two cameras mimic each other here for the most part, with the same picture modes, Art Filters, menu system, multiple exposure capabilities, metering modes and shutter speeds. The E-620 does support a wireless remote control, which the E-P1 lacks, and offers a wider exposure compensation range. The key difference between the two is autofocus performance: while the Live View autofocus system in the E-P1 does feel faster than the E-620 in Live View mode, neither is speedy enough for fast action shooting, and the E-620 has the fast phase detect focus system available for those situations, while the E-P1 has only the sluggish contrast detect Live View autofocus.
NOTE: The images above are not used in our testing or scoring, but are included here to show real-world examples of the differences between cameras at the various ISO settings
Panasonic GH1 Comp
Performance
In most of our image quality testing the Olympus outperforms the Panasonic, and by large margins when it comes to color accuracy, white balance and resolution. Dynamic range is the noteworthy exception, with the GH1 capturing more shadow and highlight detail than the E-P1.
Components
One key reason for the $700 price gap between these two cameras is the exceptional 14-140mm lens that ships with the GH1 (equivalent to a 28-280mm on a 35mm camera). Not only does the lens deliver very good performance across the zoom range, but it zooms silently, a major plus when you consider that the GH1 provides live continuous autofocus while shooting video, with no annoying lens-grinding sound for the mic to capture. The LCD is another strong suit of the GH1, with its enhanced 460,000-dot resolution and hinged mounting for off-angle shooting. We didn't find the GH1 electronic viewfinder comfortable for long shooting sessions, but it's not bad for this type of display, and the option to hold the camera to your eye makes it easier to shoot steady video and blur-free telephoto images. Where the E-P1 has an advantage in this match-up is portability, where there is clearly no contest, especially when equipped with the ingenious collapsible zoom lens.
Handling
We've heard mixed reactions to the GH1 (and the nearly identical G1) when it comes to handling. We were reasonably satisfied with the way the camera feels in your hands: the grip is a bit small and the camera surface could have used some texture, but even with the big zoom lens attached we found the camera well balanced. For some users, though, the slightly cramped handling is a deal-breaker. We did have an issue with the dedicated movie record button, which is placed basically on the rear thumb rest, begging to be pressed accidentally. We'd be surprised to hear complaints about the E-P1 handling, with a design that looks good, feels solid and secure in your hands and provides easy access to nicely arranged controls, including the dual-purpose main control dial / 4-way controller.
Controls
There are two clear wins for Panasonic here: autofocus performance and video recording. What excited us about the Lumix G1 in the first place was the best Live View autofocus performance we've seen on an interchangeable lens camera, and the same holds true for the GH1. The Olympus autofocus feels more like the sluggish system we find on typical SLRs, but it's more of a problem here since you can't leave Live View behind the way you can with an SLR. The other strong suit for the GH1 is its exceptional video control and performance. You can set aperture and shutter speed to achieve the video look you're after, shoot at 1080p resolution (the Olympus maxes out at 720p) and use continuous autofocus, which video-enabled SLRs haven't mastered. The E-P1 does provide aperture control while shooting video, a major advance over most SLRs since it provides depth of field control, but the live autofocus while shooting is impractical, and the level of video control is nowhere near as extensive.
NOTE: The images above are not used in our testing or scoring, but are included here to show real-world examples of the differences between cameras at the various ISO settings.
Conclusion
Meet the tester
Steve Morgenstern
Editor
Steve Morgenstern is a valued contributor to the Reviewed.com family of sites.
Checking our work.
Our team is here for one purpose: to help you buy the best stuff and love what you own. Our writers, editors, and lab technicians obsess over the products we cover to make sure you're confident and satisfied. Have a different opinion about something we recommend? Email us and we'll compare notes.
Shoot us an email