Through a Glass, Darkly: What Makes a Good Low-Light Camera?
Creating a good low-light photo is a challenge in two parts: limiting image noise and limiting blur. How do the best cameras do that?
Products are chosen independently by our editors. Purchases made through our links may earn us a commission.
Oh, how far we've come since the days of film. While we might have sacrificed a good deal of analog warmth in the transition to digital imaging, those losses have certainly been offset by gains in low-light shooting ability. Today's cameras really are marvels of available-light photography—even some point-and-shoots can virtually see in the dark.
Image noise Image noise, caused by electrical interference, is the digital equivalent of film grain, and it's an inevitable byproduct of digital photography. It's particularly problematic for low-light photography, and controlling it is almost entirely down to the sensor and the in-camera image processing pipeline.
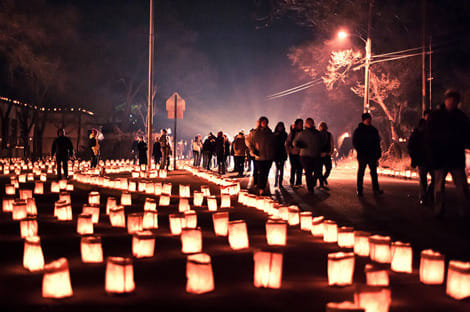
Shooting at night—or even in dim daytime conditions—can be a challenge for any camera, but there are certain traits that make some cameras stand out among their peers.
Blur Blur can come from two sources: the motion of your subject and the motion of your camera. While you can't always do much to control your subject, you can counter the latter if you raise your shutter speed and either "trade" for a larger aperture or a higher ISO setting, or both.
Of course, blur and image noise are intertwined. Overcompensate for one factor, and it raises problems with another, like a game of whack-a-mole. Higher ISO settings allow for faster shutter speeds, and therefore less blur, but they also create more noise. A larger aperture lets in more light, but it means less of the scene is in focus. What about noise reduction, one might wonder. Well, it gets rid of noise, but it also kills detail. There are a couple of magic bullets—namely larger sensors and effective image stabilization systems—that don't have any significant downsides (aside from cost), but achieving a blur-free, noise-free low-light image is always going to be a struggle, and a work of compromise.
Sensor Size: Bigger Is Better
A big sensor is better than a small sensor for low-light photography because larger sensors tend to generate less image noise. The megapixel count may or may not matter—it's too complicated to call one way or another.
As a general rule, physically larger sensors produce better low-light photographs. This is true because a larger surface area will always collect more light. Think of an exposed sensor as a bucket left out in the rain—but instead of collecting raindrops, the bucket is absorbing photons, the elementary particles that make up light. Bigger bucket, more photons, better signal, less noise. Makes sense, right?
So an advanced point-and-shoot like the Sony RX100, with a 1-inch sensor, will produce less image noise than a cheap compact like the Nikon S6300, with a 1/2.3-inch sensor. But a system camera with an APS-C sensor, like the Nikon D7000 or Sony NEX-5R, will take cleaner photos than the Sony RX100, all else being equal.
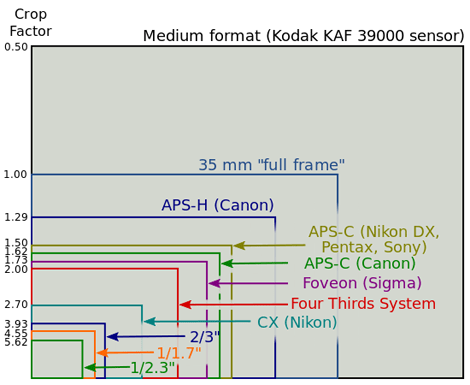
The sizes of various image sensor formats compared. Not actual size. Image credit: Wikimedia Commons.
How about pixel count? Photography enthusiasts tend to believe that fewer megapixels are always better when comparing sensors of the same physical size. For example, a 16-megapixel APS-C sensor is better than a 24-megapixel APS-C sensor when it comes to low-light photography. Or so the theory goes.
But recently, some scholarly debate (and the performance of ultra-high-resolution cameras like the Nikon D800) has thrown the matter into question. Some argue that since a larger pixel collects more photons, it can therefore be more precise in interpreting the data it receives. Others suggest that "noise performance per unit area [is] only weakly dependent on pixel size"—the same number of photons are hitting the sensor regardless of how many pixels are there to catch them.
This would go a long way toward explaining why the large full-frame sensor in the D800 (36 megapixels, 4.7μm pixel size) thoroughly outperforms the extremely well-regarded APS-C sensor in the Pentax K-5 (16 megapixels, 4.81μm pixel size). Of course, there are other factors at play in such a comparison. The D800's sensor is a full generation newer than the K-5's, and might have some design and hardware advantages that supersede a simple geometric comparison.
Lens Aperture: Brighter Is Better
Like a larger sensor, a larger aperture is always better for low-light performance. It allows you to either use faster shutter speeds to control blur, or lower ISO settings to control noise.
The biggest, most sensitive sensor in the world won't do you a lick of good if it's starved of light. This is where a large-aperture lens becomes important.
The maximum aperture of a lens, expressed as an f-number, is as wide as the lens's "eye" can open. (Lower f-numbers represent bigger apertures.) A larger maximum aperture means that more photons get in to hit the sensor. Each stop of aperture corresponds to a stop of shutter speed. In other words, a shot taken at f/2 and 1/60sec is roughly equivalent to a shot at f/1.4 and 1/125sec, in terms of exposure. When shooting in low light, a higher shutter speed is always valuable, as it can help prevent blur caused by camera shake.
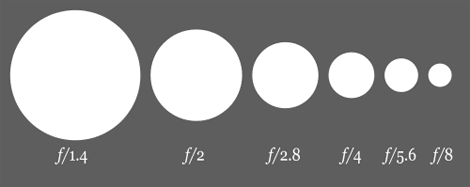
Each stop of aperture produces a corresponding stop of shutter speed, or sensitivity. Image credit: Wikimedia Commons.
With interchangeable lens cameras, users can choose the right lens for the job. While shooting in dim lighting, a large-aperture prime (no zoom) lens is desirable. Common apertures for these lenses go as low as f/1.2, with some manual focus primes dipping down to f/0.95. Constant-aperture f/2.8 zooms are also nice, but they're 1 to 2 stops slower than typical fast primes.
Fixed-lens models aren't as flexible, but a few recent compacts have had some surprisingly wide maximum apertures. The Panasonic LX7 and Samsung EX2F top out at an impressive f/1.4 at their widest focal length, and others like the Canon G15 and Sony RX100 open to f/1.8. Even some superzooms are flirting with relatively bright lenses: The Panasonic FZ200 maintains a f/2.8 maximum aperture throughout its entire 24x zoom range.
Image Stabilization: A Helping Hand
Image stabilization helps reduce blur in low-light photos, so you should always try to buy cameras and lenses with this technology. You won't regret it.
Though not directly related to the light-transmitting capacity of the lens or the light-gathering abilities of the sensor, image stabilization can have a hugely positive effect on your ability to shoot clear photos in low light.
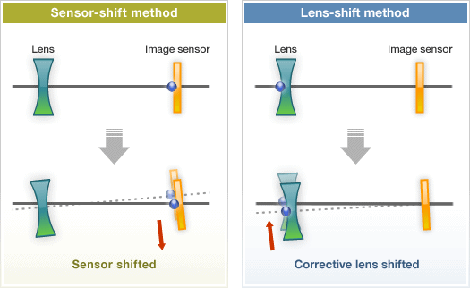
This diagram highlights the difference between in-camera and in-lens image stabilization. Image credit: Sony
Virtually all point-and-shoot models feature some form of image stabilization these days. It's helpful, but usually doesn't provide the same level of correction as you'd get from a stabilized system camera or lens.
In system cameras, image stabilization is available in two general forms: lens-based (Canon, Nikon, Panasonic) and sensor-based (Pentax, Sony, Olympus). Each approach has its pros and cons, but both result in drastic improvements to low-light sharpness. Essentially, this technology uses gyroscopic sensors that detect sudden movements and move the hardware of the camera's sensor or lens's glass elements to compensate.
These systems can provide 2 to 4 stops of stabilization, meaning that with the system's assistance you can capture blur-free shots at a shutter speed up to 4 stops slower than your slowest unassisted speed (in the best-case scenario). To put it another way, if your best blur-free speed before stabilization was 1/125sec at f/2.8, you can (theoretically) shoot at speeds as slow as 1/8sec with stabilization turned on. Obviously, that's a huge help. But remember: Stabilization only accounts for blur caused by unintentional movement of the camera itself, not for your subject's movement.
ISO Sensitivity: Steroids for Your Sensor (Side Effects Included)
High ISO settings let you use faster shutter speeds in dim conditions to prevent blur. But on a spec sheet, huge ISO numbers aren't reliable indicators of low-light photo quality.
In a frame of silver halide film, light sensitivity is determined by the size of the grains of silver halide within the film emulsion. Larger grains capture more light but create, well, more grain in the resulting image. That's why images shot using "fast" film always look extremely grainy.
With digital imaging sensors, the process is very different, but the end result is similar. Each digital camera sensor has a range of ISO sensitivities available, usually starting with its "base" ISO—typically 100, but ranging between 50 and 320. A camera will always produce its highest-quality images at its true base ISO, with the least noise and the widest dynamic range. All other ISO settings are created by adjusting the gain of the sensor. With more gain, the sensor becomes more sensitive, and you can shoot at higher shutter speeds with less light. The downside is a decrease in signal-to-noise ratio, which is visualized as a grainier, rougher image.
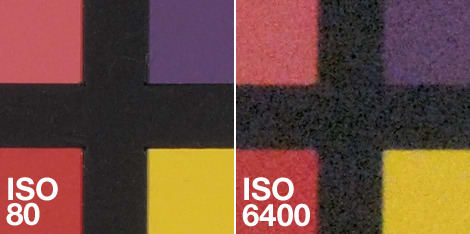
Noise performance of the Nikon P7700 advanced compact at ISO 80 and ISO 6400, its minimum and maximum sensitivity settings.
Typically, manufacturers ship cameras with a default ISO range, and then allow the user to unlock expanded sensitivity options. The default range produces shots at a quality that the manufacturer is comfortable advertising, while the expanded settings are there solely for those who absolutely need them, often only at reduced resolutions. Cheap point-and-shoot models like the Canon ELPH 110 HS go up to ISO 3200 these days, while advanced compacts can hit ISO 6400 or 12800. Consumer DSLRs climb even higher, often topping out at ISO 25600, or even 51200.
Some professional cameras, such as the Canon 1D X and Nikon D4, offer settings all the way up to ISO 204800—that's a full 11 stops higher than their base ISOs (100). As you might expect, the amount of noise you get at that level of sensor gain is staggering—the images are all but useless, for most purposes.
So why do manufacturers make these insanely high ISO settings available? Two simple reasons: 1. They look great on a spec sheet. 2. They allow you to stop motion in near total darkness. The images might look awful, but if you must get the shot and there's no other way to get it, extremely high ISOs are a fallback.
Good camera reviews will show you sample images from each ISO setting, including 100% crops, so you can judge the effects of increased sensitivity for yourself. In the end, you should trust in the test images, not the numbers on the spec sheet. Look for full-size real-world shots, too; lab tests don't always simulate the full range of conditions you'll encounter when shooting in the field.
Noise Reduction: The Devil is in the Details
The best plan is to shoot RAW. The second-best plan is to turn down in-camera noise reduction and post-process. But if you don't want to get your hands dirty, you should read professional reviews and look at sample photos for examples of how a camera handles noise and noise reduction.
Once a camera's sensor captures image data, the file either gets recorded to a memory card in RAW format, or passes through an image processing pipeline and turns into a JPEG. Not all cameras support RAW capture, and not everyone has the time or desire to post-process RAW photos at a computer. So tons of photographers end up shooting just JPEG images.
Several layers of processing are added to images before they become JPEGs, but noise reduction is the most relevant to low-light photography. Noise reduction smooths out distracting grain in photos, leaving them cleaner than they'd otherwise look. Unfortunately, not all cameras are smart about noise reduction, often producing images that look more like watercolor paintings than photographs when viewed at anything bigger than postcard size. See our review of the Sony HX200 for a particularly egregious example.
Noise reduction is a useful tool, but it can't beat physics. When a noise reduction algorithm takes away image noise, it also takes away detail. The best noise reduction systems are intelligently designed to be more aggressive on solid-color areas while taking a finer brush to complex patterns, but there's always a loss of detail involved.
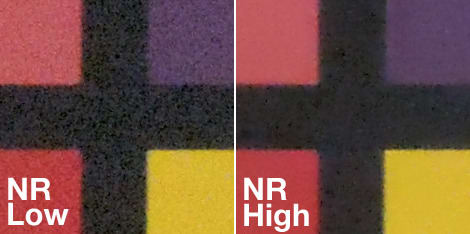
JPEG output from the Nikon P7700 at ISO 6400, first with NR set to Low, and then with it set to High.
Generally speaking, the noise reduction algorithms employed by proper computer-based post-processing programs are more sophisticated than those built in to the camera's software. So our first recommendation when shopping for a low-light camera is to look for models that let you capture RAW files, and then work on them in Photoshop, Lightroom, Aperture, or some other full-featured editing suite.
Failing that, our best suggestion is to pay close attention to professional reviews (like the ones on this very site) that analyze how noise reduction is applied. Beware: Some sites confuse the separate issues of noise and noise reduction, talking about them as if they're the same thing. You need to look for a camera that produces low noise levels to start with, but that also applies its noise reduction smartly.
Practice Makes Perfect
Low-light photography is inherently difficult, so even if your camera rig is designed for optimal performance in dim situations, you'll still struggle with blurry photos at first. It takes tons of practice and patience—learning to keep the camera steady, finding the sweet spot of settings, and harnessing the light that is available in a dark room—before you'll really feel comfortable wielding a camera in low-light. But there's no better time than the present to start!
