Pros
Cons
Physical Tour
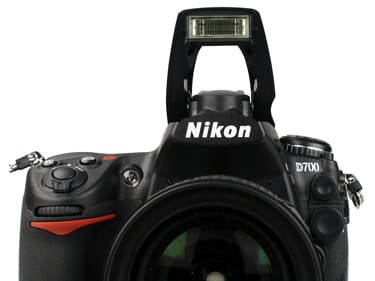
The body is made of magnesium alloy and tightly sealed against the elements. As shown in the photos below, we shot with the Nikkor 24-120mm VR lens that’s being offered as part of a $3,599 bundle (the body alone sells for $2,999.99).

Front(8.00)
The layout of the D700 will be comfortably familiar to Nikon shooters. On the left top, the on/off/shutter controls, exposure compensation and MODE controls are positioned on a platform that slopes downward from the top – we’ll look at these more closely below. Beneath this platform is the sub-command dial, and beneath that the trademark Nikon red badge.
In a vertical row, directly to the left of the lens, are (from top to bottom) the auto focus assist illuminator (which also serves as a self-timer lamp and red-eye reduction lamp), the depth-of-field preview button and a programmable function button, marked by a barely noticeable "Fn" in white ink.
The lens mount sits on a platform raised slightly from the camera body. The platform curves smoothly at the top to merge into the pentaprism housing, which protrudes forward over the lens. The top of the pentaprism housing is taken up by a pop-up flash, the front is emblazoned with the Nikon name embossed in white.
The lens alignment indicator is embossed into the raised lens mount platform at about 2 o’clock. Below it and to the right, on a step-down platform still raised from the main camera body, is the lens release button. Finally, at the top of the right side of the camera body, is the D700 name in white ink. Below this are two covered connectors: the uppermost is the flash sync terminal, the lower a ten-pin remote control connection. The front of the focus mode selector can be seen at the bottom, and below that the gold-toned FX badge trumpeting the camera’s full-frame sensor.
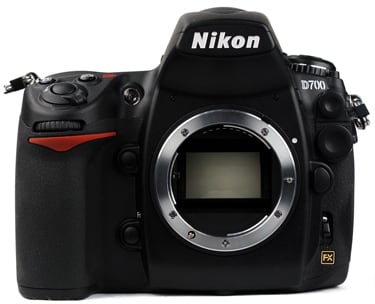
The programmable function button to the left of the lens mount lets you
reach your most frequently used features without navigating menus.
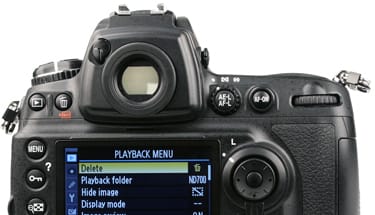
Back*(9.00)*
The most prominent feature of the camera back, of course, is the 3" (76mm) LCD panel, boasting an impressive 920,000 dot resolution – our pictures looked deceptively good as we reviewed them right after hitting the shutter, because the display is so much sharper than we’re used to. The "Nikon" name appears in silver below the LCD screen.
The camera comes with a clear plastic LCD-screen cover preinstalled. It clicks into place with tabs at top and bottom. While you’ll probably remove this cover for indoor shooting, we found it clear enough to leave in place when shooting in less welcoming environments, with very little visual obstruction.
The barrage of back panel buttons begins at the top left, inset below screen level, with the Play button (marked with the familiar VCR-style icon) and the trashcan-emblazoned Delete key. An additional red text label points out the role of the delete key, in combination with the MODE button, as a memory card formatting shortcut.
A five-button column flanks the LCD screen on the left. From top to bottom, they are:
- MENU
- Protect (the key icon), which also brings up on-screen help (hence the question mark)
Thumbnail (the checkerboard icon) / Playback zoom out (the magnifying glass with a minus sign)
Playback zoom in (the magnifying glass with a plus sign)
OK
The optical viewfinder above the screen is flanked on the left with a small switch that toggles a built-in shutter to cover the eyepiece. The eyepiece itself is surrounded by a round rubber eyepiece that unscrews easily for replacement with any of several optional accessory eyepieces, if you prefer. A diopter adjustment control, with a range from -3 to +1m-1, is mounted on the side of the viewfinder.
To the right of the viewfinder is the circular metering mode selector control, which clicks cleanly into place as it’s rotated between Spot, 3D Color Matrix II and Center-weighted settings. The auto exposure / auto focus lock button is positioned in the center of the metering mode control. A dedicated auto focus-on button (AF-ON) is positioned to its right. And completing this left-to-right lineup is the main command dial.
A relatively small, round multi-selector pivoting controller is located to the right of the screen. In the middle of this control is a button that generally, but not always, mimics the function of the OK button. Surrounding the multi-selector is the rotating focus selector lock, with the open position indicated by a single white dot and the locked position by the letter L.
The focus area selector lever, below the multi-selector cluster, clicks between Single-point auto focus, Dynamic area auto focus and Auto-area focus. The button labeled "Info" brings up an extensive information readout display on the LCD panel during shooting. A second press provides quick access to change several of the displayed settings. To the side of the Info button is a small light labeled "CF" which indicates write activity to the CompactFlash card.
There’s a textured, rubber grip pad sculpted into the space between the controls and the rightmost side of the camera back. This surface is useful enough when holding the camera horizontally, but really proves its worth when you pivot the D70 to portrait mode, and the camera’s weight against your thumb makes the extra friction afforded by that textured strip extremely welcome.
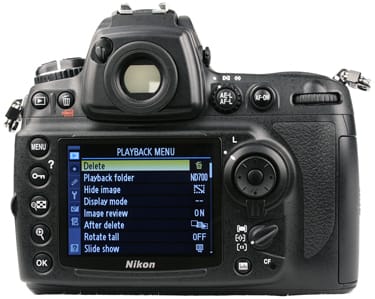
There's no shortage of controls here, but labels are clear
and most buttons serve a single purpose.
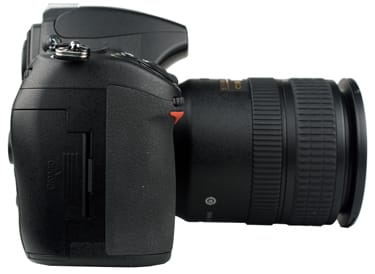
Left Side* (6.50) *On the left side of the viewfinder hump is a small black button, barely visible, that triggers the pop-up flash. Below this is the flash adjustment button. Hold it down and rotate the main command dial to change flash modes, or rotate the sub command dial to adjust flash intensity. It’s fortunate that this button is likely to be used only rarely because, out of nearly three dozen individual controls festooning the D70 body, this is the only one we found badly positioned and difficult to manipulate. The rubber cover over the flash sync terminal protrudes to the side of the flash adjustment button, preventing the user from comfortably keeping the button depressed.
Below the control cluster on the top left of the camera is a rugged metal camera strap connector. Below this is a large tight-fitting rubber door with a hinge tab that seems sturdy enough for extended use and a prominent surrounding ridge to keep out moisture in hostile environments. Inside this compartment are connections for HDMI output, composite video output, mini USB and DC power input.

The rubber cover protecting the input/output ports fits snugly.
The right side camera strap lug is mounted higher than the corresponding connector on the left, but in day-to-day use this didn’t have any noticeable impact on camera balance. The side panel holds the CompactFlash card slot, beneath a ridged cover that slides back with a quick push of the thumb, then springs open. Unlike the D300, there is no lever to lock this door, but given its position on the camera body, it seems unlikely the door will be opened accidentally.
*Nikon opted not to include a locking lever for the CompactFlash compartment.
*
The cluster of buttons and the rotating control that surrounds them to the left of the viewfinder hump places many of the most frequently changed settings in a position where they‘re easily manipulated with the left thumb and index finger, leaving your strong right hand to hold this admittedly heavy camera securely (lefties, it’s time to build up those right-arm muscles). The three top buttons are QUAL (image quality), WB (white balance) and ISO. In each case, you hold down the button with your left index finger and adjust the setting by rotating the main- and sub-command dials with your right hand. The surrounding dial includes settings for shooting mode (single-shot, continuous low-speed, continuous high-speed, live view, self-timer and mirror up modes). There’s a small round locking button at the front right of this dial to prevent accidental changes.
On top of the viewfinder hump is an industry-standard ISO 518 hot-shoe connector. This sits behind the pop-up flash.
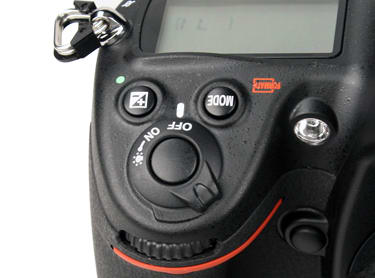
One feature that continues to distinguish high-end digital SLRs from low-cost models is the monochrome LCD readout on the top of the camera. For the D700 this control panel display indicates exposure mode, image size, image quality, shutter speed and aperture settings, battery level, remaining exposures and white balance setting while shooting, and the number of remaining exposures even when the camera is off. This display can be illuminated briefly by rotating the power switch beyond the ON position.
That power switch is located at the top front of the protruding grip, surrounding the black shutter button. The MODE button lets users switch shooting mode between Program, Aperture-Priority, Shutter-Priority and Manual modes by holding it down and turning the main command dial. To its right is the exposure compensation button. The green dot beside the exposure compensation button indicates its part in the two-button combination (with the similarly flagged QUAL button on the left side) to reset multiple shooting default values.

*Dual control dials front and back make even complex settings
adjustments a speedy proposition.*
On the left side of the camera bottom, beneath the grip, is the battery compartment door, which yields easily to a fingernail press. There is no tab or device to hold the battery in place: open the door and be prepared to catch it as it falls. There's a rubber connector cover securely fitted to the right of the battery door. Prying it open reveals the connectors for the optional MB-D10 battery pack.
The tripod mount is metal, centered under the lens and surrounded by a textured rubber surface to help avoid slippage when mounted on a tripod.
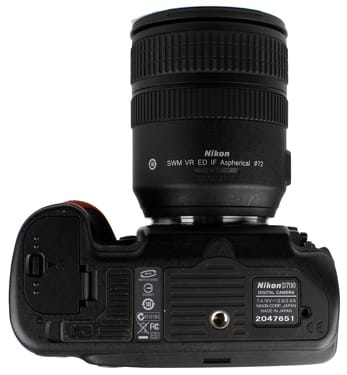
Non-slip surfaces here help secure the camera when tripod-mounted.
Color Performance
Where the Nikon D700 shines is making the most of every available photon in areas dark enough to make lesser camera shutters shudder, minimizing image noise in the process. Some of the other test results for this camera come with caveats, though. Shutter lag, for example, is infinitesimal if the camera’s already focused, but a full-travel shutter press without prefocusing on our full-computer-screen digital stopwatch produced unexciting results. We also discovered that, in certain tests, the faults we found were caused by defaults: specifically, the default Picture Control setting of Standard. As explained below, this mode produces handsome pictures, but sacrifices color accuracy in the process.
**Color **(9.32)
In our lab testing, our primary concern is accuracy: making sure that the shades reproduced by the camera match what we actually saw when we took the shot. We’d been shooting with the D700 in the field for some time before we started shooting test charts, and eyeballing our test images produces consistently appealing colors, albeit a tad warm. When we started shooting the standard Gretag Macbeth test chart under studio lighting and running the resulting images throught Imatest image analysis software, though, the camera received mediocre scores. After some discussion, we realized that this was the same effect found when testing high-end Canon cameras: the default image settings produce so-so color accuracy, but switching to Faithful mode for the Canons results in a dramatic improvement. Same thing here: switching from Standard to Neutral mode when shooting with the Nikon D700 moved the camera’s color accuracy score from a mediocre 6.89 to a far more palatable 9.32.
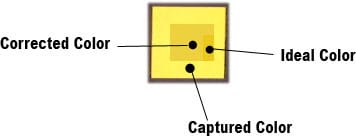
In the Imatest chart below, the color captured by the camera is shown in the outer rectangle, the luminance-corrected color is shown in the middle square and the original color chart hue is shown in the small inset rectangle.

*The ideal color segment indicates the original color chart value,
the outer rectangle is the D700 result.
*
A second Imatest chart displays graphically just how close the captured values come to the original colors. In this case, the ideal color is represented by a square, the color as captured by the camera is shown in a circle, and the line between them indicates the distance between the two values: shorter lines equal better color accuracy.
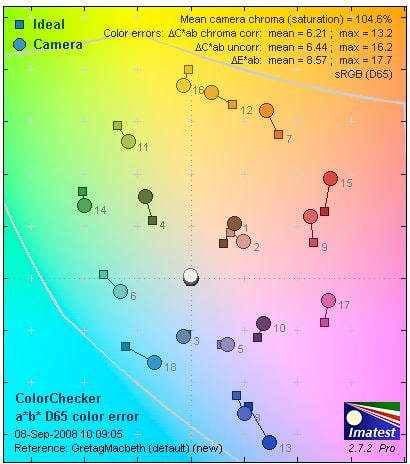
*Nice short lines in this chart indicate the D700 reproduced
color values accurately.
*
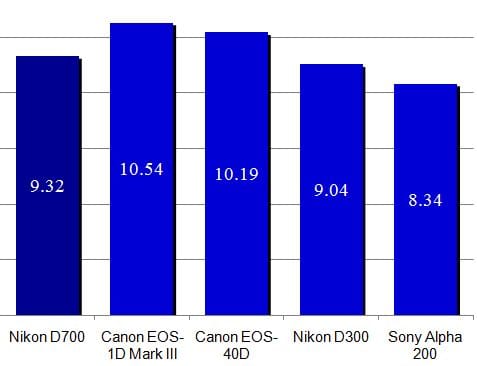
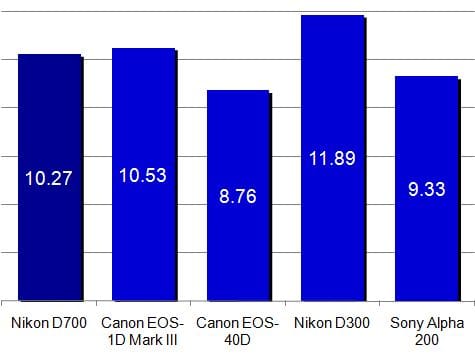
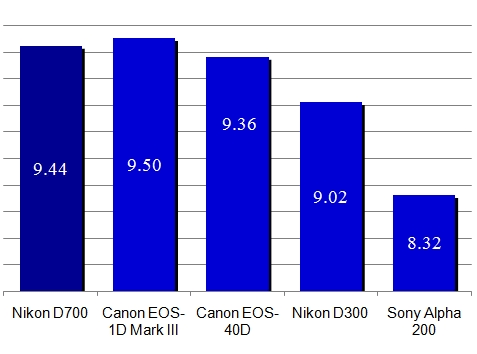
We chose a diverse group of cameras for comparison purposes against the D700, ranging from Canon's high-end EOS-1D Mark III, the EOS 40D that lists for $1299, the Nikon D300 that shares many body characteristics with its brandmate, and the least expensive reputable SLR we've reviewed, Sony's Alpha 200. In color performance, the D700 achieved a perfectly respectable if not outstanding score: you'd be unlikely to notice any significant differences in color performance between any of the Nikons or Canons shown here.
Nikon D700 Color Scores
Assuming that a high number of megapixels in the camera spec equals the superior resolution performance in your actual photos is a rookie mistake. Optics, sensor quality, and image processing, among other factors, have a powerful influence on photo sharpness. In our testing, we shoot an industry-standard resolution chart at a variety of distances and camera settings, under bright studio lighting, to find the top resolution performance the camera is capable of delivering. Imatest software analyses the test shots and grades them based on the number of alternating horizontal and vertical lines the camera can clearly reproduce (represented as line widths per picture height, or lw/ph) before the chart figures turn into grey mush.
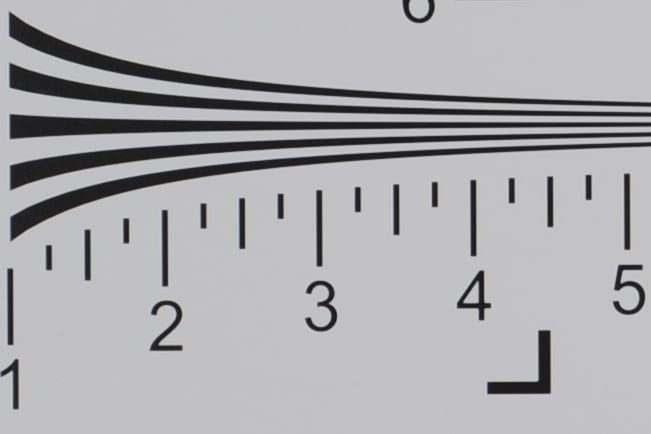
A full-resolution section of a D700 image from an industry-standard resolution chart
The D700 did well in resolution testing, topping out at 1787 lw/ph horizontal with 10.3 percent undersharpening and 1771 lw/ph vertical, with 12.4 percent undersharpening. This relatively high level of undersharpening found in Imatest’s analysis actually works in the photographer’s favor, since images have enough inherent data to respond well to sharpening tools (such as unsharp mask) during image editing.
Nikon D700 Resolution Scores
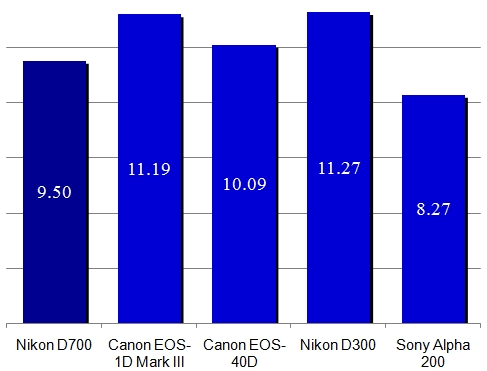
Dynamic Range (9.50)
Dynamic range is the measure of how successfully a camera can capture the full set of light values, maintaining detail in the shadowy areas of a photo without simply going black and holding on to highlighted areas without simply blowing them out to white. To test for this capability, we shoot a backlit chart with swatches of grey ranging from pure white to pitch black, and analyze the resulting images using Imatest software to determine how many steps are actually discernible.
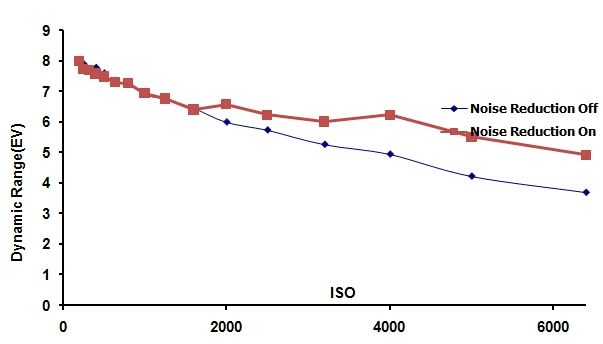
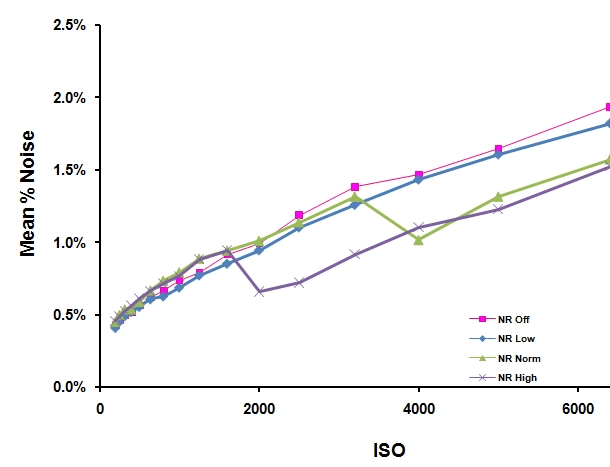
The D700 did well in the dynamic range test, especially if you consider the extraordinary breadth of the ISOs being tested. Ordinarily dynamic range falls off as ISO increases, which means a camera that goes beyond typical 1600 or 3200 ISO values, and doesn't offer an official ISO 100 setting either, is at some disadvantage statistically. At the most typical ISO settings, though, the D700 turned in a fine performance. There is an anomaly in our testing results, though, as shown in the graph above. We expect noise reduction to cut down on dynamic range, since data is being removed from the image in an attempt to cut down on speckles and imperfections, a process that ordinarily blurs dynamic range steps as well. In this case, we found apparent improvement in dynamic range from about ISO 2000 on, and this improvement was consistent throughout the standard ISO range (the values actually came back to be nearly equal when we pushed beyond the official ISO range into Hi0.3, Hi0.7, Hi1 and Hi2. We have no scientific explanation for this unexpected results, and have contacted Nikon to ferret out what caused it. We will update this review when we have an appropriate answer.
As for dynamic range scoring, the Nikon ranked slightly below the other cameras here but, again, the lack of ISOs below 200 and the inclusion of those beyond 1600 should be factored in.
Nikon D700 Dynamic Range Scores
**
**
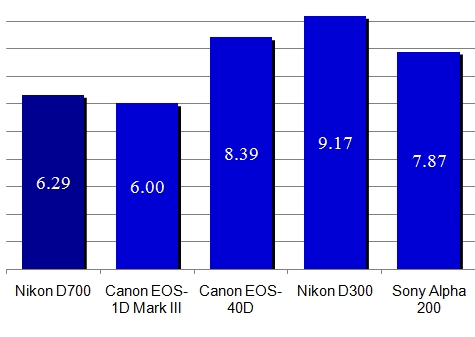
White Balance (6.29)
Sometimes looks are deceiving. Whether you look at a white sheet of paper in sunlight, or under a household lamp, or under fluorescent lighting, it looks like a white sheet of paper. That’s because the powerful meat computer between your ears skillfully adjusts for the very different colors of light these sources of illumination actually cast. Our digital cameras have to make a similar calculation to adjust for the color of light when taking photos, with greater or lesser success. And when white balance is significantly off, it’s not a subtle flaw you can easily overlook: just think of all those orange, overly warm shots you’ve seen over the years, taken indoors under incandescent bulbs with a camera that just couldn’t make light of the situation.
We test white balance under a variety of lighting conditions: flash, fluorescent, shaded daylight and tungsten. In each case we shoot the Gretag Macbeth color chart two ways: one using the camera’s automatic white balance system, the other by choosing the appropriate white balance preset. The D700 offers a variety of fluorescent presets, based on the many different types of fluorescent bulbs on the market. We shot with all the presets and went with the best results. Its also worth noting that, for each preset, the camera allows users to finely adjust the settings by moving a cursor across an on-screen color chart. If you take a shot and don’t like the results, it’s fast and easy to tweak the white balance settings and keep shooting until you get the look you’re after.
Our standardized white balance testing procedure calls for shooting in default mode, which in the case of the D700 led to lower-than-expected scores. The default color setting for the camera is Standard, which enhances colors subtly to provide a more visually appealing image. However, as shown in our Color test above, the Neutral setting favors accuracy, producing higher scores when Imatest analyzes the image. To achieve more realistic white balance results, setting the camera to Neutral is recommended.
The automatic white balance system did a good job while shooting with flash and under fluorescent lighting, but coped badly when asked to accurately capture colors under shaded daylight or tungsten lighting conditions.
-
**Preset (5.67)
*Here again, flash performance was excellent, and using the preset resulted in a major improvement when shooting under tungsten lighting. However, none of the multiple available presets outshone the results we found using the auto white balance setting when it came to fluorescent lighting.
It's interesting that the Nikon D700 and the Canon EOS-1D Mark III show similar, relatively unimpressive scores compared to their less expensive cohorts. In both cases, the standard color modes aren't the ones that emphasize color accuracy, which throws off their scores on tests that stress precision rather than aesthetics.
Nikon D700 White Balance Scores
Noise Performance
**Noise
**Image noise is the electronically-generated speckling of an image, much like clusters of silver particles in film stock used to create a noticeable texture that wasn’t present in the original scene. And as with film grain, image noise is most noticeable in areas of flat color, and under low lighting conditions.
Since noise inevitably increases as ISO settings rise, we test cameras at each available ISO setting, from the lowest to the highest. With the D700, that’s a whole lot of ISOs – while most cameras we test have six or seven setting, this Nikon offers 23 ISO settings. Of these, ISO 200-6400 are considered "official" settings, identified by numbers in camera menus (with information that gets stored in the EXIF image data). There are also three settings below 200 (labeled Lo0.3, Lo0.7 and Lo1, roughly equivalent to ISO 100, 130 and 160 respectively) and four high settings from 8000 up to an astronomical 25600 (Hi0.3, Hi0.7, Hi1 and Hi2 respectively). Nikon engineers separate the official settings from the outliers based on their belief that the sensor performance is most reliable within its sweet spot. We went ahead and tested the entire range, and found the results impressive nearly across the board. The Lo settings produced excellent noise results and, on the Hi side, we didn’t cross the 2% threshold until we’d pushed to Hi1, the ISO 12800 equivalent, making even this level usable in extreme shooting conditions. We’re less jazzed about the 4.27% noise in our Hi2 (ISO 25600) setting, but if it’s so dark that you need that high a setting, you probably can’t see what you’re shooting at anyway.**
**
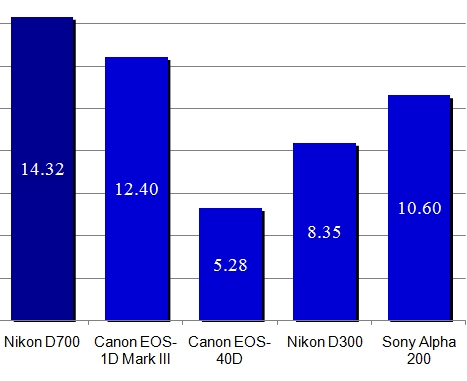
Noise – Manual ISO*(14.32)*
The extraordinarily noise-free look we got from our low-light shots in the field weren’t an optical illusion: the cold statistical light of Imatest analysis bore out our enthuasiastic response. One interesting side effect of excellent overall noise performance is the hit-and-miss effect of high-ISO noise reduction. These digital processing systems attempt to recreate the underlying noise pattern under current shooting conditions and then remove those minute specks from the actual captured image. Problem is, since image noise is a random effect, noise reduction can actually have a negative effect on image quality, particularly when there’s very little noise in the original image. The only test images where we found high-ISO noise reduction produced a significant positive effect was at extremely high ISO settings (ISO 2000 and up).
In head-to-head comparison, the Nikon D700’s noise performance significantly surpasses its competitors. Turns out those marketing claims weren’t just smoke and mirrors.
Nikon D700 Manual Noise Scores
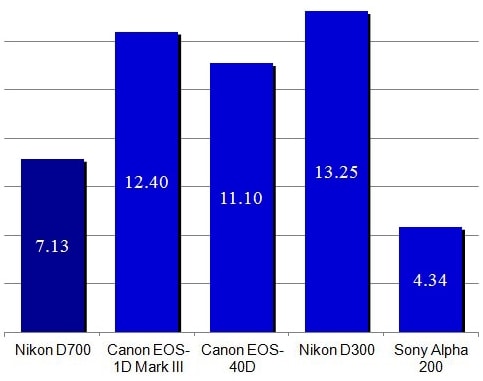
This test has an odd pitfall to it, and the Nikon fell in. We set cameras to Auto ISO, leaving the setting to the camera, and shoot the resolution chart with the same bright illumination as the manual ISO test. This makes the test partly about noise performance, but mostly examines the setting smarts of the camera: the chart is bright enough to shoot at ISO 100 or 200 with optimal results. The D700 was much more aggressive,though, consistently choosing a setting of ISO 800. The resulting shots look fine, and in real-world handheld shooting situations the relatively high sensitivity setting would gain you some shutter-speed latitude and better depth of field. In the lab, though, the auto setting cost the D700 points.
The other cameras in our comparison all chose more conservative ISO settings in auto mode and, as a result, turned in better scores, except for the Sony, which fell into the same trap as the D700.
Nikon D700 Auto Noise Scores
**Low Light **(9.44)
The ability to shoot in low-light conditions without blasting away with a flash is clearly a highly desirable feature. To determine camera performance under challenging lighting conditions we conduct two different tests. In the first, we shoot the standard color chart at four carefully controlled light levels. At 60 lux, the illumination is roughly what you'd find in a room in your home. At 5 lux, it's closer to the illumination from a single candle.
Here again, the tested color accuracy using standard settings is adequate but not great, while the noise levels are superb: even at 5 lux, noise levels barely topped 1%. The really striking feature on this test, which you can glean from the images reproduced above, is the consistency of the results across the board. Colors barely budged as light levels and noise reduction settings changed, and noise levels remained remarkably consistent as well. This is vital in a camera like the D700, which offers extensive options to tweak settings to match your personal preferences. The ability to alter settings for saturation or hue, for example, doesn't do much good if the photos taken at those settings are going to appear inconsistent based on shooting conditions. The D700 takes an extraordinary latitude of lighting conditions in stride, delivering a high level of predictability.
In our second low-light test, we examine noise levels at extended exposure times, with and without long-exposure noise reduction enabled. In this case, the noise reduction processing had virtually no effect, since the levels were so low in the first place.
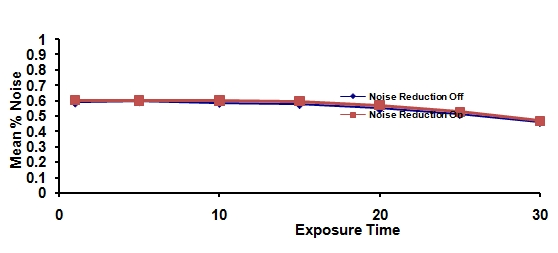
Averaging the performance on our two low light tests gives the Nikon D700 a respectable performance against the competition, though it does somewhat mask the strength it showed in the low-noise elements of our testing, as revealed both here and in the noise performance rating section above.
Nikon D700 Low Light Scores
**Still Life**
In each review, we shoot the same two still life setups at every available ISO setting, providing the opportunity to compare results for a single camera across different exposures, and to cross-compare from camera to camera. Since the D700 spans more than 20 available ISOs, we chose a sampling ranging from the lowest to the highest settings available. The lighting is standard household fluorescent, the camera settings automatic. Clicking on an image will bring up a full-resolution, but be forewarned: these are large files and can take awhile to download.
Speed Performance
 |
 |
 |
| Shooting an on-screen stopwatch lets us determine burst mode performance. |
All speed tests were performed with a fast SanDisk Ultra II 2-gigabyte CompactFlash card, to minimize the effect of any memory bottlenecks.
We clock the time it takes to turn on the camera and grab your first shot. On average, it took about six tenths of a second between sliding the power switch to the right and having the shutter click, a good result.
Shot-to-Shot (4.9)
Nikon promises 5-frame-per second JPEG performance in high-speed continuous shutter mode, and they delivered on their promise: our measured result was 4.90 fps.
Shutter-Shot (3.38)
The time it took to trip the shutter and take a photo once auto focus had been achieved was far too short to measure accurately. However, shooting our full-screen digital stopwatch with a full shutter press, including focusing, took just over half a second on average.
Components
Viewfinder*(9.00)*
The pentaprism viewfinder shows 95% of the picture area, with a magnification of approximately 7.2x. The diopter control allows adjustment from -3 to +1 m-1. We were pleased with the handy viewfinder shutter control. Instead of the cumbersome slide-in covers provided with many SLRs, this built-in shutter slides open and closed using a convenient control to the left of the viewfinder, making it easy to keep light from behind from fouling up tripod-mounted exposures.
The camera comes with a type B BriteView Clear Matte Mark VI focusing screen with AF area brackets. An on-screen grid line display is available via the custom settings menu, when using FX-format lenses.
While shooting, the basic viewfinder display is a clear yellow on black strip at the bottom of the screen showing focus confirmation indicator, focus mode, shutter speed, aperture, shooting mode, ISO speed and shots remaining. Of course, as additional setting adjustments are made, these are reflected in the display, but we couldn’t manage to create enough on-screen clutter to be confusing.
One interesting viewfinder option is the Virtual Horizon feature. By programming the function button to enable this feature, the exposure indicator in the viewfinder becomes a tilt indictor, displaying whether the camera is tilted to the left or right. The Virtual Horizon can be displayed as an image overlay in Live View mode.
The shutter inside the viewfinder makes tripod shooting simpler.
Live View
Unlike some cameras, which initiate Live View mode with a simple button press, Nikon requires you to press down the lock button on the release mode dial lock button, then rotate this control to the Lv mode position.
There are two versions of Live View mode, Hand-held and Tripod, selectable via the Shooting menu, each with a slightly different shooting procedure. In Hand-held mode, you start by pressing the shutter all the way down – this doesn’t take a picture, it just raises the mirror so the light coming through the lens will hit the sensor and be displayed on the LCD instead of bounced up into the optical viewfinder. During Live View display, pressing the playback zoom buttons will enlarge or reduce the on-screen image.
While framing your shot on the LCD, the image stutters noticeably as you move the camera from side to side. It‘s not bad enough to make you miss a shot, but it is distracting. A more serious obstacle to using Live View is the confusing focus sequence.
LiveView lets you compose an image on the high-res LCD
After pressing the shutter all the way down to get into Live View mode in the first place, a second halfway shutter press (or depressing the AF-ON button) is required to focus. This lowers the mirror and blanks out Live View. The sound of the swinging mirror makes it seem that you took a picture – but that‘s not necessarily so. You need two clicks – one to initiate focus, the second to actually take the photo. If the camera had trouble achieving focus (a common occurrence when shooting relatively close subjects with the 24-120 lens we used for test purposes), you hear a click, don’t get a photo, and don’t get automatically get back to Live View mode either (that takes another shutter click). Best case, there’s a significant focusing lag between hitting the shutter and taking the shot. Worst case, you hear lots of familiar clicking sounds and, if focus fails, end up with no photos at all. Of course, you can avoid the problem by focusing manually.
When shooting in Live View Tripod mode, there’s a lot less confusion, because the screen never blanks out for auto focus. Instead the camera uses a different focusing technology, called contrast-detect auto focus, which relies on data from the image sensor itself instead of the standard phase-detection auto focus used when shooting with the optical viewfinder and with Hand-held Live View. You see the camera attempt to achieve focus live on screen, with focus confirmed both audibly and visually, when the focus area indicator turns green. Nikon warns that contrast-detect auto focus may not be as accurate as phase-detection technology, particularly with a moving subject. When shooting product setups and landscapes with tripod-mounted Live View, though, we found the actual focus achieved to be spot-on, and composing the image was certainly more comfortable than peering through the optical viewfinder, especially when shooting from a low or high angle. It could take a few seconds, though, to finish focusing.
**
LCD Screen**(9.50)
The D700 display is a 3-inch, 920,000-pixel LCD with a wide 170-degree viewing angle. This screen has now been used in several Nikon models, so it no longer excites the thrill of discovery it once did. It’s still guaranteed to bring a smile to your face, though, when you move up from the ordinary 230,000-pixel display used on most SLRs to this dramatically crisp and clear view of your recent shots. And while we’re still not big Live View fans when it comes to composing images, the ability of this display to capture the color and detail in the Live View preview makes the feature a lot more appealing.
Seven levels of LCD brightness are available through the Setup menu. The screen is very reflective, which can be an issue when shooting in sunlight, but after cranking up the brightness we found it was still practical shooting with Live View or reviewing your images in the harsh afternoon glare. The snap-on plastic LCD cover is very clear and reasonably scratch-resistant – we left it on when shooting in less-than-ideal outdoor conditions and were grateful for the extra protection.

Pressing the "info" button on the back of the camera while shooting brings up a very useful full-screen information display. effectively communicating all the data found in the viewfinder and much more, without requiring one-eyed Popeye squinting. In addition to basic camera settings and current exposure readings, you can see at a glance which shooting bank settings are in effect, whether noise reduction is on or off, the current Active D-Lighting setting, which color space is being used, the Picture Control setting, and what functions are assigned to the programmable depth-of-field preview, AE-L/AF-L and Fn buttons. Better still, press the same button a second time and all the settings mentioned above can be customized right from this menu.
The Info screen toggles between straight
information and control options.
There’s also a 1.75-inch monochrome display on the top right of the camera that provides basic shooting information: shooting mode, image size and compression settings, aperture and shutter speed settings, battery level, white bance setting and number of shots remaining. This display can be illuminated briefly by turning the power switch beyond the ON position. Like so many D700 camera behaviors, the length of time this illumination lasts can be tailored to your personal preferences.
**Flash (8.25)
While the D3 is too much of a highbrow pro camera to incorporate a built-in flash, the D700 provides a pop-up unit that’s both handy and effective. When you press the small back button on the right of the viewfinder hump the flash pops up a good 4 inches above the center of the lens, a generous distance that noticeably minimizes red-eye when shooting in dark rooms. According to Nikon, the guide number at ISO 200 is 17/56 (m/ft).
Flash modes include front curtain sync, slow sync, rear-curtain sync, red-eye reduction and red-eye reduction with slow sync. Flash exposure compensation ranges from -3 to +1 EV in 1/3, 1/2 or 1 EV increments. By default the built-in flash operates in TTL (through-the-lens) metered mode, but you can also set the flash level manually, set repeating flash mode to continue firing as long as the shutter is depressed, or set Commander mode to control external flash units (SB-900, SB-800, SB-600 or SB-R200), in two separate groups if desired.
Flash sync speeds range from1/60 second to 1/1/250 second (the default), or 1/320 with an external flash. This makes the built-in unit an effective fill-flash even in bright lighting conditions.
The hot shoe on top of the viewfinder hump accepts the external flash units listed above. Other flash systems can controlled via the flash sync terminal on the front right of the camera.**
The high flash position helps minimize red-eye.
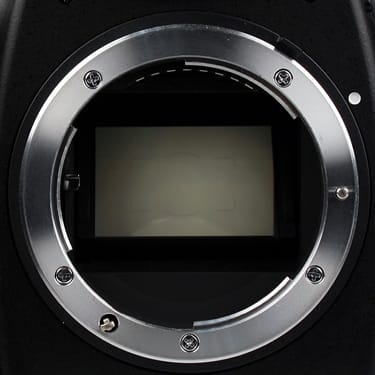
Lens Mount(10.00)
The D700 adheres to the Nikon standard F-mount spec, ensuring compatibility with just about any recent Nikkor lens you can find, though some older formats have limitations when it comes to auto focus and metering. DX AF Nikkor lenses are fully supported. Type G or D AF Nikkor lenses are also fully supported, though some functions won’t work for PC Micro-Nikkor lenses. Other AF Nikkor and AI-P Nikkor lenses support all functions except 3D color matrix metering II. IX Nikkor and lenses for F3AF are not supported. As for non-CPU lenses, they can be used in auto and manual exposure modes, with some additional compications.
Given the full-format sensor, which matches the size and shape of a 35mm film frame, FX-format lenses perform as they would on a 35mm camera. DX lenses, designed for use with digital SLRs, will also mount on the D700 with all automatic functions enabled, but will exhibit the same 1.5x magnification factor you’d find on a DX-sensor camera. The D700 can be set to automatically detect when a DX lens is attached, or this setting can be made manually.
Like the rest of the Nikon SLR line, the D700 offers no internal image stabilization technologies. If you want to minimize camera shake, you’ll have to develop great inner calm, powerful forearms and/or invest in VR (vibration reduction) lenses.
The ability to choose from a plethora of Nikon lenses
is a key part of the D700 appeal.
Design / Layout
Model Design / Appearance*(8.25)*
It’s a Nikon SLR – what more do you want to know? The D700 does have a slightly taller viewfinder hump than the D300, and a new port cover arrangement for the flash sync and remote control terminals, but exterior design innovation clearly isn’t high on the company’s priority list. And frankly, that’s fine with us
**
Size / Portability***(7.00)*
Your feelings about this ratings category will be based entirely on your frame of reference. If you’re used to a featherweight consumer SLR like Nikon’s D60, the heft of our D700-plus-lens rig will feel like you’re lifting a sack of bricks. On the other hand, if your point of comparison is Nikon's other full-frame-sensor cameras, the D3, then the D700 is a marvel of compact design. As mentioned earlier, at 35 ounces (995 g) for the body alone, the D700 is only about 6 ounces heavier than the D300, with its smaller image sensor. And when it comes to overall dimensions, the D700 is remarkably compact.
We lean toward the latter point of view. This isn‘t a camera you‘ll carry around casually, but when you have serious photographic results in mind, a little extra body weight seems worth the lugging, particularly with the camera’s expertly designed grip and balance characteristics.
Here’s a second Tale of the Tape comparison, this time with the D3 that shares the same image sensor:
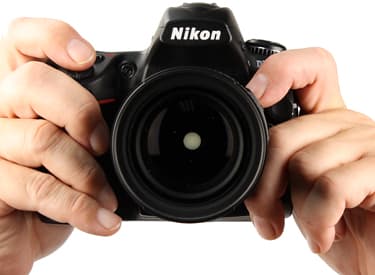
Handling Ability(7.50)
Full disclosure is required here: this reviewer is blessed with big hands. And you know what they say about men – big hands, big,um, camera. The right-hand grip on the D700 fits my grasp like it was custom tailored for my fingers, rock-solid and perfectly comfortable, in portrait or landscape mode. I can flip and turn and twist with ease. The relatively heaviness of the camera actually helps in my shooting. When I cradle the lens in my left hand, the front left edge secure in my palm and right hand grasping the rubberized grip, it would take an earthquake to knock that camera out of its firm resting place. And while I usually have my left hand supporting the bottom of the camera in portrait mode, I’ve found that shooting one-handed with my right works just fine, the weight of the camera keeping it as perfectly vertical as hanging a plumb bob.
You’ll rarely find "I" in a DigitalCameraInfo.com review, but in this case it seems editorially unavoidable. Some of you are going to have exactly the same reaction to the feel of the D700 as described above, while others will find extended shooting sessions leave them cursing the day they decided to take pictures with a couple pounds of hardware. Even I have to admit that, on travel days when I may or may not have the chance to squeeze off a few photos, a solid point-and-shoot with adequate manual controls seems a lot more seductive than a bag-bulging behemoth. But even those who fear forearm failure when confronted with the D700 will agree that the camera is well balanced and expertly shaped to maximize handling performance.
*

-
We found the D700 very comfortable, but your results may vary
**Control Button / Dial Positioning / Size **(10.00)
We count 34 buttons and dials on the D700 camera body, which sounds pretty intimidating. In practice, though, they are clearly labeled, well organized and mostly serve only a single function each, making the control scheme fast and effective. The use of two command dials, a larger one on the back and a smaller one in front, makes entering multi-part settings straightforward. When shooting in manual mode, for example, turning the main command dial changes the shutter speed, turning the sub-command dial changes the aperture setting.
Three of the buttons are customizable: the Function (Fn), Depth of Field (DOF) preview and AE-L/AF-L controls. This ability to tailor the controls can dramatically change the way the camera handles. For example, shifting to Live View mode ordinarily requires pressing the mode dial lock release, then turning the dial to the LV setting, a simple but relatively time-consuming procedure. If you shoot in Live View frequently, though, you can simply map it to the Fn button. One press and you’re ready to compose your shot on-screen.
The fit and finish of the controls are gratifying solid, with only one exception. Dials click into place with a solid click when turned, buttons are springy without feeling mushy. We do have an issue with the shutter button, though. It provides little tactile feedback when you hit the halfway-depressed stage, and is too easy to accidentally press fully if you’re jostled.
The exposure compensation button (top left)
is easy to reach while shooting.
Menu (8.00)
The on-screen menus are very easy to read, thanks to a clear typeface, bright lighting and that extremely high-resolution LCD display. All of the choices within the menu system are spelled out in plain English – the only icons you’ll need to recognize are those along the left side of the screen that identify the individual menus. Unlike some tabbed menu systems, which require moving the cursor all the way to the top of the screen in order to switch from menu to menu, each of the available menu sections are available by pressing the multi selector to the left once or twice. For newcomers, helpful on-screen explanations of most menu items are available by holding the Protect/? Button. For example, if you see "Custom setting bank" in the menu and don’t know what that means, pressing the ? button brings up the text "Store custom settings in one of four named banks (A, B, C or D) to be recalled as desired."
The onboard help system provides text explanations
of many setting choices.
The menu system is organized into six sections: Playback, Shooting, Custom Setting, Setup, Retouch, and My Menu.
Playback Menu
Shooting Menu
Custom Setting Menu
**
Setup Menu**

Retouch Menu
My Menu

Ease of Use (6.50)
For a system offering the D700’s level of control and customization, we were impressed with the camera’s ease of use. True, the options to micro-manage camera operations can appear intimidating, and the manual goes on for 444 pages, never a good sign. But the key point here is that you don’t have to wade through these choices to work with the camera: charge and install the battery, insert a memory card, turn on the D700, set it to Program mode and start shooting. And even when you do want to start tweaking relatively fine settings – adjusting white balance to precisely match shooting conditions, for example – the controls are nicely designed and easy to manipulate.
Modes
Auto Mode (7.25)
Unlike more consumer-oriented cameras, Nikon hasn’t implemented an idiot-proof Auto mode that locks out manual settings. Instead there is Program mode, which implements automated settings for exposure, white balance and other settings, but allows access to any hands-on settings the user chooses. Program shift is also available this mode: by turning the main control dial with the shutter held halfway down, the shutter speed / aperture value combination shifts in tandem, so you can control the balance between the two to favor action-stopping speed or detail-sharpening depth of field without changing the overall exposure value.
Movie Mode
Nikon recently introduced an SLR with a full-fledged movie mode, but that’s the D90, not this one. Like most SLRs, the D700 takes still photos only.
Drive / Burst Mode*(9.00)*
The continuous shooting mode capabilities are impressive, though the terminology used to describe the two modes is confusing. By rotating the release mode dial you can set either Continuous Low Speed burst mode or Continuous High Speed burst mode. The "Low Speed" setting can be set to shoot between 1 and 5 fps (frames per second )with the standard battery, or up to 7 frames per second with the optional MB-D10 battery pack attached. Continuous High Speed mode isn't adjustable the way the Low Speed mode is. It will shoot at the maximum available rate, 5 fps with the standard battery or 8 fps with the MB-D10 battery pack.
The self-timer is also adjustable, through the Custom Settings menu, to 2, 5, 10 or 20 seconds.
In addition, for those interested in experimenting with time lapse photography, there’s an Interval timer shooting mode (accessed through the Shooting Menu) that lets you leave the camera unattended and automatically shoot at user-defined intervals for a user-defined period of time.
**Playback Mode ***(8.25)*
Image playback toggles between two displays when you press the multi selector up or down. By default, the full-screen version shows image name, compression and image size settings, date and time taken and format (FX or DX). The detailed display adds a thumbnail image, histogram, shooting mode, shutter speed, aperture, ISO setting, lens zoom position, exposure compensation setting, white balance, color space and Picture Control mode.
The zoom in and zoom out controls on the left side of the camera back control image magnification during playback, with eight levels available. While zooming in, a thumbnail image is shown at the bottom right with the magnified section highlighted in yellow. As on other Nikon SLRs, turning the main control dial while zoomed in scrolls through recorded images, maintaining the same magnification setting. This is a wonderful tool for determining which image in a sequence of shots is sharpest.
When viewing a photo at full size, pressing the zoom out button brings up first a four-image, then a nine-image thumbnail display. Nikon hasn’t added a calendar or folder view during image playback, a feature we’ve found useful on other cameras.
There’s a very basic slideshow utility, with only an adjustable interval setting available, and no audio or transition effects between images.

Playback mode toggles between two views.
Custom Image Presets*(0.00)*
You won’t find the kind of "scene mode" preset combinations of exposure and image control settings offered in more consumer-focused cameras. There are four Picture Control settings, Standard, Neutral, Vivid and Monochrome, available in the shooting menu. Each of these options can be fine-tuned for sharpness, contrast, brightness, saturation and hue.
Control Options
Manual Control Options
The defining characteristic of a high-end SLR like this one is the breadth of controls it provides, and how easily you can access them. On both scores the Nikon D700 delivers exceptionally well. Automatic control systems consistently function well, which is important in even the most pro-oriented camera: in fast-changing situations, you want to point and shoot to capture the moment, not stop to tweak settings. That said, if your photographic eye says that a hair more sharpness, a slightly altered white balance setting under fluorescent light or an ISO setting between two common settings is your best option, the D700 offers precision control to make the camera match your preferences.
Focus
Auto Focus (9.50)
The D700 shares its 51-point auto focus system with the D3 and D300, which is a very good thing. It works fast and reliably, even in low-light conditions (in pitch dark, the bright auto focus assist illuminator kicks in, with good long-range results).
The continuous focus system takes full advantage of the breadth of focus points, in addition to the smarts of the predictive focus tracking technology. With the shutter pressed halfway down and the desired subject selected, the camera attempts to maintain focus based on observed movement patterns. We tried out the system on moving cars and a zig-zagging cat and found it worked effectively.
As mentioned earlier, the Live View system uses different auto focus systems depending on whether you’re shooting in Hand-held or Tripod mode. The Hand-held system uses the standard phase detection focus system used when shooting using the optical viewfinder, which ensures maximum precision and minimizes the situations in which the system fails to achieve focus, but at the cost of significantly slowing the shooting process as the mirror flips down for focus and back up again for shooting. In Tripod mode the D700 relies on a contrast-maximizing focusing system based on data from the image sensor itself. This system doesn’t have to black out the Live View image during focusing and, in our experience shooting stills on a tripod, produced sharp results.
Manual Focus (8.50)
Switching to manual focus mode is as simple as flipping a switch on the lens barrel. The viewfinder focus indicator works in manual mode as well as auto, displaying a dot to indicate the subject is in focus or arrows to indicate if the subject is behind or in front of the current focus position (though you don’t get the reassuring in-focus "beep" sound used in auto focus mode). The bright, clear viewfinder aids in manual focusing, as does the extremely high-resolution LCD display if you choose to shoot in Live View mode. You can also use the zoom-in and zoom-out buttons to magnify the Live View image while focusing, a major plus for studio shoots.
ISO (10.00)
As usual, Nikon plays a bit of a shell game when it comes to ISO specs. The official ISO settings, the ones presented with actual numerical values, range from 200 to 6400 (same as the D3, of course, since the two cameras share the same image sensor). There’s also an "expanded range" on the low end (down to ISO 100, labeled Lo1) and the high (up to ISO 25,600, labeled Hi2). We didn’t see much need for the lower ISO settings: given the camera’s exceptional low-noise performance, throttling down below ISO 200 doesn’t provide an image quality advantage, and we prefer not to imagine a shooting situation so blindly bright that ISO 200 won’t provide an acceptable exposure. On the high end of the extended ISO range, there could be situations where pushing to one of the three levels between ISO 6400 and 12,800 might prove useful in a pinch, though given the results we achieved at ISO 6400, we’d hestitate to go any further. As for the top ISO 25,600-equivalent setting, this seems more tailored to marketing than photography based on the image quality we experienced.
Low, Normal (default) and High levels of noise reduction are available. These can be turned off, though noise reduction will still kick in when shooting at an ISO setting of Hi 0.3 or higher.
Auto ISO setting is also available, Users can choose the range of minimum shutter speed and maximum ISO setting allowed.
White Balance (9.50)
In addition to auto white balance control, the D700 offers presets for sun, shade, fluorescent (seven settingsf or different bulb types), incandescent and flash, or numerically specify a Kelvin temperature setting. Each of the presets can be further refined by moving a cursor around an on-screen color map. You can also create a custom white balance setting by shooting a neutral grey or white surface, and store up to five custom white balance settings for future use. White balance bracketing is available while shooting, with up to 9 automatic exposures bracketed by as little as 1 mired.
Exposure (10.50)
The usual PASM suspects (Program, Aperture-Priority, Shutter-Priority and Manual) are provided. Program shift mode, controlled by turning the main command dial after Program mode calculates an initial exposure, shifts shutter speed and aperture value in tandem to preserve the same overall light level. Exposure compensation is also convenient – an index finger on the control to the right of the shutter, a thumb on the main command dial – and extensive, with values from -5 to +5 EV.
Auto exposure bracketing is available, down to 1/3 EV increments and up to nine shots.
Nikon’s Active D-Lighting system attempts to boost detail in shadowed areas and restrict exposure in overly bright regions that would ordinarily blow out. As with the D3, settings of Low, Normal and High for this function are available (the default is Off). The D700 adds a new wrinkle with an Auto setting, allowing the camera to determine when the image requires tweaking. A similar effect, called D-Lighting, is also available after the fact, through the Retouch Menu.
Metering (8.50)
For most shooting situations Nikon recommends using the 3D Color Matrix Metering II auto exposure mode, introduced in the D300 and D3. This system uses a 1005-segment RGB sensor to analyze a large portion of the overall frame and determine the optimal overall exposure settings.
Center-weighted metering is also available. The default area for center-weighted metering is a 12mm circle in the center of the viewfinder. Given the extraordinary level of user control, this area can be adjusted to 8, 12, 15 or 20mm.
Finally, spot metering targets a central spot representing about 1.5% of the total image area.
Shutter Speed (11.00)
Available shutter speeds range from 1/8000 of a second to 30 seconds. There’s also a Bulb setting which holds the shutter open indefinitely.
Aperture
The D700 provides a depth of field preview button to the left of the lens, which stops down the aperture to provide an accurate indication of what will actually be in focus when the photo is taken. Depth of field preview doesn’t work when shooting in Live View mode, though.
Image Parameters
Picture Quality / Size Options (9.25)
The D700 CMOS sensor has a gross pixel count of 12.87 million pixels, and an effective resolution of 12.1 megapixels. The FX-format sensor measures 23.9 x 36.0mm, matching the size of a 35mm film frame.
Using an FX-format lens, three image sizes are available 4256 x 2832 (L), 3184 x 2120 (M) and 128 x 1416 (S). With a DX-format lens (which results in a 24 x 16 image area, a subset of the full 36 x 24 sensor size), image sizes are 2784 x 1848 (L), 2080 x 1384 (M) and 1392 x 920 (S). There are no really small native image sizes that would be appropriate for web postings or emailing, nor is there an image resizing option in the Retouch menu.
The D700 supports JPEG, TIFF and RAW (NEF) file formats. JPEGs are available in three quality settings, fine, normal and basic. There are two JPEG compression options, a Size priority mode that aims to achieve approximately the same file sizes, and Optimal quality, which prioritizes image quality over file size.
Files shot in Nikon’s own RAW format, NEF, can be stored Uncompressed, with Lossless compression (the default setting), which shrinks file sizes without losing any data, or Compressed, which does sacrifice some data but shrinks file sizes by roughly 40-55%. Users can also choose between storing NEF files in the default 12-bit mode or with 14-bit color data.
NEF (RAW) files can be shot with the same image automatically saved as a separate JPEG file (at any of the three available JPEG quality settings), making a version of the photo available without post-processing on the computer.
The D700 can also shoot in uncompressed TIFF (RGB) format, producing files that are very large, but also fully compatible with most image editing software.
Picture Effects Mode*(8.50)*
As mentioned in the Custom Image Presets section, the Nikon Picture Control System offers four shooting settings, Standard, Neutral, Vivid and Monochrome, each of which can be fine-tuned for sharpening, contrast, brightness, saturation ad hue with anal retentive precision. What’s more, these settings can be saved to a memory card and copied from compatible camera to camera (the D3 and D300 use the same Picture Control System format), so you can tweak every Nikon in your collection to the same image settings in an instant.
Both the sRGB color space and Adobe RGB are supported by the D700. Ordinarily the default sRGB is the right choice, but for files to be used in a commercial printing environment, or subject to extensive retouching, the more in-depth Adobe format is preferred.
Additional image adjustment tools are available in the Retouch Menu. D-Lighting, a dyanamic range enhancement system similar to the Active D-Lighting option offered while shooting, After choosing a stored image, the display shows side-by-side before-and-after thumbnails displaying the relative effects of low, normal or high D-Lighting processing.
The D-Lighting control provides interactive feedback
when setting retouch levels.
In-camera red-eye fix and image cropping are available. Monochrome processing, in black-and-white, sepia and cyanotype, are also available in the Retouch menu, with adjustable lightness and darkness for the sepia and cyanotype effects. Filter Effects digitally mimic the impact of a skylight or warm filter. The Color Balance option allows adjustments along the red, green and blue axes viewing a thumbnail image and individual histograms, though the thumbnail is too small to make this a very practical tool.
Finally, the image overlay option combines two images shot in NEF (RAW) format, with user control over the relative gain of each component photo.
Connectivity / Extras
Connectivity
Software (5.25)
The D700 comes with two disks, one with Nikon Transfer and ViewNX software, the other with a 60-day trial version of Capture NX2. We actually like working with Capture NX2 software: it employs Nik Software’s U Point system to allow quick image adjustments without creating masks, and allows full editing capabilities for Nikon’s NEF RAW format files. Unfortunately, this is just a trial version, and continuing to use the software beyond the initial period will run you $179.99 – ouch! Nikon Transfer is a fairly ordinary program for off-loading pictures from the camera, one you’re unlikely to use. As for ViewNX, it has a few attractive features, including an adequate image browser and the ability to open and minimally adjust NEF files (for exposure compensation, white balance and Picture Control). You can also apply D-Lighting effects (useful, though there are only three levels of control) and Color Booster (basically ramping up saturation) to any file. Strangely, though, there are no basic editing functions such as cropping and adding text.
Jacks, ports, plugs (8.50)
All connectors are industry-standard rather than proprietary cables, which immediately earns Nikon points: nothing more frustrating than traveling with a camera and discovering you forgot the cables or, worse yet, lost them and have to buy expensive proprietary replacements. There is a mini HDMI port for connecting directly to a high-definition television, a composite out jack for standard TV output, and a mini USB plug for connecting to a PC. We were pleased with how quickly the D700 transferred files via USB – it was faster and easier to plug in the camera rather than pop the card out and slip it into a reader. There’s also a four-pin DC In connector for an optional external power supply.
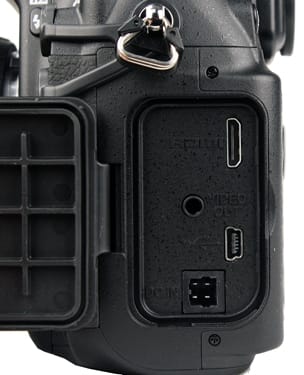
*The major connectors, for video output and USB,
use industry-standard cables.
*
Direct Print Options (6.00)
Connecting via USB to a PictBridge-compatible printer for output without a computer is fully supported, including specifying page size, number of copies, border and time stamping along with in-camera cropping and index sheet printing of thumbnails. DPOF (Digital Print Order Format) is also available, which allows you to create a file specifying which pictures on a memory card you want output, with desired quantities, and hand the card to the smiling clerk at your local photo service center for printing.
Battery (9.00)
The D700 uses the tried-and-true EN-EL3e lithium-ion rechargeable battery. Nikon says this battery should handle about 1000 shots using CIPA-standard testing (firing the flash every other shot) or 2500 shots using Nikon‘s own, non-flash test methodology. While the Nikon number does seem overly generous, there’s no question that we were able to take over a thousand shots without recharging during our testing operations.
The optional MB-D10 battery pack allows use of a wide range of different batteries, including several types of Nikon rechargeable and AA-format cells. With the MB-D10 installed, the maximum burst mode rate jumps from 5 to 8 frames per second.
Memory (3.00)
The D700 uses Type 1 CompactFlash cards, including the new, faster UDMA variety. There’s no longer support for the Type 2 format used for micro drives, but odds are you’ve outgrown that format anyway. One difference on this score between the D700 and its big-brother D3: the D3 can accommodate two memory cards simultaneously.
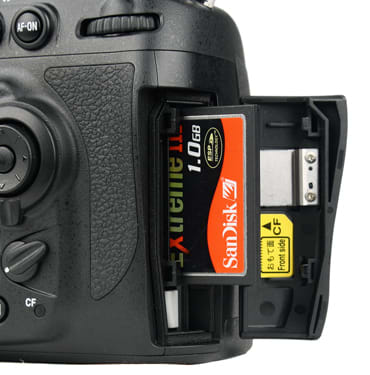
The D700 uses inexpensive, readily available
CompactFlash cards.**
**
Other features (10.00)
Dust Reduction
Here’s an area where the D700 actually outshines the D3, which was released before Nikon’s dust removal technology, which vibrates the optical low pass filter over the image sensor to remove errant flecks and flakes, was available. The camera can be set to shake its groove thing at startup, shutdown or when manually triggered. If any stubborn spots remain, their location can be tracked by taking an Image Dust Off reference photo to be used in conjunction with Capture NX2 software.
*Virtual Horizon
*The Virtual Horizon feature is basically on on-screen level that lets you know whether you're holding the camera straight. It's visible in the viewfinder, if you enable it, as a set of bars that lengthen or shorten right and left of a central point. When you're shooting in Live View mode, the Virtual Horizon can be overlaid on the LCD screen itself, looking like an airplane cockpit instrument. Whether this is a useful feature or virtually useless will depend on the type of shooting you undertake, but Nikon certainly earns points for innovation.
*Optional Accessory Compatibility
*The D700 is compatible with Nikon’s WT-4 Wi-Fi transmitter and Ethernet connector ($729) for sending images from the camera to a computer while still shooting. This accessory can also be used with Camera Control Pro 2 software to snap pictures wirelessly (an optional cable is also available for remote picture-taking).
The camera can also be connected to an external Garmin GPS unit via the 10-pin remote control terminal, allowing latitude and longitude data to be stored with your images for geotagging.
Overall Impressions
Value (10.00)
High price and value can go hand in hand, as they clearly do with the Nikon D700. Nearly all the features of the $5000 Nikon D3, including its full-frame, low-noise image sensor, are packaged here in a more portable package for 60 percent of the price.
Comparisons
[

](https://www.reviewed.com/cameras/content/Canon-EOS-1D-Mark-III-Digital-Camera-Review-14943.htm)
**Canon EOS-1D Mark III– **The Mark III performed very well in our testing, notching excellent resolution and color reproduction scores. It also shoots at a blistering 10 frames per second (the D3, which is more directly competitive at the $5000 price point, shoots 9 fps). However, the D700 offers a much wider range of ISO settings, effective Live Preview on a far superior LCD screen and sells for $2000 less
.
[

](https://www.reviewed.com/cameras/content/Canon-EOS-40D-Digital-Camera-Review-16721.htm)
***Canon EOS-40D* – **For Canon shooters, the 10.1-megapixel 40D offers Live View on a 3-inch LCD, a 6.5 fps burst rate (versus 5 fps for the D700 without the external battery pack) and picture style settings that work much like Nikon's Picture Control system along with automatic dust reduction. What's more, it turned in impressive results in dynamic range and low-light testing. At $1299 with a kit lens, it represents a very good value.
[

](https://www.reviewed.com/cameras/content/Nikon-D300-Digital-Camera-Review-17713.htm)
Nikon D300**–**The 12.3-megapixel D300 shares many important features with the D700, including the excellent high-res LCD display, well-designed controls and a functional, if not blazing-fast Live View mode. The topnotch 51-point auto focus system is also common to both cameras, along with Nikon's active dust reduction system. Image noise in low light is good, though of course it can't match the D700 or D3 on this score. At $1800, the D300 is a camera we're pleased to recommend to serious amateurs, even if it doesn't shake conventions the way the D700 does.
[

](https://www.reviewed.com/cameras/content/Sony-DSLR-A200-Digital-Camera-Review-18588.htm)
Sony Alpha 200** –**Why compare a $500 digital camera to equipment that is clearly in a different class? Because it's intriguing how much you can buy in today's market for so little. The A200 posted lower scores in color and resolution testing than the competition, but not by so much that a casual observer would be struck by the difference perusing a pile of snapshots. When it came to image noise, the A200 actually outperformed two out of four other cameras in the lineup, though low noise shooting was a notable problem area. The D700 is clearly a far more desirable purchase, if you have the cash, but you could outfit a family of six with A200s at the same price.
**Who It’s For ***
Point-and-Shooters* – Yes, you could theoretically point-and-shoot with the D700, since auto settings consistently produced attractive pictures. Live View mode is too slow and clumsy to use on a regular basis, though, and seeing the image on the LCD rather than squinting through an eyepiece is a hallmark of point-and-shoot photography. A plethora of image presets is also useful for this crowd, and this camera lacks those convenient training wheels for the uninitiated.
Budget Consumers – Not a good match on the face of it, at $3000 for the camera body plus more for a lens. Yes, we gave the D700 high marks for value based on its feature set and competitive spot in the market, but that's a long way from a recommendation for penny-pinchers.
Gadget Freaks – A great gadget lets you perform some useful trick that inspires awe and wonder among less well-equipped mortals. By that standard, the D700's ability to grab photos at ultra-challenging illumination levels gives it enormous bragging-rights allure for gadget aficionados. Still, the camera is fundamentally dedicated to photographic excellence rather than dishing up bright and shiny bells and whistles, and any gear that costs over three grand hardly seems like a 'gadget.'
Manual Control Freaks – Perfectionists and hands-on fiddlers will have a field day with the Nikon D700. You have custom control over every conceivable setting, from the programmable function of three separate buttons to the pitch of the beep when auto focus is achieved. What's more, groups of settings can be stored in four different banks (renamable, of course), to keep them easily accessible.
Pros / Serious Hobbyists – There are a handful of reasons a pro or pro wannabe might choose the D3 over the D700, most notably a faster burst mode, dual memory slots and a shutter with a 300,000 lifetime rating, double the D700. Considering the fact that the D700 incorporates the dust reduction system the D3 lacks, and the huge portability advantage of the newer camera, though, we'd be inclined to buy the D700, pocket the $2000 price difference and use it to travel somewhere photogenic.
Conclusion
**
Conclusion**

The Nikon D700 and its big brother, the D3, allow you to take available light pictures in near darkness, with remarkably little image noise. This is not a subtle enhancement: it opens the door to new photographic possibilities. While the most spectacular examples come when you crank up the ISO setting to 6400 or more and go lurking in the dark, the option to shoot at 800 or even 1600 and achieve a hand-holdable shutter speed wielding a telephoto lens, while paying a minimal price in added image noise, is not to be taken lightly.
Beyond this marquee capability, the high-resolution 920,00-pixel LCD made us smile every time we reviewed a photo we'd just taken, and even made Live View mode (not an SLR favorite feature around here) a lot more attractive. The Nikon auto focus system continues to deliver both the speed and sharpness we've learned to expect. And of course you could go broke happily buying additional goodies for your new photographic companion, from the plethora of tack-sharp Nikkor lenses to additional eyepieces, a network adapter and even a GPS for geotagging your photos. Our lab work didn't produce the stellar numbers we expected in all instances, most often because the color-enhancing idiosyncracies of the camera's default settings didn't jibe well with our standardized testing procedures. Shooting in the field, though, we became strong fans of this mini-D3.
Sample Photos
**Sample Photos
Click on any of the images below to view the full-sized original image. However, please note that some of the images are extremely large (up to several megabytes) and could take a long time to download. **
**
You can browse photos taken with the D700 at the following photo hosting sites.**
[
](http://search.fotki.com/?q=D700)[
](http://www.smugmug.com/search/index.mg?searchWords=D700&searchType=global&x=0&y=0)
Specs / Ratings
**Specs Table
**{{manufacturer_specs_table}}{{raw_scores_table}}
Meet the tester
Steve Morgenstern
Editor
Steve Morgenstern is a valued contributor to the Reviewed.com family of sites.
Checking our work.
Our team is here to help you buy the best stuff and love what you own. Our writers, editors, and experts obsess over the products we cover to make sure you're confident and satisfied. Have a different opinion about something we recommend? Email us and we'll compare notes.
Shoot us an email