Pros
Cons
Physical Tour
Front(7.50)
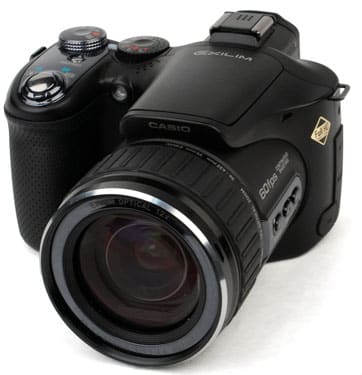
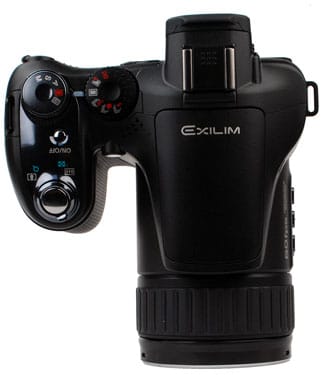
The EX-F1 provides a very deep, dimpled hand grip on the left side in a slightly rubberized material that contrasts with the overall hard plastic body. There’s a substantial indentation in the grip below the shutter to serve as a rest for your middle finger. This helps position your index finger in just the right shutter position as soon as you grab the camera.
Between the hand grip and the lens is a small green auto focus assist lamp. The large lens barrel juts out on the right side of the camera. At the top it’s labeled "EXILIM OPTICAL 12X", at the bottom the lens specs are spelled out. Above the lens is the word "Casio" printed on the angled front edge of the pop-up flash housing.

If not for the lack of a viewfinder hump,
you might mistake the EX-F1 for an SLR.
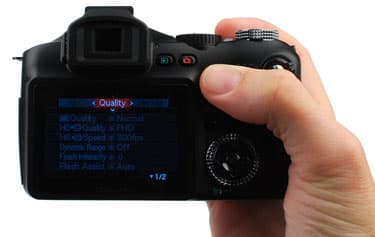
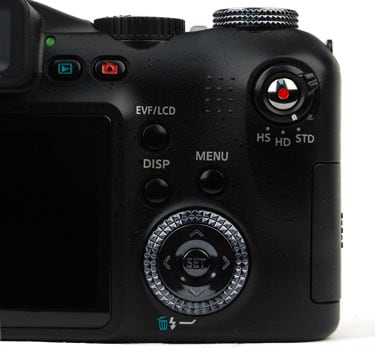
Back (6.25)
The 2.8-inch LCD screen takes up the lower left of the camera back, slightly raised with a smooth beveled edge. Centered over this display is the electronic viewfinder (EVF), surrounded by a fairly stiff rubber eyecup that protrudes about half an inch from the camera body.
To the right of the LCD is a cluster of black single-purpose buttons clearly labeled with silver text. On top is the EVF/LCD toggle control for shifting between viewing on the LCD and the electronic viewfinder. To the right of this button is a 12-dimple pattern that lets you know your thumb is properly placed for holding the camera without accidentally depressing the movie shutter button - this is an issue, as we’ll discuss later.
By default, when the camera is off, pressing either the Playback or Record button will turn the camera on in the appropriate mode, without a side trip to the ON/OFF button on top of the camera. This can be defeated via a menu setting if you prefer. These buttons can also be used to turn the camera off, though that’s not the default setting.
Below the EVF/LCD button is the DISP button, which controls how much information is displayed on screen or in the viewfinder. Next to this is the MENU button.
On the right is the movie shutter button, highlighted by a red dot in the middle. Around this shutter is a control that pivots into three positions: HS (High Speed), HD (High Definition) and STD (Standard). There’s a prominent bump sticking out from this control to let the user pivot it effectively with the ball of the thumb. This design has a problem, though, because it makes it more difficult to press down on the movie shutter lodged in the center: the bump gets in the way.
Unlike many cameras, you can’t shift from Playback to Record mode by pressing down on the shutter button. Instead, you have to press the small red Camera button. While the button is well placed under your thumb while holding the camera (assuming you have large hands), the shutter button mode swap is a faster way to grab a shot that comes up unexpectedly while you’re admiring your previous photos.
At the lower right of the camera back is an interesting control combination: a four-way controller, with a set button in the middle, surrounded by a rotating control wheel. In menu operations, camera settings or when scrolling through photos, the buttons and the wheel have the same function, moving you forward or backward through choices. If you’re moving a cursor a step or two down a menu, the four-way buttons work just fine. If you want to move quickly, though (particularly when scrolling through stored photos), the control wheel zooms through your options much faster.
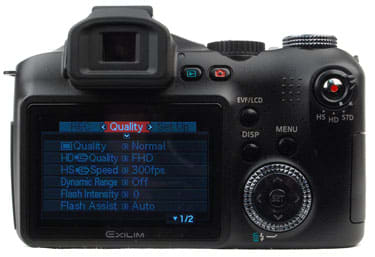
The red button on the back is the movie mode shutter.
Left Side* (5.50) *At the back of the camera’s left side is a tethered snap-off port cover, which we can’t imagine opening successfully without fingernails (abandon hope, all ye nail-biters). Reseating the cover can also be a chore, since the plastic tether holding it to the camera tends to get in the way. When closed it’s reasonably secure, though we worry that rain could make it past the less-than-tight-fitting edges.
Under the cover are a power connector for an optional 9-volt adapter, a mini HDMI port for connecting an optional cable to an HDTV, a proprietary connector that does dual duty for both USB and AV connections, and a round plug for an industry-standard microphone.
The camera body has a handsomely sculpted shape that nicely combines secure handling practicality with aesthetic flair. The side narrows from full-width to lens-width by way of a curved body section. Within the crescent-shaped nook this design creates are three more camera controls: from front to back, Focus, Backlight Compensation (represented by a sun icon, with no explanatory text) and AE-L/AF-L (auto-exposure lock / auto focus lock). Above these controls "60 FPS CONTINUOUS SHOOTING" is boldly printed, and below the controls "DIGITAL CAMERA EX-F1" appears. All the text is printed in a metallic gold ink that manages not to appear gaudy thanks to the clear but slender typeface. The only fashion faux pas we spotted was a gaudy gold stick-on label printed with "FULL HD 1920 x 1080". Fortunately this one’s a sticker that can be removed.
The black eyelet for connecting a camera strap (a much better choice than the traditional silver given the camera’s overall look) sticks out quite far from the left side to make threading the loop easy.
The diopter control dial is located on the left side of the electronic viewfinder. It’s very difficult to turn, requiring fingernails and dumb luck to hit the desired position.
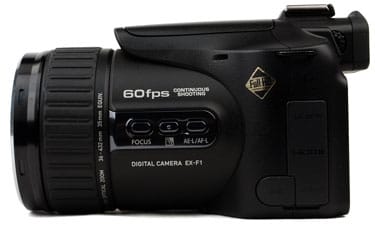
Your left hand can readily access the focus,
backlight compensation and AE-L/AF-L controls.
The right side of the camera is largely taken up with the side of the textured hand grip. Behind this is a slide-back, pop-out door concealing the SD card slot. A patch with raised plastic bumps on the door makes it easy to open, but the solid latch and smooth fit of the edges along the door makes it unlikely you’ll open it accidentally.
Above this door is a black metal eyelet for attaching the camera strap. Unlike the left side eyelet, this one is recessed in a well in the camera body, which makes it exceedingly difficult to connect the camera strap.
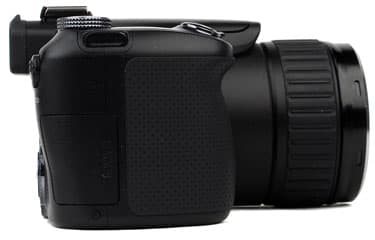
*The memory card slot door is secure yet easy to open.
*
On the right side of the camera top are two side-by-side dials. The one on the left is the CS (for Continuous Shot) dial, with six icons printed in silver and red. These represent, in clockwise order, Flash CF, Prerecord, High-Speed CS, Single Shot, Slow Motion View and Bracketing. Next to this is the Mode dial, with five settings: the unfortunately named BS (for Best Shot), Auto (an orange rectangle), A (Aperture), S (Shutter) and M (Manual).
Moving forward toward the front of the camera we encounter a small silver On/Off button, inset into the body so the top of the button is flush with the top of the camera, preventing accidental pushes. In front of this is the zoom control, with a prominent off-center bump in the front to catch your finger. The zoom control encircles a large silver shutter button.
*My what a big lens you have, EX-F1 - the
better to span 36mm - 432mm.*
The bottom of the camera features a metal tripod socket on the right, centered under the lens, and a latched battery compartment door. The tripod socket seems sturdy enough, though the ridged bottom of the camera attracts scratches when it butts up against the tripod plate.
The battery door is one more instance where fingernails are a necessity, but the latch does flip shut securely when closed. A small sliding clip keeps the battery from falling out accidentally when the door is opened.
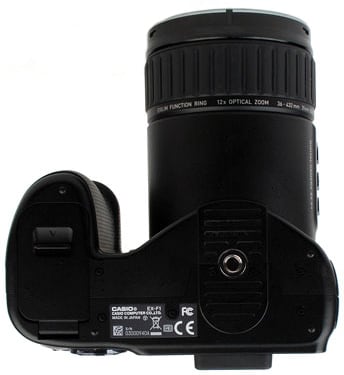
*The EX-F1 proved secure and steady when tripod-mounted.
*
Testing/Performance
Components
Viewfinder*(1.75)*
The electronic viewfinder, an 0.2-inch display with 201,000-dot resolution, appears large and clear enough, though we did find it difficult to see the entire screen at once while wearing glasses. The edges of the eyecup obstructed the view, creating a kind of tunnel vision that cut off the top and bottom, left and right edges. This is particularly troublesome since all of the menus appear in a strip at the far right side of the display. Without glasses, the problem disappears, but Lasik surgery shouldn't be required to use a camera properly.
On the plus side, viewfinder brightness can be adjusted to one of three levels based on user preference, and the settings make a noticeable difference. Another nice touch: you can overlay a nine-section grid over the shooting display, in the viewfinder or the LCD screen (through a setup menu choice), to help with horizontal and vertical alignment while shooting.
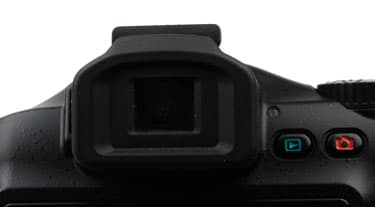
The EVF is bright enough, but hard to use with glasses on.
******LCD Screen**(6.25)
The 2.8-inch LCD screen, with 959 x 240 resolution (230,160-dots total) provides an accurate view when it comes to image framing and color reproduction. It does get the grainy jitters when working in low light, but not enough to interfere with framing your shot. The screen can be set to four different brightness levels, either automatically (the camera senses ambient light and adjusts accordingly) or manually. We found the +1 setting was a good indoor/outdoor choice. It does become difficult to judge colors on screen when shooting in bright light, but seeing what you’re shooting is possible even in the summer glare.
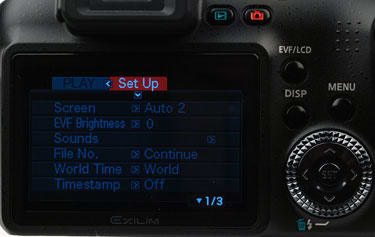
Clear legible type with good color highlighting
make the LCD easy to read.
Flash (8.50)
**The flash pops up automatically when settings require it. There is no physical button you can press to pop up the flash, or engage flash mode. This is unfortunate, since having to go through the on-screen menu is slower than simply pushing a flash button or lifting the flash into position, the systems used in most consumer-level SLRs with built-in flash. The height of the flash when engaged, at a full two inches above the camera body, is a big plus when it comes to avoiding red-eye when shooting in darkened rooms. While the flash pops up automatically, you’ll have to lower it by hand.
Casio gives the flash range as 1.6 to 22 feet (0.5 m to 6.7 m) at the widest angle setting, and 3.6 to 12.8 feet (1.1 m to 3.9 m) at the furthest telephoto. As expected, the flash can’t achieve the same range when shooting in continuous mode, at up to 7 frames per second. During continuous shooting the flash range is cut roughly in half, which is still impressive performance compared to the built-in flash in any other camera we’ve tested.
The red lamp next to the viewfinder flashes when the flash is recharging. If you’re shooting with flash, you’re locked out of taking a photo until the charge is complete. According to Casio, recharging the flash can take up to 9 seconds with a fully charged battery depending on temperature, but during our testing we never waited more than a second or two.
There are five flash settings: Auto flash, Flash off, Flash on, Red Eye Reduction and External Flash. ****Flash intensity can be set to 13 different levels, from -2.0EV to +2.0EV, in 1/3EV increments.****
For shooting movies, or stills at faster than 7 frames per second, the LED light can be turned on as a source of constant illumination. Pressing the bottom of the four-way controller turns the LED on and off while in movie mode, though this won’t work while shooting high-speed movies.
Flash assist can be turned on when a subject is not receiving adequate illumination in a dark setting. This feature uses an image processing algorithm to boost the brightness of the areas that are bright, but not as bright as they would be in a properly exposed image. Of course, this kind of processing noticeably increases image noise. We prefer tweaking the exposure in an image editing program, though point-and-shooters may be satisfied capturing an acceptable photo in difficult conditions with flash assist.
There is also an industry-standard hot shoe on top of the camera for connecting an external flash. You have to manually select External Flash (by pushing the four-way controller to the right) to avoid having the built-in flash pop up automatically, which is inconvenient.
**
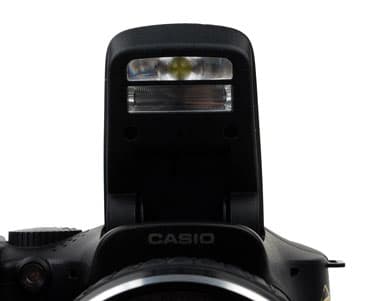
A standard photo flash is positioned above
an LCD lamp that provides continuous illumination.
Zoom Lens(7.00)
The EX-F1 doesn’t have that long snout up front for looks alone – it incorporates a powerful 12x optical zoom lens that ranges from 7.3mm to 87.6mm (equivalent to 36mm-432mm for a 35mm camera). At f/2.7 the lens is reasonably fast at the wide setting, though the maximum aperture plunges to f/7.3 at the full zoom setting, requiring plenty of illumination to take a sharp photo. The lens consists of 12 elements in 9 groups, including one aspherical lens. Image stabilization is handled through shifting the internal light sensor rather than optical lens elements.
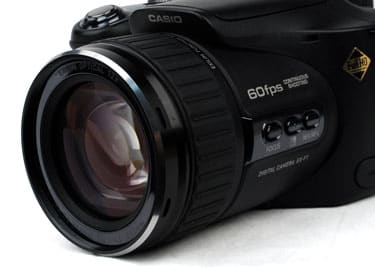
The EX-F1 zoom is equivalent to a 36-432mm lens on a 35mm camera.
A 4x digital zoom multiplier is also available, making the maximum theoretical zoom to 48x. Ordinarily, we just disable the digital zoom option when setting up a camera and leave it off. However, if you are shooting at 4 megapixels or lower with the EX-F1, you can employ digital zoom without lowering image quality, since the system can use a smaller pixel area in the middle of the sensor, producing a higher apparent zoom, without lowering final resolution. This can be useful when shooting movies, which are captured at lower resolutions than stills.

Three shots of the statue atop Grand Central Station, taken from precisely the same spot.
By default, the zoom lens is controlled using a side-to-side switch located around the shutter button. This zoom control is reasonably smooth and precise for a point-and-shoot camera, though it does jump unevenly from setting to setting at higher magnifications. We like the fact that, while you zoom, a numerical reading of the 35mm-equivalent zoom lens setting is displayed at the center left of the screen. Another nice feature is the option to program the ring around the lens barrel to work as a zoom control, just the way you'd work with a traditional SLR lens. There is a problem here, though: the ring isn't geared the way a zoom lens would be, meaning you get less zoom movement than you'd expect as you turn. That's great for fine adjustments, but for quickly zooming into the action, the standard zoom lever control is faster.
Design / Layout
Model Design / Appearance*(7.50)*
This is one handsome camera, with an elegantly curved body that seems to be swooping forward toward your next photographic adventure. Of course, that impressive-looking 12x lens is part of the appeal, but we admire the way the glass has been integrated into the overall design to create a cohesive look. Even the few shiny flourishes, including the glossy panel on the top right of the camera and the button panel on the left, behind the lens, are fun highlights rather than intrusive design interruptions.
**
Size / Portability** (5.50)
The EX-F1 is a substantial piece of hardware, at 5.03' x 3.13' x 5.1' (127.7 x 79.6 x 130.1 mm) and a hefty 23.67 oz. (671 g.) without the battery. It may not have interchangeable lenses, but in shape and size it might as well be a digital SLR, meaning portability is not going to be this camera's strong suit, even compared to other ultra-zoom models. The Olympus SP-570 UZ, for example, with its 20x optical zoom, weighs just 15.7 oz. (445 g.).
Handling Ability(6.00)
Coming to grips with the EX-F1 requires some comfort compromises. The right-side hand grip protrudes roughly an inch and a quarter from the camera body. If you have large hands, that's enough to curl your fingers tightly around the grip, just touching the camera body between the grip and lens, shutter finger well positioned for stills, thumb securely on a dimpled area just right of the movie-mode shutter. In fact, one-handed shooting is very practical with this model, especially when using the LCD rather than the EVF for lining up your shots. Go for the two-handed grasp, though, and you may find finger traffic congestion sets in. Cradle the lens with your left hand and your fingers try to curl into the same indent where your right hand is holding the grip. We found the best two-handed hold required a little delicacy on the left side, basically crooking your index finger and resting the barrel on that. With a little practice this worked just fine, but it did take some fiddling to find that comfort zone, and it's hardly intuitive.
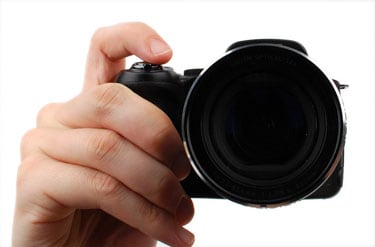
The EX-F1 is comfortable for one-handed shooting,
but a two-handed grip can be cramped..
**Control Button / Dial Positioning / Size **(8.25)
Even when you've found a comfortable grip, there's still the nagging problem of that movie shutter positioned on the back of the camera. After working with the EX-F1 for weeks we still hit that button accidentally far too often, sometimes when trying to shoot stills, sometimes just when carrying the camera around. Somebody at Casio made the design decision that being able to choose between shooting movies and shooting stills using separate shutters, without going through the extra step of changing modes with a menu or button selection, was the way to go. And yes, this arrangement does open up the possibility of shooting stills while recording movies. We just wish they'd found a better spot for the movie shutter – maybe over on the left side, where three buttons already find their home – so we wouldn't end up with quite so much video footage of our desktop, or the sidewalk, or the inside of the lens cap.
Other than that snafu, the controls are well designed and readily accessible. Very few buttons serve dual purposes, which makes the typical squinting for blue labels on a black camera body unnecessary. The combination four-way controller/ control dial on the back of the camera is a clever spin (literally) on the standard control scheme. For most operations, we still found ourselves pushing the controller sides up or down, left or right for most operations. However, when you want to whiz quickly through photos in playback mode, the control dial is a much faster solution. We like having this option, and appreciate the intuitive way it works.
The Function Ring around the lens barrel is another well-designed feature. It looks and feels like the zoom control of an SLR lens, and can be used for that purpose, but it’s actually a programmable control that can be assigned to zoom, or manual focus, or changing the continuous shutter speed setting on the fly.
The combination of a central 4-way controller surrounded by a
spinning circular wheel proved very efficient.
Menu (7.50)
There are separate sets of menus for Play and Record mode, which is a mixed blessing: it keeps the display simple, but it does mean you can't change all the settings you might like in one place. In addition to the menus that take over the screen when you press the MENU button, the record mode for stills and movies also offers an always-on Control Panel strip menu down the right side of the screen that keeps frequently used adjustments, such as flash setting, ISO and white balance readily available. It's an arrangement that works very well in practice, since you never have to hunt for a buried menu setting or a particular button to make day-to-day adjustments while shooting.
The on-screen menu displays are well organized and easy to read, with white text on a gray background and a bright red highlight to indicate your position in the menu structure. A navigational problem does comes up when you want to move between two on-screen menu sections – from REC to Quality to Set Up while shooting, for example, Pressing right or left on the four-way controller opens the options for the item that's currently highlighted, but doesn't move you between menus. Instead you have to maneuver the highlight all the way to the top of a column before you can move between sections, which can be time-consuming.
Another navigational oddity comes when choosing from a sub-menu, such as the Anti-Shake setting or adjusting flash intensity. The instinctive way to do this is to highlight your selection and then press the SET button in the middle of the four-way controller. That works fine, but it also closes the menu system, when you may well want to make additional settings. To stay in the menu system and make more changes you're expected to simply highlight your submenu choice, then move left using the four-way controller to return to the previous menu. Getting used to this is a minor annoyance, granted, but the number of times we grunted a Homer Simpson 'D'oh!' during testing because the menu screen had disappeared unexpectedly indicates this wasn't the best design choice.
**
**
****
Ease of Use (5.75)
This is a relatively complex camera, with its multitude of modes and capabilities, many of which have never been seen before. In fact, it takes a 185-page manual to explain it all, which unfortunately is provided only as a PDF file and not a printed document. We’re not big fans of grinding up trees unnecessarily, but in this case the manual is required to take full advantage of your $1000 purchase, and computer-based manuals don’t travel well when you take your camera out to shoot. And if you’re going to create a 185-page manual, wouldn’t it make sense to include an index?
Beyond documentation issues, using the EX-F1 is pretty easy once you get the hang of it. The dual control-dial system on top of the camera – one for exposure modes, one for shooting modes – organizes choices well. Similarly, the three-position selector around the movie shutter makes changing between standard movie, high-def movie and high-speed movie modes crystal clear.
Modes
Auto Mode (3.50)
While many cameras today feature a Program mode that automates exposure control and an idiot-proof Automatic mode that takes over virtually all of the camera’s controls, Casio makes due with a single mode it calls Auto, which is equivalent to what most manufacturers label 'Program.' Leave the camera set to Auto and you're still responsible for setting ISO, white balance, metering pattern and auto focus pattern, which other cameras generally handle when a user chooses the Auto mode.
Movie Mode (10.25)
The EX-F1 offers three distinct movie modes for starters, with a dazzling, perhaps dizzying array of choices within each.
Standard Movie Mode: With the Movie Mode Selector switch set to STD, movies are shot with a 4:3 aspect ratio, 640 x 480 resolution, at 30 frames per second. The maximum movie size is 4 gigabytes, which works out to nearly three hours. Best Mode presets are available, along with sensor-shift anti-shake, though face detection is turned off. The built-in stereo microphones are used, or you can plug in an external mic. The special YouTube capture mode allows lower-resolution video capture (432 x 192, 512 x 384) without audio, along with standard-resolution video with stereo soundtrack.
High Definition Movie Mode: With the Movie Mode Selector set to HS, the EX-F1 shoots in 16:9 format with resolution set at either 1280 x 720 (30 frames per second) or full HD (1920 x 1080, 60 fps). Here again, you have your choice between built-in stereo mics or an external mic.
High-Speed Movie: Flip the switch to HS and you’re ready to shoot your own personal Discovery Channel special, at speeds ranging from 30 frames per second to an astonishing 1200 fps. Of course, as you push the speed higher, the resolution creeps down to the point where you have to question the practicality of the whole thing. At 300 fps, the movie is shot at 512 x 384; at 600 fps, you’re down to 432 x 192, and at 1200 fps you’re shooting a 336 x 96 video sliver. You still have access to aperture-priority, shutter-priority or full manual exposure control, though focus remains fixed at the moment you press the movie shutter (then again, how far can your subject move in a fraction of a second?).
While shooting standard or high-def movies, you can also capture up to 20 snapshots by pressing the shutter button.
Drive / Burst Mode*(9.00)*
Continuous shutter modes, along with time-warped movies, are where the EX-F1 crosses over from cool tech into near-science-fiction. Grab up to 60 high-res stills per second. Capture up to 7 shots per second with the flash firing. This is technology that leaked out of Area 51 and somehow landed at Casio headquarters, ready to tantalize anyone from serious sports photographers to proud Little League parents.
Let’s look at these high-speed modes individually and explore the options in depth.
High-Speed CS: Three variations are available:
For any of these modes, the camera ring control can be used to change the frame-per-second rate on the fly if you specify this control assignment in the set-up menu.
Flash CS: This continuous shooting mode uses either the flash or the LED light for illumination. The flash can fire up to 7 times per second; you can set Flash CS mode to take from three to 20 shots consecutively. For even faster shooting, the LED light is used to provide continuous illumination, and you can record between one and 60 shots.
Prerecord: Press the shutter button halfway down and the camera starts taking photos and storing them in a buffer (this works for both still and movie modes). When you fully depress the shutter, the camera starts shooting continuously and then, when the combination of shots taken before and after the shutter press equals sixty seconds, both are stored to the memory card. You get to decide how much of the time should be allocated to buffer and how much to shoot after pressing the shutter. The big idea: instead of worrying about catching just the right moment to press the shutter and capture an image, you do your best secure in the knowledge that, even you’re a little late, you’ll still get the shot.
Slow Motion View: Conceptually complex but potentially interesting, this view stores images into the buffer when the shutter is halfway depressed, and plays them back at slow speed (up to two seconds worth of images are in the buffer at any given time). When the photo you want to capture appears on screen, press the shutter completely and all the images in the buffer are stored to the memory card.
All of these continuous shooting modes require setting the camera to Auto mode.
Bracket: Three different types of automatic bracketing are provided: exposure, white balance and focal distance. Each bracketing option provides the choice of 3 or 5 shots. For exposure bracketing, you set the bracketing amount in 1/3EV increments. White balance and focus bracketing each offer two increment ranges, though unfortunately there’s no indication of the degree of change being implemented. Flash isn’t supported during bracketed shooting.
**Playback Mode ***(8.75)*
Still images can be displayed in four ways, toggling between them using the DISP button.
Full-screen image with basic shooting information (file name, image size, date and time taken, plus battery charge indicator)
Same as above, but with overexposed areas highlighted
Additional overlay with focal distance, exposure compensation and white balance settings, flash mode, focus area, ISO, aperture, shutter speed and a histogram to display the distribution of exposure values in the image. While better than nothing, the tiny size of the histogram limits its practical benefit.
Clean screen showing image alone.

When shooting using Continuous Shutter mode, the camera compiles the captured images into a group for playback purposes. This allows you to delete single images or an entire group of images at once if you choose. Alternatively, you can divide up the group into individual images through the playback menu.
Pressing the zoom control toward the telephoto side displays up to 8x magnification during playback. Pressing the zoom control in the opposite direction brings up a 12-image thumbnail display which can be navigated using the four-way control or control wheel, hitting the Set button to choose a photo for full-screen display.
The slideshow utility, accessed via the Play menu, provides user-selected interval timing, total playback time, and five combinations of between-image effects and background music.
Movie playback offers forward and backward playback at multiple speeds, zoomed-in viewing and audio volume adjustment. The information display toggles between a clean full-screen display and an overlay with file name, movie length, shooting mode (standard, high-def of high-speed), date and time plus battery charge indicator.
It’s possible to capture stills from stored movie files in playback mode. This function, called Motion Print, will either save a single movie frame of your choosing as a full-screen image, or create a nine-frame montage with your selected frame in the center and additional frames before and after that one in strips at the top and bottom of the image.
Basic in-camera movie trimming is also supported. During movie playback, use the four-way controller or control dial to find the spot where you want to edit. You then have three choices: trim away everything from the beginning of the movie to your current location, delete everything after the current location, or remove everything between two points (you’ll be prompted to find the second point after selecting this option). It isn’t possible to re-order sections of a movie or combine pieces from different files – this is strictly a trimming feature. And there’s an important caveat before using this option: only the edited result is saved, not the original file. There’s a kludgy workaround: you can create a second copy of the file to the camera’s built-in 31.9-megabyte memory if your movie fits. It would have been much more logical to save both the original and the edited version in the first place, though, a procedure the camera follows automatically for in-camera still image editing operations.
**
Custom Image Presets***(12.00)*
Casio calls its preset system Best Shot, labeled BS on the mode dial. There are 26 already programmed, most of which apply to both still and movie shooting, from the expected portrait, sports and scenic vista settings to some more esoteric choices including "eBay" for shooting items for auction and "Food" (high-saturation macro). For each Best Shot mode, pushing the zoom control brings up a short text block explaining how the settings work, a nice touch.
The Digital Anti Shake mode is unusual. It records multiple images and automatically combines the sharpest sections to correct for image blur. Digital panning is another technologically sophisticated choice, again shooting and combining several images to create a photo with the foreground subject in sharp focus against a motion-blurred background. There’s a Move Out CS mode that automatically starts shooting multiple frames when the subject moves out of a user-defined on-screen frame, and Move In CS which starts shooting when the subjects enters an on-screen frame. There’s also a preset mode optimized for shooting YouTube videos, which are stored in a separate folder on your memory card to make them easier to find.
Finally, if there is a set of adjustments you particularly want to have at your fingertips in the future, it’s easy to create your own Best Shot mode. Simply select a photo you’ve taken with the desired settings, then register it as a scene mode selection. There’s room for up to 999 user-created entries, each of which includes settings for face detection, focus, EV shift, white balance, flash, ISO, metering, dynamic range, flash intensity, flash assist, color filter, sharpness, saturation, and contrast.
Control Options
Manual Control Options
The EX-F1 offers aperture-priority, shutter-priority and full manual shooting. The metering system makes them difficult to use, though. Instead of offering a live on-screen display indicating the current metering as you adjust the aperture or shutter setting, all you see is the setting you’re manipulating in green on-screen text. Then, when you press the shutter half-way, the camera takes a meter reading, sets the shutter speed and ISO, and lets you know whether you’ve hit an acceptable combination by displaying ISO, aperture and shutter readings numerically. If the type is white, you’re alright. If the type is orange, your settings are bad, though there‘s still no indication of how far off you might be from the camera‘s idea of an ideal setting, making further adjustments another hit-and-miss proposition. This guesswork approach to manual control is so inefficient that it will discourage newbies and experienced shooters alike from moving the mode dial off Auto.
Values for Sharpness, Saturation, and Contrast are adjustable through the Record mode Quality menu, each offering two steps up and two steps down from normal.
Focus
The Focus button on the lens barrel toggles between four modes:
Auto Focus, available in the range from 1.3 inches to infinity
Macro Focus, available from approximately 2.0 inches to 19.7 inches
Infinity Focus, which sets focus for landscape and other distant subjects with one press
Manual Focus, from 2.0 inches to infinity
Auto Focus (8.75)
There are three auto focus modes, each of which basically uses a small focal spot, but in different ways. The basic spot focus mode concentrates on the small area in the center of the screen. You can always use focus lock to aim at an object in the middle of the screen, focus on it by holding the shutter down halfway, then move the camera to recompose the image without changing the focus setting.
The Free focus mode overlays a visible crosshair pattern on the viewfinder and lets the user move the point of intersection up and down, left and right to select a point anywhere on the screen as the focal point.
Finally, Tracking mode focuses on the object in the middle of the screen when you half-press the shutter button, then automatically maintains focus on that subject as it moves, as long as the shutter button remains depressed. There are a few picture modes where Tracking isn’t available, including still image prerecord, slow motion view, and YouTube.
Continuous Auto Focus is also available in all three modes. When enabled, this feature maintains focus even when you don’t keep the shutter button half-depressed.
There is an Auto Focus Assist Light to the left of the lens which illuminates automatically when the shutter is depressed halfway in dim lighting situations.
The EX-F1, sad to say, is auto focus challenged, particularly in low light situations. We frequently found that the system refused to focus the first time we held the shutter down, only to lock in quickly and efficiently when we pressed it a second time, with no change in position or settings. There’s no rhyme or reason to the problem. It is worse when the lights or low, but even an outdoor scene with clearly defined edges can suffer from focus interruptus.
Manual Focus (7.75)
During manual focus operations, a yellow box appears on the monitor. Focusing is controlled using the left and right sides of the four-way controller. When you start to focus, the area within the yellow box enlarges to full-screen to make details easier to see (the display returns to normal after remaining idle for two seconds). If you prefer, you can use the set-up menu to set the lens barrel ring to control manual focus. We found this much smoother and more instinctive than using the four-way controller, and recommend making the change.
ISO (7.50)
There are five ISO settings, 100, 200, 400, 800 and 1600, plus Auto. Some odd restrictions turn up regarding ISO when you read the fine print, though. When shooting RAW, the maximum ISO setting is 200, for no apparent reason. Also, when shooting movies, Auto ISO is always used.
White Balance (6.50)
In addition to the default Auto WB setting, which lets the camera set the white balance based on live readings while shooting, there are also six user-selectable white balance presets: Daylight, Overcast, Shade, Day White Fluorescent, Daylight Fluorescent and Tungsten (i.e., light bulbs). You can also set a white balance value by selecting Manual WB from the white balance menu, aiming the camera at a white piece of paper and pressing the shutter button.
Exposure(7.25)
The EX-F1 offers aperture-priority, shutter-priority, full manual and auto exposure modes. Exposure compensation is available from the main Control Panel menu in the -2.0EV to +2.0EV range, in 1/3EV increments.
One-button backlight correction is also available by pressing the middle button on the lens barrel. This choice combines exposure shift with dynamic range adjustment to compensate for an underexposure caused when a dark subject is positioned in front of a bright background.
The AE-L/AF-L button is programmable through the menu system to lock either exposure, focus or both when pressed.
We found that, when left in auto mode, the EX-F1 frequently blew out highlights, even when the range from dark to light wasn’t all that challenging. Seting exposure compensation to -1/3 nearly always solved the problem without excessively darkening the image, but we expect the auto exposure setting to handle that chore.
**
Metering** (8.50)
The EX-F1 supports three metering modes, accessible via the Control Panel. Multi-pattern metering analyzes the entire image area to create an exposure setting that maintains an overall balance. Center-weighted, as the name implies, favors achieving proper exposure in the middle of the frame. Spot metering reads only the small central area of the image and sets exposure value accordingly.
Shutter Speed (10.00)
The shutter speed specs for the EX-F1 are unlike any other camera we've seen. Yes, you can take long exposures up to 60 seconds, but you can also shoot at 1/40000th of a second thanks to the system’s unique high-speed technology. When shooting single-shot stills in Auto mode the shutter speed range is a bit more traditional, maxing out at 1/2000th second. And as noted in the testing section, the camera puts hard limits on the selectable slow shutter speeds based on ISO values. While a 60-second exposure is allowed at ISO 100, you’re limited to 8 seconds at ISO 400 and 1 second at ISO 1600.
Aperture (8.50)
Aperture settings range from f/2.7 to f/7.5 at the widest end of the zoom range and f/4.6 to f/13.1 at the maximum telephoto setting. That represents respectable light sensitivity at the wide setting, though the telephoto side of the range isn't up to our expectations. The Olympus SP-570 UZ, for example, is a 20x ultra-zoom model ranging from 26-520mm (35mm equivalent), yet still delivers a maximum aperture of f/4.5 at the top of its telephoto range.
Image Parameters
Picture Quality / Size Options (6.00)
Stills can be shot in seven sizes plus RAW:
RAW shooting is only permitted in single-shot mode, is only available paired with a JPEG file, and that file must be at maximum resolution.
**
There are three image compression settings, Fine, Normal and Economy.
Higher-res images can be resized in the camera to 3M, 2M and VGA sizes. In-camera cropping is also available.
Picture Effects Mode** (5.00)
The EX-F1 offers eight color filter options: B/W, sepia, red, green, blue, yellow, pink and (for you Prince fans), purple. There is no option to increase or decrease the intensity of the effect, though.
Image sharpness, color saturation and image contrast can also be adjusted during shooting. Each supports a range of five settings.
Several parameters can also adjusted in-camera for a shot you’ve already saved to memory card. The full selection of white balance settings is available as an image adjustment in playback mode. Image brightness can also be fine-tuned (five settings are available). In-camera image resizing is supported, saving to either 3MP, 2MP or VGA (640 x 480) size, along with in-camera image cropping. The good news for all these editing options is that both the original and the altered image are automatically saved as separate files.
Connectivity / Extras
Connectivity
**Software (2.00)
Casio supplies a CD with two or three programs (depending on how you count), for Windows users only. The YouTube Uploader streamlines the process of sending photos to the ubiquitous social networking site, and works seamlessly with photos taken using the YouTube Best Shot mode. The remaining software is two-part suite from ArcSoft including TotalMedia Theatre and TotalMedia Extreme. The Theatre program allows you to play back high-definition video shot with the EX-F1 and, sometimes, capture still images from that video (this apparently works on computers running Windows XP but not Vista). The TotalMedia Extreme program allows basic video editing and creation of AVCHD DVDs that will run in suitably equipped DVD and Blu-ray players. While the software is good enough for basic chores, it doesn’t fix the underlying compatibility problems we encountered. The camera produces .MOV files which we were unable to open in QuickTime (on Mac or PC) or several other video playback programs.
Jacks, ports, plugs (5.50)
On the left side of the camera, under a rubber door, are connectors for an optional external power adapter, a mini HDMI cable (not included) for viewing high-def video (with sound) on an HDTV, a proprietary connector for USB and standard-definition AV output (both cables included) and an external microphone (again, mot included). High-def video output should automatically adjust to match the specs of a connected TV through HDMI – it worked in our tests. However, it’s also possible to manually set the output resolution to 1080i, 480p or 576p (for PAL sets).
The potentially useful connection missing here is component output, which is supported by virtually every high-def display or device, even those that do not offer HDMI connectors.
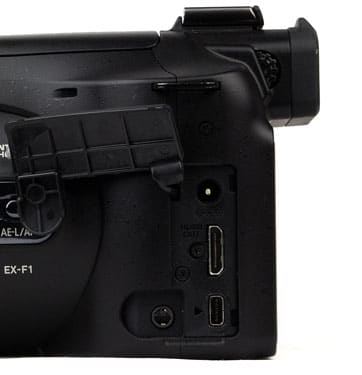
*The left-hand panel supports (from top to bottom)
power in, HDMI out, USB/AV and external mic.*
Direct Print Options (3.00)
The EX-F1 is compatible with PictBridge-equipped printers, allowing direct output without using a computer. This is a barebones implementation of PictBridge printing, allowing paper size and number of prints selection, but not more advanced features such as creating an index print of thumbnails.
DPOF, which allows you to create a predefined print order to be used when printing through your computer or from a professional print service, is also supported. You can specify the number of prints you want for each individual image and whether you want the time and date stamp included in the print, but again no advanced features are provided.
Battery (7.00)
The FX1 uses a Casio NP-100 lithium-ion rechargeable battery rated at 7.4V, 1950mAh. The manufacturer claims 520 shots, 8 hours of continuous snapshot playback or 3.5 hours of continuous movie recording per charge.
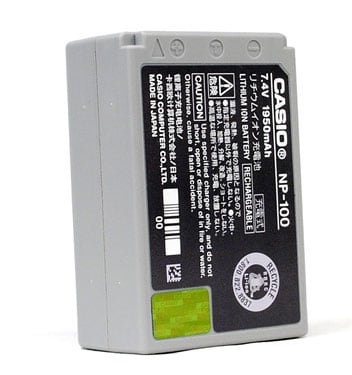
*Casio claims a 520-shot life for this
lithium-ion battery.*
Memory (4.00)
The EX-F1 accepts SD and high-speed SDHC memory cards along with the less common MMC and MMCplus format cards.
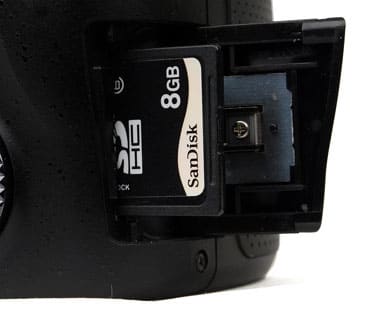
The EX-F1 works best with high-speed
SD and SDHC memory cards.
Other features (5.50)
Image Stabilization – *Casio employs two strategies to deal with camera shake. What they call Camera AS (Anti-Shake) employs sensor-shift stabilization to counter the effect of shaky hands. Camera AS is available in both still and movie modes. Image AS, which applies to still photography only, controls ISO settings in an effort to boost sensitivity, hence increase shutter speed and minimize the effect of movement. Choosing Auto deploys both techniques simultaneously. We found the anti-shake system worked well when shooting stills using the telephoto capability, but our handheld long-distance movie attempts could serve as ads for Dramamine.
Face Detection – *The EX-F1 face detection software sets focus and exposure based on one or more faces it finds in the frame. *
Remote Shutter Release – An unusual extra included in the bundle, the wired remote shutter release comes in handy when shooting on a tripod. The cord, at six and a half feet, offers some welcome freedom to move around while shooting. The remote shutter release plugs into the USB/AV port on the left side of the camera.
Dynamic Range Compensation - *While shooting, the EX-F1 offers two levels of dynamic range compensation to minimize over- and under-exposure.
Overall Impressions
Value*(7)*
This is usually an easy section to assess, but this camera is so unprecedented that how much is worth is very much in the eye of the beholder. We got tired of the slow-mo movie feature quickly – you might find shooting Mentos hitting Diet Coke in exquisite detail endlessly fascinating. The standard-definition movie mode is better than some cameras we’ve tested, but nothing exceptional, and certainly doesn’t compare to what you’d shoot with a dedicated camcorder. As for the high-def movies, we like the look but hate the compatibility problems. That leaves us with the one feature we find irresistible: shooting lots of stills very, very quickly, a capability even our favorite SLRs simply can’t match. That’s why it’s going to hurt sending our review unit back to Casio, and why we’re giving the EX-F1 a high score in this category. At the same time, though, we’re inclined to wait till the next camera incorporating these technologies before dinging our own credit cards with a purchase.
Comparisons
Inevitably, trying to compare a unique multitasking device like the EX-F1 with existing products on the market is going to read a little like the old story of the blind men trying to describe an elephant when each is touching a very different part. Still, for the price of an EX-F1 you could buy a highly rated digital SLR and probably an extra lens to boot. And if it’s high-quality long-lens digital photography you’re after, plenty of solid cameras are available at a fraction of the price. With the unique characteristics of the EX-F1 as a given, let’s compare it against the strengths of four other cameras when it comes to tackling traditional photographic tasks.
[
](https://www.reviewed.com/cameras/content/Canon-Digital-Rebel-XSi-Digital-Camera-Review-18379.htm)
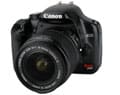
**Canon Rebel XSi – **This low-cost digital SLR ($830 with the 35-70mm kit lens) outperforms the EX-F1 soundly when it comes to color accuracy, resolution, white balance, low-light performance and dynamic range (though interestingly enough, not in noise performance). The ability to use interchangeable lenses from a host of major manufacturers translates into a wealth of photographic possibilities, and manual controls are far more sophisticated than those provided by the Casio. Of course, the XSi has no video mode at all, a long-zoom lens is an extra-cost purchase, and burst mode tops out at 3.5 frames per second, which used to sound impressive.
[
](https://www.reviewed.com/cameras/content/Canon-PowerShot-S5-Digital-Camera-Review-15596.htm)
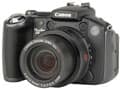
Canon PowerShot S5 IS – With a list price of $499, the 8-megapixel S5 IS boasts a 12x-zoom lens with optical image stabilization, a very good movie mode and high scores for color reproduction and white balance accuracy (though image noise and dyamic range didn’t measure up in lab testing). Its 2.5-inch LCD folds out and rotates to provide additional comfort and flexibility while shooting. Burst mode is nothing to write home about, though, at 1.5 frames per second, and at nearly a pound, it lags behind other ultra-zooms in portability.
[

](https://www.reviewed.com/cameras/content/Olympus-SP-560UZ-First-Impressions-Review-14903.htm)
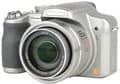
Olympus SP-560UZ–It weighs in at a svelte 12.9 ounces (versus 23 ounces plus for the EX-F1), even with an 18x zoom lens. With 8-megapixel resolution (versus 6MP for the EX-F1), the SP-560UZ lists for $499, and is widely discounted. The image stabilization system effectively combines optical and sensor-shift technologies, making it a superior performer for those handheld long-zoom shots. And when it comes to low-light photography, this Olympus model goes all the way to ISO 6400, albeit at reduced resolution. When it comes to our lab testing, the 560UZ was bested by several other ultra-zooms, but rarely by the EX-F1.
[
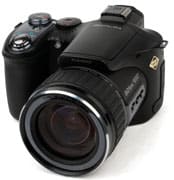
Panasonic Lumix DMC-FZ18](https://www.reviewed.com/cameras/content/Panasonic-Lumix-DMC-FZ18-Digital-Camera-Review-16104.htm)- The lowest-priced choice here, at $399 list, the FZ18 nevertheless provides an 18x optical zoom lens, RAW image capture, high-quality video capture and extensive manual control capabilities. The Panasonic shares the EX-F1s dislike for low-light autofocus, but proved far superior in reproducing colors accurately. And when it comes to portability it’s no contest: the Panasonic weighs in at 14.4 ounces with battery, and measures a modest 4.63 x 2.96 x 3.47 inches versus the Casio’s beefy 5.03 x 3.13 x 5.12 inch body.
**
Who It’s For ***
Point-and-Shooters – Yes, you can use the EX-F1 simply, and the fact that you can shoot large quantities of images first and figure out what came out well later can cover up a multitude of photographic technique shortcomings. On the other hand, this is a bulky piece of equipment to carry around, and much smaller cameras with even greater zoom lenses are available for far less money.
Budget Consumers – At $1000? Not a chance.
Gadget Freaks – *It just doesn’t get much better than this. Amuse yourself with dials and controls and modes galore, enjoy the photo and video results and, most important, show off your Jetsons camera to all your friends.
*
Manual Control Freaks – *It’s possible, but the manual control implementation is clumsy and limited. *
Pros/ Serious Hobbyists – *Six megapixels does not a pro camera make, and there are image quality and control limitations. Still, if you’ve got the extra cash, it’s hard not to buy a camera that will help you catch the one that got away as frequently as the EX-F1 will.
Conclusion
**
Conclusion**
Casio's EXILIM EX-F1 promises features no digital camera on the market has offered before, and it delivers - with some reservations. The camera's strongest suit is the option to shoot up to 60 full-res 6-megapixel images in a second. Combined with a sophisticated prerecord capability that continually captures images to a buffer when you half-press the shutter and saves the most recent ones to memory when push the shutter all the way, the tools you need to never miss another great shot are at hand. Image quality wasn't great, but it's perfectly acceptable for on-screen viewing or consumer-size prints. The other headline feature is capturing movies at incredible speed -- as many as 1200 frames per second, producing a slow-motion effect previously found only in science lab experiments. We loved this for a day or two, but it lost the ability to raise a giggle pretty quickly. Of course, your smileage may vary.
There are ultra-zoom cameras that are far more portable, and available at far less than the $999 price of an EX-F1, or you could opt to spend a grand on a high-quality digital SLR with superior image quality and the option to use interchangeable lenses. That's our practical side talking. When it comes to having fun with a digital camera, the EX-F1 has no equal.
Sample Photos
**Sample Photos
Click on any of the images below to view the full-sized origional image. However, please note that some of the images are extremely large (up to several megabytes) and could take a long time to download. **
**
You can browse photos taken with the Casio EX-F1 at the following photo hosting sites, and search YouTube for videos taken with this camera.******
[
](http://search.fotki.com/?q=EX-F1)[
](http://www.smugmug.com/search/index.mg?searchWords=EX-F1&searchType=global&x=0&y=0)YouTube****
Specs / Ratings
**Specs Table
**{{manufacturer_specs_table}}{{raw_scores_table}}
Meet the tester
Steve Morgenstern
Editor
Steve Morgenstern is a valued contributor to the Reviewed.com family of sites.
Checking our work.
Our team is here to help you buy the best stuff and love what you own. Our writers, editors, and experts obsess over the products we cover to make sure you're confident and satisfied. Have a different opinion about something we recommend? Email us and we'll compare notes.
Shoot us an email