Pros
Cons
Introduction
Design
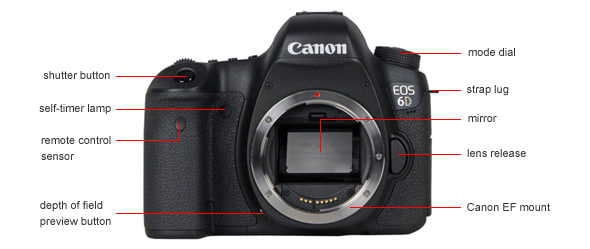
Front
{{section_header}}{{section.name}}{{/section_header}}
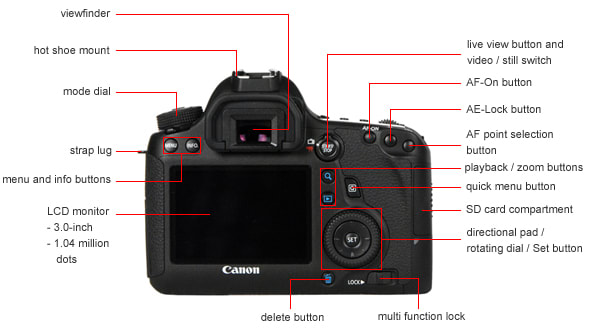
Back
{{section_header}}{{section.name}}{{/section_header}}
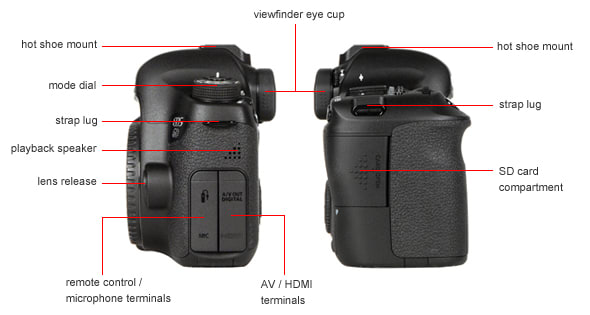
Sides
{{section_header}}{{section.name}}{{/section_header}}
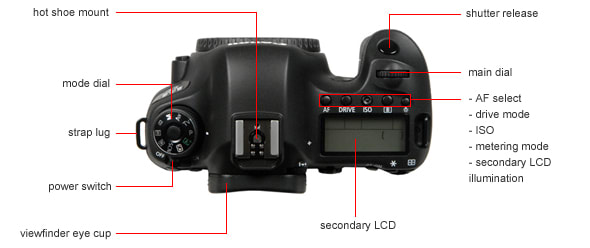
Top
{{section_header}}{{section.name}}{{/section_header}}
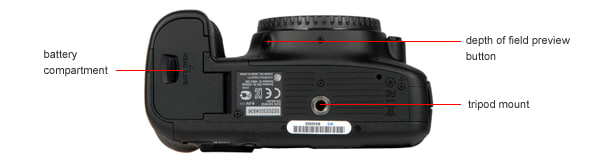
Bottom
{{section_header}}{{section.name}}{{/section_header}}
In the Box
{{section_header}}{{section.name}}{{/section_header}}
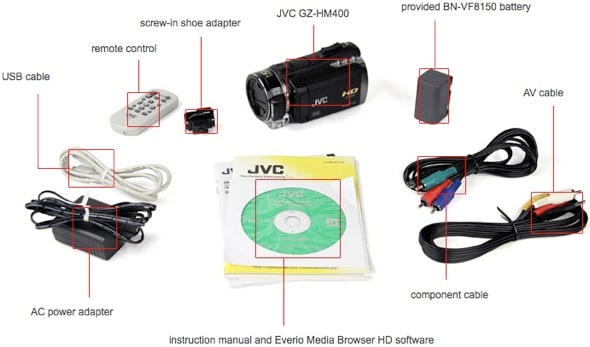
As well as the camera body and 18-105mm kit lens, the box includes:
- EN-EL15 1900 mAh battery
- MH25 battery charger & power cable
- Eyepiece cap (to cover the viewfinder in long exposures)
- Rubber eyecup,
- USB & analog Audio Video cables
- Camera strap
- LCD monitor cover
- Body Cap & lens end cap
- Accessory shoe cover
- ViewNX 2 CD ROM
- Getting started sheet & user guide (English & Spanish)
Lens & Sensor
{{section_header}}{{section.name}}{{/section_header}}
Lenses designed for use with 35mm film cameras (such as Nikon’s own DX format lenses) will have a focal length multiplier of 1.5x when used with this camera, turning a 24mm lens into a 36mm, and a 300mm lens into a 450mm. That is a good thing for longer telephoto lenses, but is a bit of a pain with wide angles. The D7000 is sold as a kit with an 18-105mm zoom lens for $1499, but it can be bought without the lens for $1299.
The D7000 is built around a CMOS image sensor, which measures 23.6 by 15.6mm (0.92 by 0.61 inches) and which captures 16.9 megapixel images. That makes it an APS-C sized sensor, which means it is not a full frame camera. This also means that lenses designed for use with 35mm film cameras will have a focal length multiplier of 1.5x added. This sensor can also capture HD video at Full HD resolution (1920 by 1080 pixels) at 24fps, or 1280 by 720 resolution video at 30fps.
Viewfinder
{{section_header}}{{section.name}}{{/section_header}}
On the top of the camera is the viewfinder, an optical model that uses an eye-level pentaprism. Nikon claims that this offers a 100% preview of the captured image. We found it to be comfortable and easy to use, although the rubber seal around the edge of the viewfinder does leave a mark if you wear spectacles. Fortunately, it can be removed. A small wheel on the right side of the viewfinder provides for diopter adjustment if you have bad eyes and want to shoot without glasses.
The viewfinder shows a lot of information, including the focus points, battery and card status in the main viewing area and shooting information in a strip at the bottom. The guide to all this information from the manual is shown below, but the bottom line is that pretty much every shooting feature is shown there somewhere. With a bit of practice, you can change things like the ISO setting, shutter speed, aperture and focus point without looking away from the viewfinder. You do need to use the top LCD panel to change settings such as white balance, image size or color mode, though.
Display(s)
{{section_header}}{{section.name}}{{/section_header}}
On the back of the camera is a 3-inch LCD screen with a resolution of 921k pixels. This is a fixed screen: it does not rotate or flip out like the Canon 60D.
We found that this screen was sharp and produced clean images, but they did look a little pale in direct sunlight. Menus and other text is very clean and sharp, and the LCD screen can show shooting information when it is not being used to show the live view. A clear plastic cover is included that protects the screen from being scratched, which is a definite plus for a camera like this that is going to be used out in the real world.
The LCD screen on the back of the camera can also act as a secondary information screen if you press the info button while shooting, as shown below.
Secondary Display
On the top of the camera body is a secondary LCD screen that shows shooting information. This packs a lot of information into a relatively small area, but it is still easy to read. Below is an excerpt from the manual that shows the information on display.
The mono LCD display is small and disappointing.
Flash
{{section_header}}{{section.name}}{{/section_header}}
The D7000 has two flash options: a small pop-up flash built into the viewfinder housing, and a hot shoe that allows you to connect an external flash. The built-in flash is small, but adequate for general use: we found that it could adequately illuminate objects out to about 12 feet in complete darkness.
The second option is to install a flash on the hot shoe on top of the camera body. Nikon used a standard flash shoe mount, so any type of standard flash will work. Nikon does claim that their own flashes work best, though and offers a range of flashes from the low cost SB-600 AF ($300) to the more powerful SB-900AF (approx $470). A variety of specialist flashes (such as macro and ring light models) can also be used with this camera.
The flash sync speed for this camera is 1/250 of a second, but this can be shortened to 1/320 if you don't mind loosing a bit of flash power. TTL (through the lens) flash metering is offered on all compatible flash guns, and several flash modes are offered, including front and rear curtain sync, red eye reduction and flash compensation of between -3 and +1 stops.

The flash emitter pops up from the top of the body via a mechanical release.
Connectivity
{{section_header}}{{section.name}}{{/section_header}}
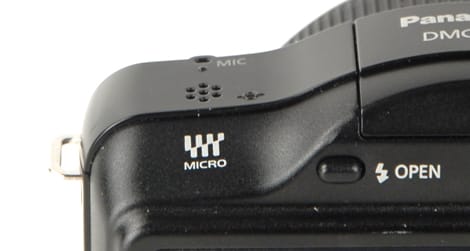
The D7000 has a selection of ports under a couple of covers on the left side of the camera body. Under the top cover is a USB port and a mini HDMI port. Under the bottom cover is a microphone input (which also provides phantom power for microphones that require it) and a GPS port. This proprietary port connects to the $195 GP-1 GPS receiver, which allows photos to be tagged with a GPS location and precise time.
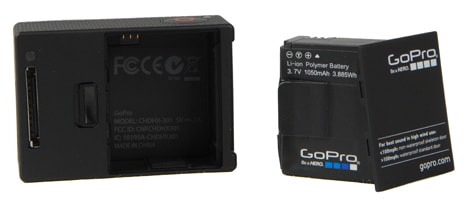
Battery
{{section_header}}{{section.name}}{{/section_header}}
The D7000 is powered by an EN-EL15 battery with a capacity of 1900 mAh. Nikon claims a battery life of 1050 shots, and we found that this is probably pretty close to the mark: the battery of our review model lasted through several days of intense shooting before we had to recharge it. A spare battery will cost you around $60.
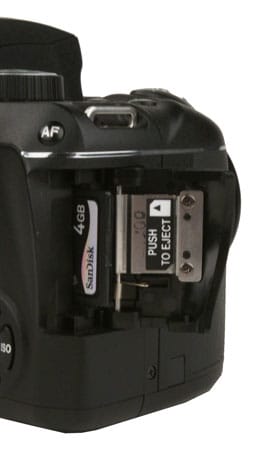
Memory
{{section_header}}{{section.name}}{{/section_header}}
Cameras with two memory card slots are not uncommon: cameras like the SLT-A55 offer support for both SD and Memory Stick cards. The D7000 is different, though: it has two SD/SDHC/SDXC card slots, which can be used simultaneously, providing it with an extra level of flexibility. These two cards can be used in a number of ways:
** **Backup* - Identical images are written to both cards, providing a backup or second copy for quick distribution.
** **Overflow* - The camera writes to the first slot until it is full, then writes to the second. Cards can be hot-swapped, so you can remove one while still writing to the other, so you can be almost continuously shooting.
** **RAW Slot1 – JPEG Slot 2* - The camera writes RAW images to the first card slot, and JPEG images to the second.
This provides a good level of flexibility for the user, especially those who shoot both RAW and JPEG files and want to use both separately, or event photographers who want to be able to keep shooting large numbers of images. These functions are not available when shooting movies, though: the only option available with movies is to choose which card slot the recorded file is written to.
The K2000 accepts inexpensive, easy to find SD cards.
Photo Gallery
{{photo_gallery "Front Photo", "Back Photo", "Sides Photo", "Top Photo", "Bottom Photo", "Viewfinder Photo 1", "Viewfinder Photo 2", "Display Photo 1", "Display Photo 2", "Secondary Display Photo", "Flash Photo", "Lens Mount Photo", "Lens Photo 1", "Lens Photo 2", "Battery Photo", "Memory Photo", "Ports Photo 1", "Ports Photo 2", "Ports Photo 3", "Ports Photo 4", "Ports Photo 5", "Ports Photo 6", "Modes Photo", "Handling Photo 1", "Handling Photo 2", "Handling Photo 3", "Buttons Photo 1", "Buttons Photo 2", "Mic Photo", "Box Photo"}}
Image Quality
Sharpness
{{section_header}}{{section.name}}{{/section_header}}
The images that the D7000 captured were generally sharp, but there were a few situations where that sharpness fell off. We found that the edges of the frame became somewhat soft at the smallest apertures, and a little soft at the widest apertures, especially at the longer zoom settings. Our test images were very sharp across the frame in the middle of the aperture range, though, so the issue here seems to be with the lens: the D7000 is capable of capturing very sharp images, but the performance is let down somewhat by the kit zoom lens. More on how we test sharpness.
Image Stabilization
{{section_header}}{{section.name}}{{/section_header}}
The D7000 uses lens active image stabilization, where an element of the lens moves to try and compensate for the shake detected by the camera body. We found it to be moderately effective, producing a small, but noticeable, improvement in the sharpness of images at most of the shutter speeds that we test at. One thing to note here is that this type of stabilization is dependent on the lens, so you will get different performance from different lenses. We tested this with the 18-105mm kit lens that Nikon sells with the camera body, but plenty of other lenses are available. And, if you are using a non-VR lens with the D7000, you won’t get any image stabilization.
Color
{{section_header}}{{section.name}}{{/section_header}}
To take good pictures, a camera has to be able to capture colors accurately. That’s what we test here: how well a camera can capture the 24 colors on our test chart. We found that the D7000 had good color accuracy, capturing most of the test colors with only minor changes from the original. It did struggle slightly with some colors, though: the blues on our test chart were a little lighter than we like to see, and lacked some of the subtlety that would make photos of blue skies look natural. More on how we test color.
The D700 offers a number of color modes (see below): we found that the mode that offered the most accurate color was the appropriately named Neutral mode, although the Standard mode was also very accurate. Below are crops from our test images of the color patches alongside those from other cameras.
NOTE: Because of the way computer monitors reproduce colors, the images above do not exactly match the originals found on the chart or in the captured images. The chart should be used to judge the relative color shift, not the absolute captured colors.
As you can see from the chart above, the D7000 is a strong performer in this test, achieving a score just a bit below the Canon 60D, but better than the Sony SLT-A55V and the Nikon D300.
{{comparison_bars title="Color Score Comparison", attribute="Color Score", xLabel="Color Score"}}
Color Modes
{{section_header}}{{section.name}}{{/section_header}}
The D7000 offers 6 picture control modes that affect the way that color is captured. Which picture control you select does not only affect color: these controls also affect sharpness, contrast, brightness, saturation and hue. These settings can also be tweaked from the default settings: the images below are shot with the default settings. In addition, the D7000 can capture photos in either the standard sRGB color space, or the wider Adobe RGB color space.
White Balance
{{section_header}}{{section.name}}{{/section_header}}
The color of objects in photos depends on the source of the light that is illuminating it: called the white balance. Your eye automatically adapts to different lighting, and your camera has to do the same thing, which is what we test here. We illuminate a color chart with three light sources: simulated daylight, fluorescent light and a tungsten light bulb similar to the incandescent bulbs in your house. We take photos using both the auto white balance feature of a camera and the custom white balance, where the camera gets to sample and judge the light before the photo is captured.
Automatic White Balance ({{product.raw_scores['Auto White Balance Score']}})
We found that the Nikon D7000 did a mixed job with the white balance set to auto: with the simulated daylight light source, the camera accurately judged the light, only producing a very minor color cast in images that was barely noticeable. The fluorescent light source produced a slight color error, but the main problem was with the incandescent light source, and most cameras seem to have issues with this, producing images with a distinct color cast.
Custom White Balance ({{product.raw_scores['Custom White Balance Score']}})
The D7000 can create a custom white balance setting by analyzing the light before it takes the photo. To use this feature, you have to sample the light first, which is done by holding down the WB button, pointing the camera at a white or gray object and pressing the shutter. The camera doesn’t take a picture, but it does judge the white balance from the white object and create a custom white balance setting. We found that the D7000 was pretty accurate when this was done, producing color errors of only a few hundred degrees, which is barely visible.
If we compare the results for the D7000 with other cameras, we can see that the D7000 wasn’t much worse than the others: all of them struggled to accurately judge the incandescent light source we use in this test.
{{comparison_bars title="White Balance Score Comparison", attribute="White Balance Score", xLabel="White Balance Score"}}
White Balance Options
{{section_header}}{{section.name}}{{/section_header}}
The D7000 offers a lot of white balance features and controls. As well as the usual full auto mode, there are 12 presets (including 6 different fluorescent light types), a direct entry mode and five custom settings, which can be either measured from a photo of a gray card or entered directly as degrees Kelvin. The auto white balance mode also offers an option to preserve the warm look of indoor lighting.
Long Exposure
{{section_header}}{{section.name}}{{/section_header}}
Long exposures push digital cameras to the limit, so we test cameras by turning down the lights and taking a photo of our test chart with exposure times from 1 to 30 seconds. We found that the D7000 did pretty well in this test: although the images had definite noise and a slight color error, the noise was pretty constant as the shutter speed got longer. We did find that the long exposure noise reduction the camera offers did reduce the noise slightly with a 1 second exposure time, but it didn’t make a significant difference at other shutter speeds. More on how we test long exposure.
The graph below shows the color error on our test chart at the range of shutter speeds. As you can see, the error remains constant through the range of shutter speeds, with only a very slight difference between the tests with the long exposure noise reduction on and off.
The graph also shows the noise at the range of shutter speeds with the long exposure noise reduction on and off. The only shutter speed where enabling long exposure noise reduction made a significant difference was 1 second.
{{comparison_bars title="Long Exposure Score Comparison", attribute="Long Exposure Score", xLabel="Long Exposure Score"}}
Noise Reduction
{{section_header}}{{section.name}}{{/section_header}}
The D7000 offers four levels of noise reduction: off, low, medium and high. We found that these did reduce the noise in images as you would expect, but they did also lead to some loss of detail in the image.
We found that the noise in the red, greed, blue and luminance channels was equal: there was no significant difference between the noise in each. More on how we test noise.
ISO Options
{{section_header}}{{section.name}}{{/section_header}}
The ISO range of the D7000 goes from a minimum of 100 up to a maximum of 6400. This can be extended somewhat by using the Hi settings that the camera offers, which are equivalent to ISO levels of 12800 (Hi1) and 25,600 (Hi2). An auto setting is also offered, and the user can determine the upper limit that this can select from. The examples below were shot with the high ISO noise reduction at the Normal setting.
Dynamic Range
{{section_header}}{{section.name}}{{/section_header}}
Dynamic range is a measure of how wide a range of tones a camera can capture. The wider this number, the more detail the camera will be able to capture in both shadows and highlights, making images look more realistic and natural. The D7000 did well in this test, managing to an impressive 7.8 stops dynamic range at ISO 100.
In the chart below, we show the dynamic range at ISO levels from 100 to 6400. As you can see, this range did fall as the ISO increased (falling to just over 3 stops at ISO 6400), but that is not unusual: as the ISO increases, the noise increases as well, overwhelming the shadow detail in images and loosing the fine details. More on how we test dynamic range.
If we compare the dynamic range of the D7000 to our comparison cameras, we can see that it has a slightly wider range than the others, but only by a small amount.
{{comparison_bars title="Dynamic Range Score Comparison", attribute="Dynamic Range Score", xLabel="Dynamic Range Score"}}
Noise Reduction
{{section_header}}{{section.name}}{{/section_header}}
The D7000 offers four levels of noise reduction: off, low, medium and high. We found that these did reduce the noise in images as you would expect, but they did also lead to some loss of detail in the image.
We found that the noise in the red, greed, blue and luminance channels was equal: there was no significant difference between the noise in each. More on how we test noise.
ISO Options
{{section_header}}{{section.name}}{{/section_header}}
The ISO range of the D7000 goes from a minimum of 100 up to a maximum of 6400. This can be extended somewhat by using the Hi settings that the camera offers, which are equivalent to ISO levels of 12800 (Hi1) and 25,600 (Hi2). An auto setting is also offered, and the user can determine the upper limit that this can select from. The examples below were shot with the high ISO noise reduction at the Normal setting.
Focus Performance
{{section_header}}{{section.name}}{{/section_header}}
The D7000 offers an impressive 39 focus points, all of which are arranged in a grid pattern around the center of the frame. The 9 points closest to the center of the frame are the cross type, which are more sensitive when shooting in low light. If 39 points is too many (especially if you are choosing an individual focus point manually), a menu option allows you to cut that down to 11 points. You can also use a dynamic focus mode, where you select an initial point, but the camera switches to another focus point if the camera moves. This is designed to track a moving object such as a bird or a football player, and options are offered to use 9, 21 or all 39 focus points. A similar 3D focus mode is also offered, which tries to track and object moving towards or away from the camera.
One interesting feature on offer here is the AF fine tuning feature, which allows you to, as the name suggests, fine rune the focus system to adapt for different lenses. Different lenses can have very slight differences in their response to the auto focus signals the camera body sends, so this feature allows you to tweak the signal for maximum sharpness. Most users won’t need to use this feature, but a pro who is looking for maximum performance might want to spend the time tweaking their lenses.
Long Exposure
{{section_header}}{{section.name}}{{/section_header}}
Long exposures push digital cameras to the limit, so we test cameras by turning down the lights and taking a photo of our test chart with exposure times from 1 to 30 seconds. We found that the D7000 did pretty well in this test: although the images had definite noise and a slight color error, the noise was pretty constant as the shutter speed got longer. We did find that the long exposure noise reduction the camera offers did reduce the noise slightly with a 1 second exposure time, but it didn’t make a significant difference at other shutter speeds. More on how we test long exposure.
The graph below shows the color error on our test chart at the range of shutter speeds. As you can see, the error remains constant through the range of shutter speeds, with only a very slight difference between the tests with the long exposure noise reduction on and off.
The graph also shows the noise at the range of shutter speeds with the long exposure noise reduction on and off. The only shutter speed where enabling long exposure noise reduction made a significant difference was 1 second.
{{comparison_bars title="Long Exposure Score Comparison", attribute="Long Exposure Score", xLabel="Long Exposure Score"}}
Video: Low Light Sensitivity
{{section_header}}{{section.name}}{{/section_header}}
The Nikon D7000 put up impeccable numbers in our sensitivity tests. The camera needed just 5 lux of light—which is almost nothing!—to record an image that was bright enough to register 50 IRE on our waveform monitor. This is an excellent score, even for a video-capable DSLR.
Chromatic Aberration
{{section_header}}{{section.name}}{{/section_header}}
We saw a small amount of chromatic aberration at the smaller apertures that the 18-105mm lens was capable of: there was some aberration at apertures of between f/16 and f/32 in the middle of the zoom range. Chromatic Aberration is caused by the elements of the lens refracting the colors of light differently, producing a colored fringe on sharp edges. Overall there was little aberration with this lens: in the great majority of our images, the aberration that we found was barely visible.
At the 18mm zoom setting, the overall sharpness is good, with only a slight softness at the edge of the widest aperture.
Distortion
{{section_header}}{{section.name}}{{/section_header}}
We found that the 18 – 105mm kit zoom lens sold with the D7000 introduced a lot of distortion into images, particularly at the wide end of the zoom range. In images shot at 18mm, there was about 3.5 per cent distortion, which is extremely noticeable (see the example below). But this is not unusual: we often see lots of distortion from lenses like this that cover a wide zoom range. Because you can swap out the kit lens for another, we don’t include this test in our overall score.
Motion
{{section_header}}{{section.name}}{{/section_header}}
The Nikon D7000 has the best motion performance we’ve seen from a Nikon DSLR, but it still couldn’t match the performance we’ve gotten from the best video-capable DSLRs on the market. The camera had low levels of artifacting in our video motion test, but the video was choppy and not very smooth. There was also noticeable blur and interference throughout our motion test. More on how CamcorderInfo tests motion.
The D7000 has a number of frame rate options—including 24p, 30p, and 25p modes—but it does not have a 60i or 60p setting. This may not bother most users who want to create a film-like aesthetic with a 24p mode, but it will be jarring to anyone who is used to solely recording with consumer camcorders with a 60i or 60p frame rate.
In contrast to the Nikon D7000, the Canon 60D put up one of the best motion performances we've seen from a video-capable DSLR. The camera can record using a variety of frame rates: 30p, 24p, and even a 60p mode when shooting at a 1280 x 720 resolution. The camera did have a similar amount of artifacting to the Nikon D7000, but we were more impressed with its lack of blur and smooth motion video.
The Sony A55V didn't show much artifacting in our test, which is good, and its video was quite smooth, but we were disappointed that the camera didn't offer a 24p record mode. The camera does have options for 60i and 30p recording, but the fact that it lacks a 24p mode is surprising. Strangely, this is almost the exact opposite reason we were disappointed with the D7000's frame rate options.
There's only one frame rate option on the Nikon D300S for recording video, and that frame rate is 24p. This is the big advantage that the D7000 has over previous Nikon DSLRs, as it is the first Nikon DSLR to offer 30p recording (and it offers 25p as well). Overall, the motion captured by the D300S wasn't bad, but the camera did have a problem with rolling shutter and it had more artifacting than the D7000's motion image.
Video Sharpness
{{section_header}}{{section.name}}{{/section_header}}
The D7000 is Nikon’s first DSLR capable of recording a Full HD 1920 × 1080 image, so this is the first time we’ve really been able to evenly compare a Nikon DSLR with other manufacturers in terms of video sharpness. With that said, the Nikon D7000 didn’t do all that badly. The camera measured a horizontal and vertical sharpness of 650 lw/ph each, which is a big improvement over the Nikon D300S.The Nikon D7000’s sharpness score was also on par with what the Canon 60D showed us, while the Sony A55V did a bit better in this category. More on how CamcorderInfo tests video sharpness.
{{comparison_bars title="Video Sharpness Score Comparison", attribute="Video Sharpness Score", comps="video", xLabel="Video Sharpness Score"}}
Low Light Sensitivity
{{section_header}}{{section.name}}{{/section_header}}
The Nikon D7000 put up impeccable numbers in our sensitivity tests. The camera needed just 5 lux of light—which is almost nothing!—to record an image that was bright enough to register 50 IRE on our waveform monitor. This is an excellent score, even for a video-capable DSLR.
Usability
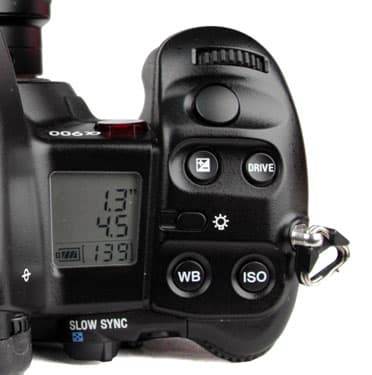
Buttons & Dials
Menu
{{section_header}}{{section.name}}{{/section_header}}
The main menu of the D7000 is a standard Nikon layout, with the options divided into six tabs on the left side of the screen: Playback, Shooting, Custom Settings, Setup, Retouch and My Menu. Most of these are self-explanatory, except for the last one. This is kind of a custom menu that allows you to put frequently used controls into a single screen for quick access, or to access a list of the most recently used menu items.
Instruction Manual
{{section_header}}{{section.name}}{{/section_header}}
The D7000 is supplied with two manuals: a quick start guide that gets you up and running and a more in-depth manual. With out review unit, both were supplied in both English and Spanish. We found both manuals to be well written and useful, with plenty of illustrations and a good index. It is a little odd to see simple concepts such as how to insert the battery drawn out for a $1400 that is designed for serious users, though.
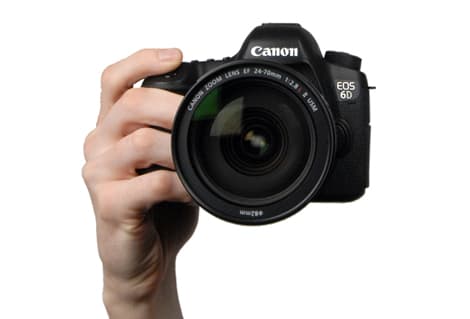
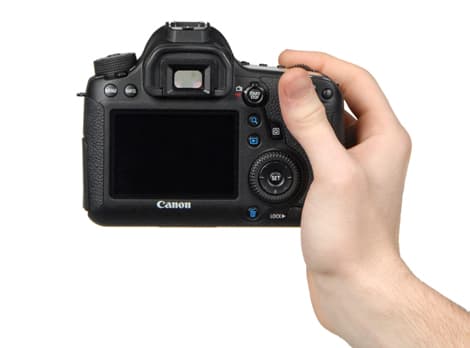
Handling
{{section_header}}{{section.name}}{{/section_header}}
The D7000 is not a small camera, but it fits comfortably into the hand, with the grip on the right side providing plenty to hold onto, with a rubberized covering that makes sure that the grip is firm with slippery hands. This is important given the size and weight of the camera, and with most lenses (especially the larger ones) you are going to need two hands to hold and use the camera. The fingers fall naturally into place, with the index finger of the right hand falling onto the shutter button and the thumb falling onto the video shutter and live mode controls. The two control dials for shutter and aperture control are also located close by, so you can change either value without looking away from the viewfinder. Nikon refers to the one on the back of the camera body as the main command dial, and the front one as the sub command dial.
Display(s)
{{section_header}}{{section.name}}{{/section_header}}
On the back of the camera is a 3-inch LCD screen with a resolution of 921k pixels. This is a fixed screen: it does not rotate or flip out like the Canon 60D.
We found that this screen was sharp and produced clean images, but they did look a little pale in direct sunlight. Menus and other text is very clean and sharp, and the LCD screen can show shooting information when it is not being used to show the live view. A clear plastic cover is included that protects the screen from being scratched, which is a definite plus for a camera like this that is going to be used out in the real world.
The LCD screen on the back of the camera can also act as a secondary information screen if you press the info button while shooting, as shown below.
Secondary Display
On the top of the camera body is a secondary LCD screen that shows shooting information. This packs a lot of information into a relatively small area, but it is still easy to read. Below is an excerpt from the manual that shows the information on display.
The mono LCD display is small and disappointing.
Viewfinder
{{section_header}}{{section.name}}{{/section_header}}
On the top of the camera is the viewfinder, an optical model that uses an eye-level pentaprism. Nikon claims that this offers a 100% preview of the captured image. We found it to be comfortable and easy to use, although the rubber seal around the edge of the viewfinder does leave a mark if you wear spectacles. Fortunately, it can be removed. A small wheel on the right side of the viewfinder provides for diopter adjustment if you have bad eyes and want to shoot without glasses.
The viewfinder shows a lot of information, including the focus points, battery and card status in the main viewing area and shooting information in a strip at the bottom. The guide to all this information from the manual is shown below, but the bottom line is that pretty much every shooting feature is shown there somewhere. With a bit of practice, you can change things like the ISO setting, shutter speed, aperture and focus point without looking away from the viewfinder. You do need to use the top LCD panel to change settings such as white balance, image size or color mode, though.
Image Stabilization
{{section_header}}{{section.name}}{{/section_header}}
The D7000 uses lens active image stabilization, where an element of the lens moves to try and compensate for the shake detected by the camera body. We found it to be moderately effective, producing a small, but noticeable, improvement in the sharpness of images at most of the shutter speeds that we test at. One thing to note here is that this type of stabilization is dependent on the lens, so you will get different performance from different lenses. We tested this with the 18-105mm kit lens that Nikon sells with the camera body, but plenty of other lenses are available. And, if you are using a non-VR lens with the D7000, you won’t get any image stabilization.
Shooting Modes
{{section_header}}{{section.name}}{{/section_header}}
The D7000 offers a wide selection of shooting modes that are accessible from the mode dial on the top of the camera body, including two auto modes, the usual Program, Aperture, Shutter and full Manual modes and two user defined modes.
Focus
{{section_header}}{{section.name}}{{/section_header}}
The D7000 offers an impressive 39 focus points, all of which are arranged in a grid pattern around the center of the frame. The 9 points closest to the center of the frame are the cross type, which are more sensitive when shooting in low light. If 39 points is too many (especially if you are choosing an individual focus point manually), a menu option allows you to cut that down to 11 points. You can also use a dynamic focus mode, where you select an initial point, but the camera switches to another focus point if the camera moves. This is designed to track a moving object such as a bird or a football player, and options are offered to use 9, 21 or all 39 focus points. A similar 3D focus mode is also offered, which tries to track and object moving towards or away from the camera.
One interesting feature on offer here is the AF fine tuning feature, which allows you to, as the name suggests, fine rune the focus system to adapt for different lenses. Different lenses can have very slight differences in their response to the auto focus signals the camera body sends, so this feature allows you to tweak the signal for maximum sharpness. Most users won’t need to use this feature, but a pro who is looking for maximum performance might want to spend the time tweaking their lenses.
Recording Options
{{section_header}}{{section.name}}{{/section_header}}
The D7000 offers a limited range of options for both the size and compression of captured images, but it is flexible enough for most users. For size, there are three options of large, medium and small (see table below for resolutions), all at the 3:2 aspect ratio. There are no options for other aspect ratios, but the cropping editing tool does allow you to crop images down to other aspect ratios.
There are more options for the compression, with three levels of JPEG compression (fine, normal and basic) and the option to capture RAW images in Nikons own NEF format. Simultaneous RAW and JPEG versions can also be saved, with the second memory card slot providing the option to save NEF to one card and JPEG to the other.
Other Controls
{{section_header}}{{section.name}}{{/section_header}}
Electronic Level
The D7000 includes a digital level which tells the user if the camera is being held level to the ground with an on-screen display.
Speed and Timing
{{section_header}}{{section.name}}{{/section_header}}
The D7000 offers two burst modes: CH and CL. CH (for continuous high) takes about 6 fps, while the CL (continuous low) mode can be set to take between 1 and 5fps. The number of shots taken in a single burst is dependent on the memory card, but can be set to a maximum of between 1 and 100 frames with a custom setting.
We measured the speed of the D7000 in the CH mode at just under 6 frames per second (5.97 to be precise), which is pretty much spot on with the specs. This speed was also very consistent: the time between frames did not vary much in our tests.
The standard 2 and 10 second self timer delays are offered, as well as a very flexible interval timing mode. The latter mode can be set to start shooting at a specified time (or after a certain interval), with a specified interval between frames (between 1 second and 24 hours) and to take a specified number of frames per interval (up to 99).
Nikon also offers an optional remote (the ML-L3) which can be used instead of a self timer, and which allows for a “mirror up” mode, where the camera flips up the mirror, but does not take the image until the remote shutter is pressed. This can help prevent camera shake on long lenses caused by the mirror flipping up and shaking the camera and lens.
Focus Speed
{{section_header}}{{section.name}}{{/section_header}}
The D7000 offers an impressive 39 focus points, all of which are arranged in a grid pattern around the center of the frame. The 9 points closest to the center of the frame are the cross type, which are more sensitive when shooting in low light. If 39 points is too many (especially if you are choosing an individual focus point manually), a menu option allows you to cut that down to 11 points. You can also use a dynamic focus mode, where you select an initial point, but the camera switches to another focus point if the camera moves. This is designed to track a moving object such as a bird or a football player, and options are offered to use 9, 21 or all 39 focus points. A similar 3D focus mode is also offered, which tries to track and object moving towards or away from the camera.
One interesting feature on offer here is the AF fine tuning feature, which allows you to, as the name suggests, fine rune the focus system to adapt for different lenses. Different lenses can have very slight differences in their response to the auto focus signals the camera body sends, so this feature allows you to tweak the signal for maximum sharpness. Most users won’t need to use this feature, but a pro who is looking for maximum performance might want to spend the time tweaking their lenses.
Features
Recording Options
{{section_header}}{{section.name}}{{/section_header}}
The Nikon D7000 has a lot of recording options, which we’re pleased to see. Previous Nikon DSLRs that could record video didn’t have anywhere near this kind of extensive list of quality settings or frame rates to choose from. Also, the D7000 is Nikon’s first camera to use the MPEG-4 codec rather than Motion JPEG (MJPEG). MPEG-4 is generally regarded as being a better codec for video and it is widely used in the camcorder industry.
All videos are saved using the MOV file format and the camera has a maximum clip length of approximately 20 minutes (according to Nikon). We like having the options to record using either a 24p or 30p frame rate, but we’d like to see a 60i or 60p option as well. We also think it is a bit odd to use a 640 × 424 resolution for the standard definition record option (instead of the standard 640 × 480 or 720 × 480), but we don’t mind too much… we’re more than happy to see all these record modes available on the D7000.
In addition to the multiple recording options listed in the table below, the D7000 also has the ability to switch to PAL recording in its menu system. When this switch is made, the camera offers 25p recording instead of 30p recording at 1280 × 720 and 640 × 424 resolutions. The 24p record settings are unchanged in PAL mode.
Video Controls
{{section_header}}{{section.name}}{{/section_header}}
The Nikon D7000 has a generous set of manual controls, but the camera suffers from a confusing interface in video mode. This has been a problem with Nikon DSLRs that record video ever since the launch of the D90 a few years ago (the first video-capable DSLR to hit the market).
Nevertheless, we are happy to see the camera offer aperture, shutter speed, and ISO control, as well as a new auto focus system that works during recording—without the need to press or hold a button.
Auto Controls
Unless you go into the camera's menu system and turn manual movie controls on, the D7000 will function with automatic controls during video recording. You can, however, still adjust exposure in this mode.
The new continual auto focus feature is a pleasant surprise, but it has its fair share of problems. For starters, the system is extremely loud with its audible clicks and noises every time the camera attempts a shift in focus. We also found the system to be fairly inaccurate and slow at times. But the feature does work if you give it time, and the fact that it is present on the camera in video mode is more than you can say about many video-capable DSLRs.
Zoom
The kit lens on the D7000 is an 18 - 105mm lens, which is close to a 6x optical zoom. You can get more (or less) zoom depending on what kind of lens you have attached to the camera. Zoom is controlled by rotating the zoom ring on the lens, which is how you control zoom on nearly all DSLR cameras.
Focus
We talked about the D7000's continual auto focus mode, but it's not the only focus features available on the camera. There's four focus options to choose from when you select auto focus for video mode: Face-priority AF, Wide-area AF, Normal-area AF, and Subject-tracking AF. The latter of these focus modes is the most interesting, and it reminds us of the tracking modes that are popular on high-end consumer camcorders. With Subject-tracking AF engaged, you may press the "ok" button the back of the D7000 and the camera will "follow" your subject as it moves about the frame (and focus the subject properly in the meantime). The feature works surprisingly well, although it has the same problems with noise and focus speed as do all of the D7000's focus systems.
If you don't want to be bothered with the noisy auto focus, you can always focus manually with the D7000 using the focus ring on the lens. There's also an auto focus option that does not work continually, and will only be prompted to focus when you press the shutter button down half way.
Exposure Controls
All three of these controls can be adjusted manually on the D7000, but the setup for each is a bit confusing. Exposure adjustment is the simplest, as it can be set in any mode as long as the camera isn’t in manual mode. The only confusing element is that the camera makes you think you can adjust exposure from -5 to +5 in 1/3 EV increments, but video mode really has a range of -3 to +3. We have no idea why the camera lets you adjust to the higher or lower levels, as there is no actual exposure response when you do. It is confusing, sneaky, and poor design on Nikon’s part.
To control aperture and shutter speed on the camera you must switch over to manual movie settings in the D7000’s menu. You can then set aperture and shutter speed values independently when the camera is in “M” mode only. Aperture-priority mode allows you to set the aperture control (but not shutter speed). The one confusing element to all this is that the aperture cannot be set manually during recording, while shutter speed can. In fact, to set the aperture, you must exit Live View mode on the camera and change the aperture values prior to re-entering Live View mode. Nikon had a similar system on previous models, but at least the process is now outlined in the manual (it was even more confusing before, if you can believe it).
Other Controls
ISO control is available in video mode, but the ISO is locked when recording begins. The camera has a wide range of ISO controls for video, which is great, but we find it strange that ISO cannot be set to automatic control if you have the camera set to manual movie mode. What if you want to adjust aperture and shutter speed, but allow the camera to pick a corresponding ISO? Not possible on the D7000. You either have full manual ISO control, or full auto ISO control.
Audio Features
{{section_header}}{{section.name}}{{/section_header}}
Video-capable DSLRs certainly aren’t known for their good audio features, but at least Nikon tried to put together an intriguing package for the D7000. Unfortunately, the camera doesn’t offer anything that we didn’t see on the Nikon D300S, so if you’re familiar with the audio options on that camera you won’t read about anything new here.
The D7000 has a very poor built-in mic that records mono audio only. It also picks up tons of extraneous noise ranging from the loud auto focus mechanism to clicking dials or buttons manipulated by the user. There is also a 3.5mm external mic jack on the camera, which is a feature that has become quite popular to find on video-capable DSLRs these days. The external mic jack allows you to record stereo audio with a connected microphone.
In the camera’s menu system, you’ll find three audio recording sensitivity settings. This isn’t quite as impressive as full audio level control, but it is something (and it is more than you find on many video-capable DSLRs). Alas, the camera does not offer a wind cut or hi-pass option for filtering out wind noise.
In the Box
{{section_header}}{{section.name}}{{/section_header}}
As well as the camera body and 18-105mm kit lens, the box includes:
- EN-EL15 1900 mAh battery
- MH25 battery charger & power cable
- Eyepiece cap (to cover the viewfinder in long exposures)
- Rubber eyecup,
- USB & analog Audio Video cables
- Camera strap
- LCD monitor cover
- Body Cap & lens end cap
- Accessory shoe cover
- ViewNX 2 CD ROM
- Getting started sheet & user guide (English & Spanish)
Meet the tester

Richard Baguley is a veteran writer who has written about technology ranging from Alphabet to Zip file utilities. He has contributed to pretty much every major tech publication, including Amiga Format Magazine, PC World, Wired, CNET, Toms Guide, Forbes, and many others. He lives in the Boston metro area with his wife, dog, and an indeterminate number of cats.
Checking our work.
Our team is here to help you buy the best stuff and love what you own. Our writers, editors, and experts obsess over the products we cover to make sure you're confident and satisfied. Have a different opinion about something we recommend? Email us and we'll compare notes.
Shoot us an email