Pros
Cons
Introduction
Product Tour
Front
Back
Sides
Bottom
Top
** Size Comparisons **
** In the Box **
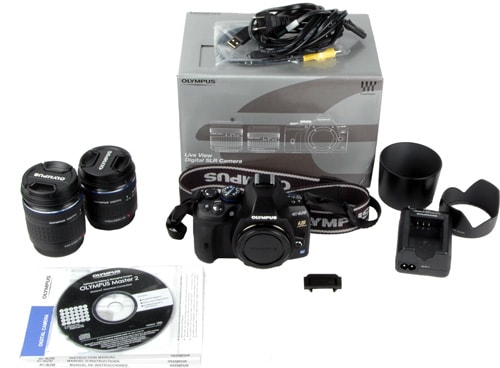
The Olympus E-620 comes in three configuration. The body alone sells for $699.99; a kit priced at $799.99 includes a single 14-42mm f/3.5-5.6 lens; a third kit (shown here), priced at $899.99, adds a 40-150mm f/4.0-5.6. The following components are included:
• Camera body with body cap attached
• 2 lenses with rear covers attached
• Rechargeable Lithium-ion BLS-1 battery
• BCS-1 battery charger
• Camera strap
• USB cable CB-USB6
• Video cable CB-VC2
• Eyepiece cover
• Olympus Master 2 CD
• 3 Instruction Manuals (English, Spanish, French)
Color
**Color Accuracy *** (17.86) *
The Olympus E-620 demonstrated impressive color accuracy, producing lower color error figures than any of the other cameras in our comparison lineup. Orange, yellow and green reproduction are spot-on, and flesh tones are also handled notably well. Saturation was just over 98%, also a particularly strong result.
What we're testing here is how accurately a camera can recreate real-world colors, not making a value judgment on whether the captured colors are especially attractive. Yes, you can always tweak the colors in your photo with image editing software after the fact, but there's value in having colors right out of the camera match as closely as possible the scene as you actually saw it when taking the picture. To measure this, we shoot an X-Rite ColorChecker chart under tightly controlled 3000 lux illumination, then analyze the resulting images using Imatest software to determine color error. First step is to shoot with each of the available color modes, to determine which is the most accurate -- in the case of the Olympus E-620, that's the Muted setting. All of our remaining tests are shot using this setting. Click here for more on how we test color.
In the table below we show same-size crops of each color patch in the X-Rite chart, for the Olympus E-620 and four comparison cameras, each taken in the camera's most accurate color mode. The leftmost column shows the ideal color values from the original chart. The color names come from X-Rite.
NOTE: Because of the way computer monitors reproduce colors, the images above do not exactly match the originals found on the chart or in the captured images. The chart should be used to judge the relative color shift, not the absolute captured colors.
The chart below compares overall color scores for the Olympus E-620 and our four comparison cameras -- taller bars indicate superior performance.
Color Modes*(4.00)*
The E-620 provides the choice of five Picture Modes, settings which adjust color reproduction along with sharpness, contrast and gradation (dynamic range). The system is explained in more depth in the Picture Effects section below. Here, we show the effect of each color setting by reproducing actual-size crops from ColorChecker photos taken in each mode (leaving out the black-and-white Monotone option).
*NOTE: Because of the way computer monitors reproduce colors, the images above do not exactly match the originals found on the chart or in the captured images. The chart should be used to judge the relative color shift, not the absolute captured colors.
*
Like most digital SLRs sold today, the Olympus E-620 supports the default sRGB color space, which is the best choice for most shooters, and the Adobe RGB color space used primarily for commercial printing applications.
Long Exposure*(7.91)*
Our long exposure test is a two-stage process, measuring both color error and image noise over a range of shutter speeds (1, 5, 10, 15 and 30 seconds). The Olympus E-620 outperformed the more expensive Olympus E-30 substantially in the color error testing, but both had mediocre results for long exposure image noise (as we'll see in the Noise testing section below, image noise remains the Achilles heel of Olympus SLRs overall). As a result, the combined long exposure score for the E-620 is superior to the E-30, but far surpassed by the Canon Rebel XS and Nikon D90.
Our long exposure testing procedure calls for illuminating the X-Rite ColorChecker chart evenly at a low illumination level and shooting it at five shutter speeds, with and without long exposure noise reduction. Ordinarily we turn off any dynamic range optimization system for this test, since it can affect results. The Olympus doesn't allow an 'off' setting, though. After some experimentation we went with the Normal setting for all of our test procedures. Click here for more on how we test long exposure.
As seen here, the Olympus E-620 maintained a strong, steady color accuracy performance across the range of shooting times, with only minor variation between photos shot with noise reduction on and off. In this chart a shorter bar is desirable, since it indicates a lower color error.
Image noise, shooting here at ISO 400, was also consistent, but on the high side (a shorter bar indicates lower noise levels). We did find it necessary to lower the illumination level somewhat to keep the 30-second exposure from blowing out and skewing the test results.
Based on previous testing experience, it doesn't surprise us to note that, despite promises to the contrary, turning on long exposure noise reduction actually produced slightly inferior results. The concept of long-exposure noise reduction is that the camera takes a second shot, with the shutter closed, after the actual photo is taken, then digitally corrects the image based on the noise present in that second exposure. The problem is, image noise is inherently random, leading to corrections where none is required and missed opportunities for fixes in other areas.
Neither Olympus model excelled in our long exposure testing, though the E-620 does show improvement over the previous model.
Noise
Noise*(5.36)*
It isn't easy to cram 12 million pixels into a Four Thirds-size sensor -- the individual light receptors have to be tiny and closely packed, leading to elevated noise levels, as shown in our lab testing. The Olympus E-620 tested at approximately the same noise level as the Olympus E-30, which is to say, poorly. particularly at high ISOs. Even a noise reduction system that does sharply reduce noise levels, as shown in the chart below, couldn't tame the problem, and as expected leads to noticeable loss of image detail. Overall the two trail the other cameras in our comparison group by a wide margin in this area.
We test image noise performance by shooting the X-Rite ColorChecker chart at each available ISO level under bright studio illumination (low-light performance is tested separately). When multiple noise reduction settings are available, we shoot at each of them, and the score is based on a camera's overall performance. Ordinarily we turn dynamic range enhancement features off for this test, since this digital manipulation can increase image noise, but Olympus doesn't offer 'off' as an option. Instead, we shot at the normal setting for 'gradation,' the Olympus term for dynamic range enhancement. Click here for more on how we test noise.
Turning off noise reduction entirely to maximize image sharpness produced easily visible image noise by the time we reached ISO 400, and the problem accelerates rapidly from that point. The low noise reduction setting offers a major improvement at high ISO levels, but not enough to solve the problem. And while the two highest settings maintain sub-2% image noise across the board, the loss of image sharpness is readily apparent.
The E-620 noise curves are all tightly clustered for red, green, blue, yellow and luma (gray) noise, with no single component color spiking (which can be highly visible).
In the most demanding, noise reduction off testing, the two Olympus models produce photos with far more image noise than any of the comparison cameras, even at low ISOs.
Crank up the noise reduction to its maximum setting for each and the playing field levels somewhat, with the Pentax K2000 actually noisier than the Olympus at ISOs up to 400, though the familiar ranking returns as we push to ISO 800 and beyond.
The chart below shows the relative ranking of the five cameras in our image noise testing, with longer bars indicating superior performance and higher scores.
ISO*(5.50)*
Available ISO values range from 100 to 3200. The ISO step value can be changed from the default 1 EV to 1/3 EV if you prefer finer increments.
In Auto ISO mode, both the default value to be used and the maximum allowable ISO can be set, from 200 to 3200 in 1/3 EV increments. ISO bracketing, a relatively unusual feature, is also available, providing a three-shot sequence with 0.3, 0.7 or 1 EV increments.
NOTE: The images above are not used in our testing or scoring, but are included here to show real-world examples of the differences between cameras at the various ISO settings.
Resolution
Resolution*(10.31)*
While the Olympus E-620 didn't match the stellar resolution performance of the E-30, we are still very happy with the test results here, particularly when we factor in the fact that we are shooting the E-620 with the inexpensive 14-42mm f3.5-5.6 kit lens, while the more expensive Olympus E-30 is not sold in a kit and was paired with a $500 14-54mm f/2.8-3.5 lens for our review.
We test for three factors, distortion, chromatic aberration and sharpness, and score based on the last two. The E-620 demonstrated exceptionally low distortion in all but the widest focal length, respectable chromatic aberration results and performed very well in our sharpness testing.
We test resolution by shooting a custom chart at three focal lengths (the widest angle, the longest telephoto and the midpoint of the zoom range), under bright studio illumination, at three apertures for each focal length. The resulting images are analyzed using Imatest software to determine sharpness (a test that is independent of megapixel count), lens distortion and chromatic aberration. Click here for more on how we test resolution.
Distortion
Shooting at 42mm we found barely a trace of barrel distortion, and at 29mm it only reached 0.24%. This figure climbed to 2.46% at the 14mm focal length, which is to be expected given the extreme angles involved.
*Chromatic Aberration
*The only significant trouble spot where chromatic aberration is concerned shows up at the widest 14mm focal length, which is not surprising. Otherwise, we found very little visible fringing in the test images.
*Sharpness
*The highest sharpness results were found at the 29mm focal length when shooting at f/5.0, where the lens could resolve 1712 lw/ph horizontally and 1700 lw/ph vertically at the center.
At the 14mm setting we encountered significant horizontal chromatic aberration from the midpoint out to the edges. Sharpness was very good from corner to corner, especially when shooting at f/3.5 and f/13.0, and even at f/22 remained acceptable.
Sharpness at 29mm remains high, with only the fully stopped down f/22 shots showing any significant softness. Chromatic aberration becomes less of an issue, as expected, though there are still some notable horizontal flaws at those troublesome midway points.
Shooting with the lens at full zoom we found chromatic aberration controlled well for an inexpensive lens, and sharpness very good across the board, particularly with the lens wide open.
As shown below, the Olympus E-620 held its own in our resolution testing, posting slightly higher scores than the kit-lens-equipped Canon Rebel XS and Pentax K2000 and maintaining parity with the Nikon D90, which was shot with a more expensive lens attached.
Picture Quality & Size Options*(12.60)*
The E-620 offers seven image size options, but they're not all available at once, which seems unnecessarily complicated. Three settings are offered at any given time: Large, Middle and Small. There is only one option for Large, but Middle has three possible settings, and so does Small. The size that currently corresponds to Middle and Small settings is determined via section G of the custom settings menu. It feels like it would be far simpler and more flexible just to present a dozen settings on a single menu, and let the user scroll quickly to the desired choice using the control dial.
There are four compression options for JPEGs: Super Fine (1/2.7 compression), Fine (1/4), Normal (1/8) and Basic (1/12).
RAW shooting is available in the Olympus .ORF file format, either as a standalone file or with an attached JPEG image. The JPEG is saved in Large format with Fine compression.
Dynamic Range*(3.44)*
The curse of high-noise images rears its head here again, affecting the ability of our analysis software to detect clearly delineated steps of dynamic range in the standard Kodak chart we shoot. The Olympus E-620 did not fare quite as poorly as the Olympus E-30 on this test, but it still ranks well below the competition.
The advantage of a wide dynamic range is the ability to maintain detail in both very bright and very dark areas, which comes in handy when shooting contrasty scenes (a light-colored building with dark shadows cast by slanted sunlight, for example) and, of course, zebras. We test dynamic range by lighting the 20-patch Kodak Gray Scale chart at an even 3000 lux, shooting it at each available ISO and a range of aperture settings. These individual images are evaluated using Imatest software, which then analyzes the results at multiple apertures to calculate an overall dynamic range performance evaluation at each ISO. Click here for more on how we test dynamic range.
Even at basic ISO 100 and ISO 200 settings, the dynamic range demonstrated by the Olympus E-620 is poor, with a top result of only four and a half stops, compared to over seven stops at ISO 100 for the $599 Pentax K2000. No matter what ISO you shoot at, you're going to lack flexibility and fine detail in high-contrast scenes when shooting with the Olympus.
This chart shows the relative dynamic range results among our comparison cameras when shooting at ISO 200. This is the second Olympus camera we've shot recently that produced poor results on this test, indicating an unfortunate consistency undoubtedly linked to the high-megapixel, small-sensor challenge.
Short bars reflect lower performance results in the following scoring chart.
Image Stabilization*(5.81)*
The Olympus supports three different modes of in-camera image stabilization. I.S. 1 is the basic setting for shooting with stabilization turned on. I.S. 2 is used for shooting when panning horizontally: horizontal stabilization is turned off, vertical stabilization is active. I.S. 3 is for panning vertically, with horizontal stabilization active and vertical turned off. As you would imagine, we tested using the I.S. 1 mode. And the results prove the system is useful, but doesn't offer the dramatic sharpness gain we found when shooting with the Olympus E-30.
To test the effectiveness of a camera's image stabilization system, we mount it in a custom-designed computer-controlled rig that recreates a consistent series of horizontal and vertical movements, designed to mimic the pattern of a person's shaking hands at low and high levels. We shoot a brightly lit chart repeatedly and measure the image resolution of each shot using Imatest. These results are then statistically sampled to reveal the underlying pattern. Click here for more on how we test image stabilization.
With a fairly low level of shake, roughly what you'd expect from a person standing still and trying to hold the camera steady with two hands, we found the image stabilization system produced a modest loss of sharpness at the highest shutter speeds, but from 1/125 second on consistently offered a modest improvement.
Revving up the level of shake to about what you'd find when trying to shoot one-handed, or while moving, the pattern remains similar. The 1/500 second shutter speed results measuring horizontal movement indicate a larger improvement than we'd expect, which held true even when we reshot the test. On the vertical side, there are minor differences one way or the other between having the IS system on or off until you hit 1/60 second, from which point the system consistently delivers a slight improvement.
The two Olympus camera produced very different results, which is probably at least in part due to the different physical dimensions, balance, lens types and focal lengths involved. For the E-620, the system proved marginally useful, but shouldn't be considered a major selling point when considering your options.
The chart below summarizes the image stabilization scores for three of our comparison cameras (test results are not available for the other two).
The chart below will help visualize the actual differences reflected in the data above. These are representative same-size crops taken from photos in our test group, at each horizontal shake level and shutter speed.
White Balance
White Balance*(5.94)*
The Olympus E-620 ran into difficulties in our combined automatic mode / custom mode white balance testing, with notable difficulties under two out of three illumination sources in our auto WB testing and results after setting a custom white balance that still weren't as accurate as other SLRs we've tested.
We shoot a standard ColorChecker chart inside a Judge II light box, produced by X-Rite, that provides carefully controlled illumination at a variety of color temperatures. We test under incandescent, compact white fluorescent and daylight illumination. The test photos are analyzed using Imatest to determine how far the results vary from the chart ideal values. Click here for more on how we test white balance.
Automatic White Balance (6.93)
The results shooting in daylight using the automatic white balance mode were quite good, but fluorescent lighting produced significant color error. As for incandescent illumination, that poses a consistent stumbling block for auto white balance systems, and the Olympus E-620 followed the weak performance trend we've come to expect, with images that are far too warm and orange, though still not the worst we've seen. Taken together, the camera scored a middling 6.93 in automatic white balance mode.
In the charts below, the bars indicate color error, so shorter is better. Also worth noting is the fact that the horizontal scale used varies to accommodate the much larger color error figures for incandescent illumination.
The color error in daylight produced by the Olympus E-620 is certainly greater than the comparison cameras shown here, though the shift toward overly warm tones is not so dramatic that it will jump out at you when looking at actual photos.
The auto WB system produces overly warm images under incandescent lighting, but that's not uncommon, as shown below. This is an area where manual control, whether taking a custom reading or using the included preset, is worth the effort.
Photos taken under fluorescent illumination were subtly but significantly too warm, an apparent attempt by the WB system to overcompensate for the inherently cool tones of fluorescent bulbs.
Custom White Balance (4.94)
Taking a few extra moments for a custom white balance reading cuts the incandescent lighting problem down to size, producing only minor shifts toward the cooler side under all three illumination sources. The scoring in this test is stringent, though, and the Olympus was not as accurate here as competitive models.
The Olympus E-620 underperformed all the cameras in our comparison group, including its brand-mate E-30, when it comes to overall white balance performance.
White Balance Settings*(9.070)*
The Olympus E-620 offers eight white balance presets in addition to auto WB, manual white balance setting and direct white balance entry in degrees Kelvin. The three settings for fluorescent bulbs is a useful addition, given the different color temperatures available with different bulb types.
The procedure for taking a manual white balance reading requires that the programmable Fn button has to be set to One-touch WB mode, which requires a trip deep into the bowels of the menu system. If you're the type of photographer who cares enough to take manual readings, you'll probably just set the Fn button and leave it as a white balance control, which pretty much defeats the purpose of having a programmable button in the first place. Unfortunately, there's no other way to set a manual white balance.
Once the button is properly programmed, taking a reading still requires some manual dexterity: you hold Fn down, point at a white surface and hit the shutter button. If you've already said you want Fn to be the white balance control, wouldn't pressing just that one button make more sense than requiring a combo move? There is one bright point to this procedure, though: you don't have to set the camera to manual white balance mode and then take a reading separately. The act of taking the reading sets the camera to manual WB mode.
The white balance setting can be manually fine-tuned along the Amber-Blue and Green-Magenta axes. each in 15 increments. Unlike some cameras we've used, there is no interactive way to see the effect of these fine white balance changes while shooting. You can press the AE/AF lock button and take a temporary preview shot at the current setting, allowing you to see the effect without leaving the fine tuning screen, but each change has to be previewed separately.
Three-step white balance bracketing is also available, a handy way to hedge your bets. A single image is taken, and saved in three different flavors. Adjustments can be made in either or both of the Amber-Blue and Green-Magenta axes, in 2-step, 4-step or 6-step increments.
Sample Photos
Sample Photos
In the following photo sample portfolio, clicking on the large image at the top of each group will download the full-size original, though this may be time-consuming if you have a slow Internet connection.
Still Life Examples
Clicking on any of the thumbnails below will download the full-resolution image.
NOTE: The images above are not used in our testing or scoring, but are included here to show real-world examples of the differences between cameras at the various ISO settings.
Noise Examples
NOTE: The images above are not used in our testing or scoring, but are included here to show real-world examples of the differences between cameras at the various ISO settings.
Playback
Playback Mode*(7.00)*
When reviewing your photos in playback mode, five different types of information display are available, cycled through by pressing the INFO button, as shown below. The Image Only, Overall, Histogram and Highlight & Shadow views can be eliminated from the sequence if you prefer, via the Custom menu.
When reviewing photos on screen, the right and left buttons in the four-way controller group move forward or back one picture at a time. Pressing the top button jumps you back ten pictures, and pressing the down button jumps forward ten pictures. The control dial is used to manage image magnification, increasing from 2x to 14x enlargement in six steps when you turn the dial right. Turn it left when a single photo is on-screen and you get a series of thumbnail display screens.
There is a rudimentary slideshow capability, with no audio background or effects between images, and no control over the length of time each photo is displayed or which shots will be included. The only user control is the option to show 1, 4, 8, 16, 25, 49 or 100 photos per slideshow screen.
You have the usual option to set the length of time a picture is shown on the LCD right after you take it, from 1 second to 20 seconds, or to turn off instant review altogether. An additional choice here strikes us as interesting, though; you can set the camera to switch to playback mode with your image displayed after each shot. This lets you linger over an image without having it disappear when the timer expires, cycle through the different playback views available by pressing the INFO button, and delete an unwanted image instantly, an option that's unavailable while in image review. You can still jump back to record mode quickly by touching the shutter button, so this strikes us as a viable custom setting.
By default, image display is rotated automatically when you hold the camera vertically during playback. It's unfortunate that the same internal sensor used to accomplish this minimally useful feat wasn't also employed to pivot the LCD information display while shooting, a feature we particularly liked when shooting with the Sony A900.
There's a nice little customization option regarding image deletion procedure. Like most cameras, by default the Olympus pops up a confirmation message when you hit the Erase button, requiring you to then move the on-screen cursor to confirm your selection. You have the option, though, of eliminating this confirmation message and using one-button delete, a much faster way to banish ugliness from your memory card.
In-Camera Editing*(4.25)*
A handful of in-camera image editing features are provided. Working with JPEG files, shadow adjustment brings out details in dark or backlit images. Redeye fix attempts to automatically repair the glowing retina problem. Photos can be cropped to two horizontal and two vertical sizes, but there's minimal flexibility here. Images can be converted to black and white or sepia, and saturation can be adjusted in 10 steps. Files can be converted to lower-resolution versions, with 1280 x 960, 640 x 480 and 320 x 240 the three available options. Finally, photos can be trimmed to a different aspect ratio (3:2, 16:9 or 6:6), using the 4-way controller to determine the crop position.

*Shadow adjustment during playback
helps bring up lost shadow detail.*
With RAW files, up to three images can be superimposed to create a multiple exposure. After the photos are selected, they are overlaid with equal intensity and displayed on screen. At this point you can raise or lower the gain on each image, previewing the effect live after each adjustment. And if a three-image sandwich isn't enough to sate your photographic appetite, you can save the result of your three-image combination in RAW format, then use it as one layer of an additional multiple exposure combination.
Software*(5.00)*
The E-620 comes with a CD offering a full version of a single program, Olympus Master 2, plus a trial versions of Olympus Studio 2 (it costs $99 to unlock the full version). Both Windows and Mac versions are provided.
Direct Print Options*(4.00)*
The Olympus E-620 supports the two standard computer-free printing options, direct connection via USB to a PictBridge-compatible printer and creation of a DPOF (Direct Print Order Form) file for placing an order with a professional output service. In both cases, the system is simple and clear, with appropriate options available. The two-tier PictBridge system (Easy Print and Custom) is unusual, and welcome.
Hardware
Controls
Shooting Modes*(10.50)*
The shooting modes are as expected, though the version of Auto incorporated here is a bit unusual, setting key controls to default but allowing users to change whatever they like. This contrasts to the more grandma-friendly auto modes found on many other cameras, which emphasize idiot-proofing over flexibility. The point to keep in mind here is that the changes you make are lost if you turn off the camera or change to another mode and return.
There are also six scene modes accessible via the mode dial, plus a spot for the larger scene mode / Art Filter collection. These are covered below.
Live View*(2.75)*
While the Olympus E-30 won praise from our reviewer for its stutter-free screen update even when panning rapidly horizontally or vertically, the E-620 is a considerable step backward in this department. Even moderate movement leaves it struggling to keep up, producing an annoying chugging effect. It's not bad enough to hinder most shooting situations, but trying to follow sports, for instance, is unpleasant using this system. Of course, sports photography in Live View is problematic across the board, thanks to slow autofocus performance.
There are three autofocus mode choices when shooting in Live View. The default is Imager AF, which uses contrast information from the image sensor itself to determine the best focus position. The problem with this approach is that it requires the lens to slowly extend and retract, hunting for the optimal focal point, which is one slow process.
One alternative, AF Sensor autofocus, relies on the same autofocus sensor used when shooting through the viewfinder. This requires flipping the mirror down briefly, which interrupts the Live View display momentarily. Most Live View cameras that offer this option let the screen go black briefly. Olympus chose to freeze the on-screen image as it was when you pressed the shutter, which we found slightly disconcerting -- if you move the camera, the image doesn't change. Another oddity when shooting with AF Sensor autofocus is that holding the shutter button down halfway does not focus your shot -- the camera waits for you to press the shutter completely, then there's a hesitation to autofocus, then your photo is taken. The workaround is to hold down the AEL/AFL button and press the shutter button halfway, but it still feels clumsy.
The third Live View autofocus choice is Hybrid Autofocus which, as the name implies, mixes the two approaches. When you press the shutter button halfway, the camera focuses approximately using the Imager AF system, so you can at least see what you're shooting clearly. Then, when you press the shutter all the way down, the mirror flips down, final focus is achieved using AF sensor autofocus, and the picture is snapped.
What do all these methods have in common? They are painfully slow. You can hear the lens make chugging noises in AF Sensor mode like the Little Engine That Could, as it moves first in one direction, then the other, then back again. And switching between focus systems requires a trip to the custom menu system, which makes a slow process even slower.
One more Live View autofocus option is Face Detect. At least getting into Face Detect mode is fast; pressing OK brings up the Live View version of the Super Control Panel (the on-screen quick settings menu), and Face Detect is one of the options.
When using manual focus in Live View mode you have two choices. There's S-AF+MF mode, which uses autofocus and then lets the shooter tweak the results manually, or full manual mode. In either case, a few presses of the INFO button brings up a Zoom display option, which lets you magnify the on-screen image by 5x, 7x or 10x for fine control.
There are six different display layouts available in Live View mode, as shown below. These are toggled in order by pressing the INFO button. It's also possible to disable any of these views you don't plan to use through the custom menu.
By default, the Live View screen reflects any exposure adjustments as they're made, which provides a more accurate preview of your final photo but can result in a darker on-screen display. We think this interactive feedback is one of the stronger points of the Live View system but, if you prefer, Live View boost (available through the Custom menu) automatically adjusts the brightness level and ignores exposure compensation settings, to make it easier to see what you're shooting regardless of available lighting.
Scene Modes*(9.00)*
The E-620 offers an unusually wide array of scene modes to provide one-stop access to a group of camera settings tuned to particular shooting situations.
In addition to the wide selection of scene modes, the E-620 incorporates the same selection of six Art Filters introduced with the E-30. These six virtual filters have a major impact on the appearance of your photos and, unlike the filter effects provided with the Pentax K2000, they are only available while shooting and not as playback mode alterations. We were very uncomfortable with the idea of taking photos with Art Filters turned on and having only that distinctively distorted image, without an unenhanced original to fall back on. Turns out there's a workaround: shooting JPEG + RAW. With this approach, the JPEG incorporates the Art Filter effect but the RAW is saved as a straightforward photo, so you don't lose any editing flexibility.
And speaking of flexibility, another oddity about the Art Filters is that there's no way to adjust the effects: they are all-or-nothing choices. That certainly simplifies matters for neophytes who want to look like Photoshop wiz kids, but a little more flexibility in applying the filters would have been welcome.
The other point to consider when shooting with Art Filters is that the digital effects slow down your shooting substantially. We counted roughly a ten second delay between pressing the shutter and seeing the finished shot on the LCD when using the Pin Hole filter, for example.
Taking all these rough edges into account, though, we still like having the Art Filter feature overall. The soft focus, pale & light and light tone effects don't really grab us, but the pop art, grainy film and pin hole filters can create some striking images given the right subject.
Picture Effects*(5.75)*
The Olympus E-620 offers the same six Picture Modes as its big brother, the E30. These modes affect color reproduction along with other image quality factors outlined below. The following chart shows enlargements from our still life shot in each Picture Mode.
Each of the color Picture Modes can be adjusted for contrast and sharpness, and all but monotone can also have a saturation adjustment, with each parameter offering five settings. The monotone mode offers two additional adjustments. One mimics the effect of using a color filter when shooting in black and white. Yellow enhances white clouds in blue skies, orange emphasizes blues and sunsets, red brings out blue skies and red foliage, and green emphasizes reds and green foliage. The other black and white adjustment is a toning effect, with sepia, blue, purple and green available.
The other component part of an Olympus Picture Mode is a setting for dynamic range adjustment, which the company calls gradation. The company suggests Normal for most shooting, but also offers High Key for high-contrast subjects, Low Key for low-contrast subjects, and Auto, which divides the photo into several regions and tweaks the individual sections. When set to anything other than Normal, the Gradation setting overrides any contrast changes made in the Picture Mode adjustments.
In-camera multiple exposure is available both while shooting and in playback mode. While shooting, two consecutive shots can be combined to create a single image. It's possible to use a RAW file stored on your memory card as one of the two images to be combined, allowing you to keep a library of component parts available or your multiple exposure experiments. By default, each image is set to half brightness, but this can be overridden so each image is reproduced with its full brightness value. For getting a precise alignment of multiple exposure frames, shooting in Live View displays a semi-transparent view of the first frame while you line up the second. If two frames isn't enough to suit your needs, you can shoot in RAW mode and use the newly taken multiple exposure as one part of a new multiple exposure combination. Overall, though, there is more flexibility to the multiple exposure function in playback mode.

*We weren't sold on multiple exposures at first,
but after playing with the feature we saw the light.*
Pentax also offers panorama shooting, with stitching of up to 10 images either horizontally or vertically. Choosing the panorama option from the Scene Modes menu automatically shifts the camera into Live View mode and puts guide bars at the sides, or top and bottom, of the frame (you have to indicate which direction you'll be panning, or you won't be able to stitch the images later). Unlike the panorama-shooting system found on many point-and-shoots we've tested, you don't get to see a portion of the previous image on screen as you move on to the next shot, making alignment difficult. Also, the stitching doesn't take place in the camera itself: you have to use Olympus Master 2 software on your computer to see the effect, the opposite of instant gratification. Finally, the panorama feature only works with Olympus xD Picture Cards, not when shooting to CompactFlash or even another brand of xD card.
Focus*(11.75)*
The Olympus E-620 uses a seven-point autofocus system, with . There are two available modes. All-target autofocus lets the camera choose among the seven available points, while single target AF uses one focus point selected by the shooter. The focus point can be chosen by pressing the AF target button behind and to the right of the shutter, then adjusting using the control dial (pretty easy) or the four-way controller (pretty tricky if you have the viewfinder up to your face).
For an extra level of fine control, there are two settings for single-point autofocus. The default Normal setting uses an area slightly larger than the target indicated, while Small focuses only on that single tiny point.

The seven-point autofocus pattern
Five focus modes are available when shooting with the viewfinder, as follows. Live View autofocus is described in the separate Live View section here.
There is no dedicated autofocus assist lamp on the Olympus E-620. Instead, the pop-up flash emits a series of quick bright pulses, effective over a greater distance than an autofocus assist light, but a bit less subtle if taking indoor candids or baby pictures were what you had in mind.
We found autofocus speed rather slow with the kit lens, especially in spot focus mode. Relatively dim indoor room lighting resulted in a notable lag in focus and, while popping up the flash did solve the problem, other SLRs do a better job dealing with similar lighting conditions. Once focus is achieved, though, the continuous autofocus system did a good job tracking all but the fastest-moving subjects.
As for manual focus, it's available using a menu selection rather than a physical switch. As a focusing assist, the viewfinder focus indicator stops blinking when the image appears sharp. This is an area where Live View is a useful alternative, since you can magnify the on-screen image while focusing for easy-to-see instant feedback.
Exposure*(5.50)*
Exposure compensation is available in an unusually wide range, a full 5 stops up or down, in 1/3, 1/2 or 1 EV increments. Autoexposure bracketing is provided in a three-shot sequence, with 0.3, 0.7 or 1 EV increments.
Ordinarily you have to press the exposure compensation button to enable shifting the value, but the option to have the control dial adjustment work without the extra button press is available as a custom setting. We'd advise against it: too easy to accidentally shift the exposure value without noticing.
You can also tweak the default for optimal exposure for each metering mode, in 1/6 EV increments in a range of ±1 EV. Ordinarily we wouldn't expect to use this capability, but with this camera, we found it tended to shoot a hair dark as a rule, making an overall exposure boost potentially desirable (though we didn't use this setting in any of our lab tests or sample images, it should be noted).
Dynamic range compensation is called 'gradation' by Olympus. Unlike cameras with a range of fine settings, the E-620 offers High Key for bright subjects, Low Key for dark subjects, Normal (the default) and Auto, which divides the subject into regions and adjusts brightness separately for each. We found that the Auto setting, while a good concept, added to the camera's already considerable image noise problem.
Speed and Timing
Shot to Shot (4.00)
Olympus claims a burst rate of 4 frames per second when shooting in the default Large Normal mode, and our testing confirmed their claim on the nose (actually, a hair better at an average 4.004 fps). What's more, shooting to a fast 8-gigabyte UDMA CompactFlash card, there was no hesitation as we kept our finger on the shutter and just kept firing. Upping the quality setting to Large Fine did cause a slowdown after just seven or eight or six images, though, and shooting to the xD card caused a slowdown even in Large Normal mode after 10 shots.
The E620 isn't a speed demon, certainly, but the true 4-shot performance puts it in line with comparable cameras.
Drive/Burst Mode (9.50)
The Olympus E-620 supports two continuous shooting modes. High shoots at 4 frames per second as long as you hold down the shutter. The Low burst mode speed can be set to 3, 2 or 1 frame per second in the custom menu. The number of sequential shots that can be taken without slowdown at current image settings is shown in the viewfinder display.
Depth of Field Preview*(1.00)*
The traditional depth of field preview system, which stops down the lens so you can see which areas will be in focus at the current aperture setting by looking through the viewfinder, is available if you assign the programmable Fn button to the task. There is also a Live Preview capability, available as another choice for the programmable Fn button, which shows a depth of field preview image on the rear LCD when pressed. We found the viewfinder flavor more practical, since you can keep the camera to your eye and see the available depth of field, but having both options is certainly a plus.
Metering*(6.50)*
The Olympus E-620 uses a 49-segment metering system.
We found that the camera tended to underexpose slightly, especially when shooting with digital ESP metering. Depending on the shooting situation, we often turned to the spot metering mode, chose a relatively dark area of the scene and recomposed the image while holding the shutter button halfway as a quick fix.
Shutter Speed*(10.00)*
Available shutter speeds range from 1/4000 to 60 seconds, plus bulb mode for extended exposures. Pushing the long exposure out to 60 seconds is a bit unusual, but not especially useful, particularly with a camera that suffers from an overabundance of image noise.
Self-Timer*(3.00)*
There are two self-timer modes when shooting with the shutter button, plus two modes supporting the optional RM-1 wireless remote control ($40) or the RM-UC1 remote cable release ($57). The remotes can also be used for bulb shooting.
In addition to the self-timer options available through the drive mode menu, there is an Anti-shock option in the Custom settings menu that lets you set the delay from the moment the mirror is raised until the shutter is released from 1 to 30 seconds. This can be useful for mission-critical applications where any tiny shake at all could affect results, such as astronomical photography.
This section of the review was updated with revised results and scores on July 13, 2009. These changes did not affect the relative ratings of the reviewed cameras.
Design & Handling
Handling*(7.00)*
The E-620 is a compact piece of gear, measuring 5.11 x 3.70 x 2.36 inches (130mm x 94mm x 60mm) and weighing in at 16.76 ounces (475g) for the body alone, without lens or battery. That makes it just a skinch larger in all dimensions than the company's E-420, the smallest digital SLR on the market, at 5.1 x 3.6 x 2.1 inches, 129mm x 91mm x 53mm and 13.4 oz, (380g), This is great news for those who prize portability, and folks with smallish hands. For large-handed individuals like this reviewer, it poses some challenges. When I cradle the camera in my left hand and wrap my fingers around the lens, they bump into my right hand clutching the camera grip. I found a compromise position that works reasonably well, folding my index and pinky fingers down and letting the camera rest on top of them, but it isn't the most natural shooting position.
The situation on the right-hand side is a little better. The grip has an effective texturized rubber covering on the front, and the same material on a curved thumb rest on the back. With the thumb rest balancing much of the weight, the camera is easier to shoot one-handed than most we've tried.
Controls*(10.75)*
Olympus brought one idea to the E-620 design that we heartily endorse: backlit buttons for the controls found on the right panel (playback, Live View, the four-way controller, etc.). We did find ourselves stumbling a bit when shooting in the dark and trying to locate the small Menu button on the left, though; it isn't illuminated and it's barely raised from the camera body.
If you're not using it for another purpose (taking manual exposure readings, for example), the Fn button can be assigned to instantly change to a predetermined settings configuration while shooting. Two groups of settings can be saved as My Mode 1 and My Mode 2. To use them, you hold down the Fn button while pressing the shutter button. We would have preferred to toggle entirely to the My Mode setups rather than this awkward double-button-press system, but even then it's a useful feature.
Another settings-storage strategy involves the Reset process, which addresses our concern above. In addition to the ability to reset the camera to its default settings, there is a Custom Reset option that sets the camera to one of two prepared settings combinations you've stored. This is a powerful feature for finicky photographers who want to maintain a group of settings for different shooting occasions. Unfortunately, Olympus has pretty much buried these options away deep in the menu system instead of presenting them as Custom User Modes or somesuch terminology and making them directly accessible via the mode dial.
The drive mode button is also programmable. In addition to the default, it can be set to access AF area selection, AF mode, WB, metering or ISO setting. It's a bit unclear, of course, why you'd want to set this button to a function that already has a dedicated button on the back of the camera, but perhaps this is meant to appeal to left-handed index finger virtuosos.
Menu*(7.00)*
The best part of the Olympus E-620 menu system is clearly the Super Control Panel -- even the name is enjoyable. By pressing the OK button, the LCD information display becomes interactive. Move the cursor to the setting you'd like to change using the four-way controller, then turn the control dial to browse through the available settings. If you prefer, pressing OK again will bring up a full-screen menu for the setting you've chosen. The Super Control Panel is very comprehensive, easy to read and navigate, and a very effective way to avoid working your way down through the formal menu system, or even figuring out which button to press for the setting you're after.
The Olympus menu system is a drab-looking construction, but the black-on-gray type is easy to read and navigation is straightforward using the four-way controller and, if you want to speed through a list of entries, the control dial. Oddly, moving down through a menu screen using the four-way controller wraps you back to the top of the current screen when you reach the bottom, while turning the control dial takes you continuously and consecutively through the different menu sections.
Manual & Learning*(4.50)*
The instruction manual supplied with the E-620 isn't bad, but it leaves out some important information.
The single 156-page book incorporates both a quick-start Basic Guide (up to page 24) and a more detailed manual, with the Table of Contents for the whole shebang inexplicably appearing after the end of the quick start part. If there were an Intimidation Olympics, the opening Basic Guide would certainly be a medal contender, leading off with illustrations festooned with enough callouts for a nuclear power plant diagram and tables that list settings without actually explaining what they do (particularly the Art Filters and Scene Modes). The initial shooting instructions fail to mention that the camera should be in Auto mode, the diagram here is confusing, the initial Live View discussion tells how to get into Live View mode but not how to get back out, and so on. This is a camera with eighteen scene modes and six Art Filters, but there is no actual explanation of what any of them do inside the entire 156-page manual -- you're left to dope it out by reading the on-screen displays, and not even told how to access those (you need to navigate to a particular scene mode and wait until the text magically appears).
Newbies may not feel the love, but if you're an experienced shooter you'll get along OK here, though the skimpy index finally had us resorting to a downloaded PDF of the document so we could use the search function. The writing is dry but comprehensible, there are enough diagrams and tables in most cases (though it all gets a bit dense in the camera customization section), and the reference material in the back of the book is comprehensive and well presented. As for learning about the included Olympus Master software, there is a cursory five-page drive-by and then you're stuck learning using the program's hard-to-navigate disc-based help system.
Incidentally, it doesn't appear that it's received a lot of loving attention from Olympus lately (there's a contest here with an August 20, 2008 drawing date), but there are some useful free photographic lessons available online at olympusdigitalschool.com. Neither the E-620 nor the E-30 are listed under the Digital SLR Cameras tab yet, but the Photo Lessons section has several useful tutorials explaining controls and techniques to improve your results in particular shooting situations, including shooting sunsets, macros, portraits and product shots.
Olympus E30 Comparison
Performance
The E-30 tested very well for color accuracy, but the E-620 did even better. In the Olympus problem areas of image noise and dynamic range, the E-620 did improve on its predecessor's dynamic range, but still proved sub-par next to the competition. In image noise, the two were for all practical purposes identical. The E-30 surpassed the long exposure performance of the E-620, but again not by enough to see a difference.
Components
The two cameras offer the same articulated HyperCrystal III LCD. We think the ability to pivot and rotate the screen is a particularly strong feature, and a rarity among SLRs. The button layout is very different, with the four-way controller used only for navigation on the E-30 rather than serving double-duty as direct settings control keys as they do on the E-620 -- not a huge advantage for larger camera, though it does avoid accidental trips to a settings adjustment screen when when all you wanted to do is get from here to there. The E-620 offers dual control dials, front and back, a significant advantage if you shoot in manual exposure mode frequently, along with a secondary monochrome LCD on top which is handy when shooting on a tripod.
Handling
When it comes to portability, the compact E-620 has a clear advantage. For actually handling the camera, though, your preference is likely to be based on the size of your hands. We find the E-30 much easier to maneuver, with its full-sized, nicely textured grip and solid heft in the palm of your hand. If you have smaller hands, though, the E-620 will be more to your liking. Both offer a nicely juxtaposed positioning of front grip and rear thumb rest to maintain camera balance even when shooting one-handed.
Controls
There's not a huge difference here. The E-30 has a faster claimed burst rate, at 5 frames per second versus 4 for the E-620, but in the lab we found the actual difference was much closer. The autofocus system on the E-30 is both statistically and practically superior, with faster performance both in bright and low light situations. The E-30 does offer a faster top shutter speed of 1/8000 second, but in actual shooting situations the E-620's 1/4000 speed really doesn't pose a practical limitation. And if you're a fan of Art Filters and Scene Modes, the two cameras offer identical capabilities.
NOTE: The images above are not used in our testing or scoring, but are included here to show real-world examples of the differences between cameras at the various ISO settings.
This section of the review was updated with revised results and scores on July 13, 2009. These changes did not affect the relative ratings of the reviewed cameras.
Canon Rebel XS Comp
Performance
The one area where the E-620 can claim noteworthy superiority over the Canon Rebel XS is resolution, though the XS didn't fare badly here. Both cameras offer extremely accurate color reproduction, but that's where they part company. The XS was by far the superior performer in long exposure, white balance and dynamic range testing, and noticeably better on image noise. As for burst-rate shooting, the difference was minimal.
Components
We far prefer the construction of the Olympus E-620. While the Canon Rebel XS is slightly lighter, the weight savings come at the cost of solid construction and feel in your hands; the XS feels almost like a toy camera. The LCD on the Canon is smaller than the Olympus (just 2.5 inches versus 2.7), and lacks the useful articulated-screen flexibility of the E-620 and its bright-light-resistant HyperCrystal III technology. Olympus also provides in-camera image stabilization, while Canon continues to require the purchase of individual image-stabilized lenses. On the other hand, Canon does offer a broader array of lens choices than the Four Thirds format Olympus.
Handling
Neither camera was a perfect fit for this reviewer's large hands, but the Rebel XS feels less substantial and comfortable, with a textured plastic grip instead of the rubberized handhold on the Olympus E-620. The camera buttons and dials are also easier to maneuver on the Olympus, while the Rebel XS offers fewer direct-access options and more menu-screen navigation.
Controls
The extra $200 spent on the Olympus buys you higher resolution (12.3 megapixels versus 10.1), a wider ISO range (out to ISO 3200 versus 1600 for the Canon) and a faster burst rate (four shots per second versus the Canon's 3 fps). The E-620 offers customization options that are both broad and deep, while the XS sticks with the basics. The E-620 also offers finer control over white balance settings, more bracketing options while shooting (including white balance and ISO bracketing) and a rear control panel menu system for changing key settings quickly and easily that the Rebel XS lacks.
NOTE: The images above are not used in our testing or scoring, but are included here to show real-world examples of the differences between cameras at the various ISO settings.
This section of the review was updated with revised results and scores on July 13, 2009. These changes did not affect the relative ratings of the reviewed cameras.
Pentax K2000 Comparison
Performance
In our lab testing, the Olympus E-620 posted superior performance in color accuracy and burst mode shooting, and the two cameras were comparable in resolution, with good results. On all of our other tests, though, the inexpensive Pentax was the better choice, including far more accurate white balance and dynamic range. Neither camera is going to win awards for its handling of image noise but, even here, the Pentax scored significantly higher.
Components
The most notable missing link in the Pentax component rundown is Live View; the Olympus E-620 offers a reasonable implementation of the feature, the Pentax doesn't offer it at all. While both LCDs are the same size and resolution, the E-620 offers the articulated hinge and HyperCrystal technology that make it more flexible and easier to use in low light (though this is, of course, more important if you're using Live View). Both cameras are quite small and, while the Olympus appears more solidly built than the Pentax, we were impressed with the quality of the value-priced K2000 as well. One surprising feature in the $600 Pentax bundle is an external flash unit, which retails alone for about $100. Unfortunately, it doesn't offer bounce flash capability, which makes it a less valuable add-on.
Handling
The Pentax K2000 has a much simpler, less cluttered design, with fewer direct-access buttons. That can mean slower shooting, but both camera offer well-designed LCD-screen control systems that put key settings at your fingertips. As for the way the cameras feel in your hands, the Pentax has a deeper righthand grip, making it easier to hold steadily compared to the stubbier Olympus design.
Controls
The Olympus E-620 provides a greater range of customization options than the Pentax K2000, allowing the sophisticated shooter to tailor the camera to his or her personal preferences, though some of these options are buried deep in the complex menu system. The top ISO and shutter speeds are the same for the two cameras, though the Olympus offers significantly faster burst-rate shooting. And both cameras ladle on the flashy filter features, with the six Art Filters provided in the E-620 competing against the six Filter Effects of the K2000. We found the Art Filters more interesting to shoot, though the Pentax offers two options we wish Olympus would adopt: the flexibility of adding the filter effects after you shoot rather than in the original photo, and settings that let you adjust the intensity of the filter's manipulation.
NOTE: The images above are not used in our testing or scoring, but are included here to show real-world examples of the differences between cameras at the various ISO settings.
Nikon D90 Comparison
Performance
In a head-to-head with the Olympus E-620, the Nikon D90 (which is $300 more expensive) leads in every performance category except color accuracy, by a significant though not overwhelming margin in most cases. The difference in dynamic range, long exposure and white balance capabilities is dramatic, and there a noteworthy edge in image noise as well.
Components
The Olympus LCD screen is more flexible but the Nikon screen is bigger and far more beautiful, at 3 inches and 921,000-dot resolution (versus the 2.7 inch 230,000-dot Olympus). The Nikon also supports direct HDMI connection to a high-def television, which is useful for movie output but also for viewing your photos on the big screen.
Handling
The Nikon D90 is significantly larger and heavier than the Olympus E-620, with a textured plastic grip that fits better in your palm than the abbreviated E-620 design, but lacks a rubberized covering. The D90 is the more rugged model, better suited to shooting in harsh environments.
Controls
The D90 offers an extended ISO range to 6400, but otherwise controls are comparable between the two cameras, with top shutter speeds of 1/4000 second and five-stop exposure compensation range. The Nikon has a slightly higher burst rate, which proved out in our lab testing, but both cameras perform well here.
NOTE: The images above are not used in our testing or scoring, but are included here to show real-world examples of the differences between cameras at the various ISO settings.
Conclusion
Meet the tester
Steve Morgenstern
Editor
Steve Morgenstern is a valued contributor to the Reviewed.com family of sites.
Checking our work.
Our team is here to help you buy the best stuff and love what you own. Our writers, editors, and experts obsess over the products we cover to make sure you're confident and satisfied. Have a different opinion about something we recommend? Email us and we'll compare notes.
Shoot us an email