Pros
Cons
Introduction
Design
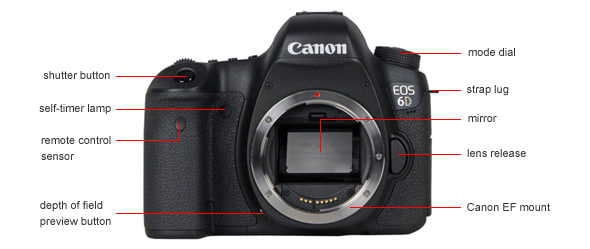
Front
{{section_header}}{{section.name}}{{/section_header}}
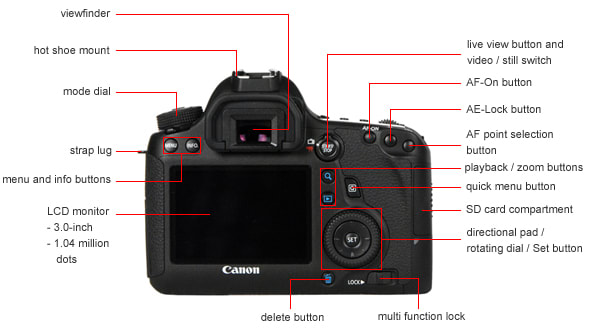
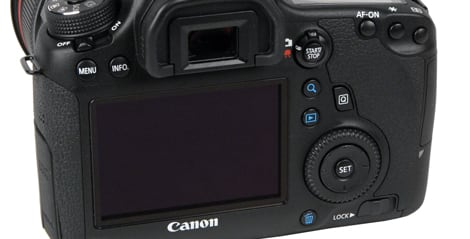
Back
{{section_header}}{{section.name}}{{/section_header}}
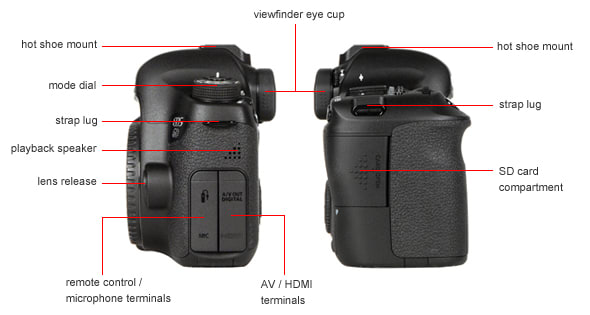
Sides
{{section_header}}{{section.name}}{{/section_header}}
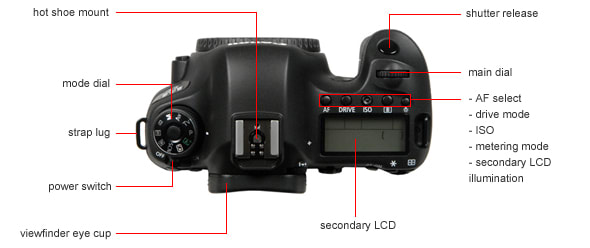
Top
{{section_header}}{{section.name}}{{/section_header}}
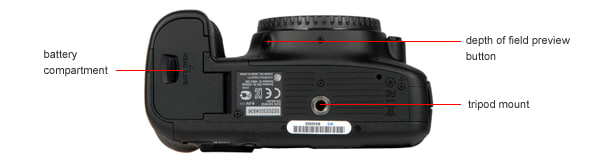
Bottom
{{section_header}}{{section.name}}{{/section_header}}
In the Box
{{section_header}}{{section.name}}{{/section_header}}
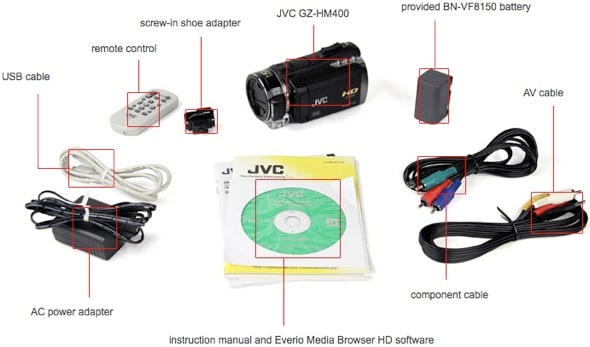
- Panasonic DMC-G2 camera body
- with body cap
- with body cap
- Interchangeable lens (LUMIX G VARIO 14–42mm, F3.5-5.6)
- with detachable lens hood, lens cap, lens rear cap, and lens storage bag
- with detachable lens hood, lens cap, lens rear cap, and lens storage bag
- Battery pack (DMW-BLB13PP)
- Battery charger / AC adapter
- AC cable
- AV cable
- USB connection cable
- CD-ROM
- Shoulder strap
- Stylus pen
Lens & Sensor
{{section_header}}{{section.name}}{{/section_header}}
The list of Panasonic lenses compatible with the company's Micro Four Thirds system is steadily increasing in size. There are about half a dozen lenses available (not including those you can use if you buy the lens converter). The kit lens that ships with the G2 is a 14–42mm, F3.5–5.6 LUMIX G VARIO lens.
The Panasonic G2 has the same sensor as last year's GF1, with a gross resolution of 13,060,000 pixels and an effective resolution of 12,100,000 pixels (12.1 megapixels). There are upsides and downsides to the Micro Four Thirds format, but the sensor is one of the most obvious differences. The 17.3 x 13mm sensor is nearly 10 times as large as the typical point-and-shoot, but the camera body is a lot more compact than DSLRs. On the other hand, the Micro Four Thirds sensor doesn't stack up well against the typical APS-C sensor found in most DSLRs. Image noise is likely to be higher with the Micro Four Thirds sensor and wide angle coverage won't be as extensive, even with the same size lens.
For those of you that like to know the math, the image below summarizes the optics equivalencies of Micro Four Thirds versus the other sensors. With Micro Four Thirds, you want to double the millimeter measurements: a 14–45mm lens on the G2 is equivalent to a 28–90mm lens on a 35mm camera. In comparison, a 14–45mm lens on an APS-C sensor DSLR is equivalent to a 22-72mm lens on a 35mm camera. The APS-C sensor, therefore, captures more on the wide angle side of the range, but has a lower maximum telephoto.
The G2 has an automatic dust reduction system that kicks in whenever the camera is turned on. It can be performed manually by choosing Sensor cleaning in the Custom menu.
Viewfinder
{{section_header}}{{section.name}}{{/section_header}}
Unlike last year's Micro Four Thirds cameras from Panasonic, the G2 is equipped with a viewfinder. The Gf1 was compatible with on optional EVF, but that meant dropping $200 on yet another accessory for your camera—an unnecessary expense, even though the detachable viewfinder was pretty awesome.
The color LCD viewfinder on the G2 has a resolution of approximately 1,440,000 dots with a field ratio of approximately 100%. On the side of the viewfinder is a diopter adjuster with a range of -4 to +4. To the right is a sensor, which automatically turns off the LCD when you put your eye up to the viewfinder.
Display(s)
{{section_header}}{{section.name}}{{/section_header}}
The LCD on the Panasonic G2 is the same as the 3-inch, 460,000-pixel screen that appeared on last year's GF1. The big improvement this year is that the LCD is articulated, allowing the user to turn it around for safe storage (or when you're using the LCD) or bring it out from the camera body and rotate it for more viewing angles. This is extremely useful if you're doing any self-recording or trying to grab a high or low vantage point for shooting.
The image on the LCD looked fine when shooting in most lighting conditions, but the refresh rate did slow down in lower lighting. In those cases, or when glare on the LCD becomes a problem, it might be easier to use the built-in viewfinder.
There are two optional modes for adjusting screen brightness to fit the shooting environment: Auto Power LCD and Power LCD. The former reacts to detected light levels, while the latter turns brightness to full blast—very handy when shooting in bright outdoor lighting.
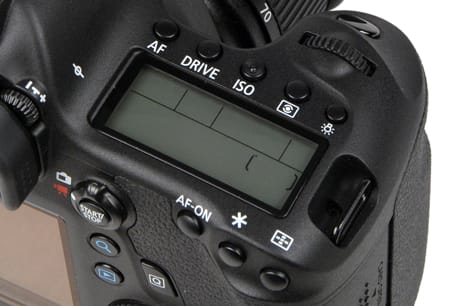
Secondary Display
The small monochrome LCD often found on the top of higher-end traditional SLRs to display camera settings is not present on the G2—as is to be expected. The compact body doesn't offer enough real estate for this feature.
The mono LCD display is small and disappointing.
Flash
{{section_header}}{{section.name}}{{/section_header}}
Unlike the most of the Micro Four Thirds competition, Panasonic continues to tuck a flash into this compact little camera body. The built-in pop-up flash snaps up at the flick of a switch and is nestled right around the accessory shoe. It's in a different position than the off-centered flashes on last year's GF1, but Panasonic enthusiasts will recognize the clever design from the GH1.
The flash is located high above the lens when extended, to minimize red-eye and shadows from the lens. The autoexposure system never causes the flash to pop up on its own, which is just fine with us. (The G2 won't volunteer its flash in unwanted shooting scenarios.) Maximum synch speed when shooting in forced flash mode is 1/160 of a second.
All the flash controls you'd expect in a well-outfitted SLR are included here, with different combinations of auto or forced flash, slow sync, and red-eye reduction.
When not using red-eye reduction, the flash can be set to second curtain sync, which produces a trailing light effect when shooting moving cars and similar subjects.
Flash output can be manually adjusted, in a ±2 EV range, in 1/3 EV increments.

The flash emitter pops up from the top of the body via a mechanical release.
Connectivity
{{section_header}}{{section.name}}{{/section_header}}
Beneath a hinged rubber flap on the left side of the camera, there are two connectors: mini HDMI (a universal connection found on many high definition camcorders), and a proprietary AV connection. The G2 does not ship with an HDMI cable, but they are easily found in most electronics stores. It does, however, ship with an AV cable to fit the proprietary connection. Unfortunately, this is only a standard definition composite connection, so it won't be good for viewing your HD video footage.
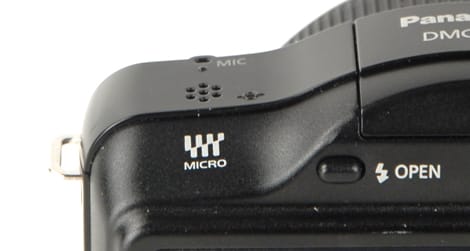
Above that compartment is a smaller covering, which hides the microphone input/wired remote terminal. The microphone input can come in handy for video recording.
As an extra bonus, if you own a Panasonic television, you can use the HDMI connection to view your videos and you can use the TV remote to control camera playback.
Battery
{{section_header}}{{section.name}}{{/section_header}}
The G2 ships with a DMW-BLB13PP lithium ion battery rated at 7.2V, 1250mAh. Panasonic gives the number of exposures per charge at 350 pictures, testing according to CIPA standards. This sounds about right to us, and we find this performance impressive, given the constant use of the power-sucking Live View display. Charging time is approximately 155 minutes.
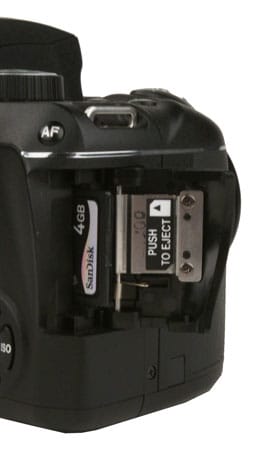
Memory
{{section_header}}{{section.name}}{{/section_header}}
The Panasonic G2 is compatible with standard SD/SDHC cards. Like all 2010 Panasonic camcorders and cameras, the G2 is also compatible with the new SDXC memory cards.
The K2000 accepts inexpensive, easy to find SD cards.
Photo Gallery
{{photo_gallery "Front Photo", "Back Photo", "Sides Photo", "Top Photo", "Bottom Photo", "Viewfinder Photo 1", "Viewfinder Photo 2", "Display Photo 1", "Display Photo 2", "Secondary Display Photo", "Flash Photo", "Lens Mount Photo", "Lens Photo 1", "Lens Photo 2", "Battery Photo", "Memory Photo", "Ports Photo 1", "Ports Photo 2", "Ports Photo 3", "Ports Photo 4", "Ports Photo 5", "Ports Photo 6", "Modes Photo", "Handling Photo 1", "Handling Photo 2", "Handling Photo 3", "Buttons Photo 1", "Buttons Photo 2", "Mic Photo", "Box Photo"}}
Image Quality
Sharpness
{{section_header}}{{section.name}}{{/section_header}}
The Panasonic G2 had incredibly impressive scores in the sharpness department, outstripping the Canon T2i, the Nikon D5000, and all of the Micro Four Thirds cameras in this comparison set. The best sharpness result was measured in the center of the lens when shooting at the widest focal length. At these settings, the sharpness was measured as 1888 lw/ph horizontally and 2033 lw/ph vertically. More on how we test sharpness.
Image Stabilization
{{section_header}}{{section.name}}{{/section_header}}
Image stabilization on the Panasonic G2 was very poor, boasting only minor improvements at a couple of shutter speeds and having a negative impact on sharpness under most conditions. Both the GF1 and the GH1 turned in superior performance in this test—as did every other Micro Four Thirds camera we've tested.
Color
{{section_header}}{{section.name}}{{/section_header}}
The Panasonic G2 produced more accurate color than either of the company's previous Micro Four Thirds models—in fact, for color accuracy alone, the G2 outstripped all of its competitors except for the remarkably accurate Olympus cameras. Compared to most traditional SLRs, however, the G2 underperforms in color accuracy. More on how we test color.
The G2 offers nine film modes: six in color and three in black and white. The most accurate of these modes turned out to be Smooth, which turned in a color accuracy of 2.87 and a was only slightly undersaturated at about 98%. Red, pink, dark blue, and dark green were the most accurate shades for the G2, while yellow, turquoise and lighter shades of green and blue turned out to be trouble spots.
The following chart shows same size crops of each color patch from the test chart, shot in the most accurate color mode for each comparison camera.
NOTE: Because of the way computer monitors reproduce colors, the images above do not exactly match the originals found on the chart or in the captured images. The chart should be used to judge the relative color shift, not the absolute captured colors.
{{comparison_bars title="Color Score Comparison", attribute="Color Score", xLabel="Color Score"}}
Color Modes
{{section_header}}{{section.name}}{{/section_header}}
The G2 offers nine different preset 'film modes,' which will be familiar to those that have used a Panasonic Micro Four Thirds camera in the past. Each modes impacts contrast, sharpness, saturation, and noise reduction differently. Six of those film modes impact color: Standard, Dynamic, Nature, Smooth, Nostalgic, and Vibrant. There are also three black and white film modes: Standard, Dynamic, and Smooth.
Including high-ISO noise reduction settings as part of color mode settings is a peculiarity. This means that the most accurate color presets may come hand-in-hand with some amount of noise reduction. There's no simple way to just turn off noise reduction altogether.
There are a couple of custom 'my film' presets that you can also enable; you can manually adjust contrast, sharpness, saturation, and noise reduction—each along a five-step scale—then save your adjustments for later.
The chart below shows same-size crops from test shots of the ColorChecker chart in each color mode. Dynamic and Vibrant modes were highly oversaturated: 112% and 124%, respectively. Nostalgic mode (not pictured below) heavily mutes saturation. The most accurate colors came when the G2 was set to smooth, but this mode also forces you to sacrifice from sharpness. We recommend using Standard mode for most of your shooting; its colors were fairly accurate in our tests and the mode doesn't impact sharpness.
White Balance
{{section_header}}{{section.name}}{{/section_header}}
balance was a significant weakness in the G2's performance, with disappointing results using both the automatic white balance setting and the custom white balance.
The only real highlight was the cameras's accuracy in rendering color under incandescent lighting, while using its custom white balance setting. This is often an Achilles heel for digital cameras and it's nice to see that the G2 fared comparatively well in this regard. With incandescent lighting, the auto setting definitely fared much worse. Even under daylight testing, the G2 didn't do particularly well compared to the competition. Custom white balance improved things overall, but the results were still disappointing.
Automatic White Balance ({{product.raw_scores['Auto White Balance Score']}})
Using the automatic white balance setting, results were best in fluorescent and daylight. Of course, these are the conditions under which most cameras usually do well. Compared to most of the cameras we've tested, the G2 actually did poorly.
The big surprise was actually incandescent lighting. As always, the camera struggled with this type of lighting, but not as much as the competition did. Sure, colors weren't exactly accurate (they were, in fact, much warmer than they should be), but compared to a lot of other models, the G2 did quite well.
Custom White Balance ({{product.raw_scores['Custom White Balance Score']}})
Taking a custom white balance eliminated the overall warm skew to color reproduction, but in most cases, the system actually overcompensated, resulting in cool tones across the board. These are disappointing results for any camera.
White Balance Options
{{section_header}}{{section.name}}{{/section_header}}
The G2 offers only a modest selection of white balance presets. Conspicuously missing is any kind of fluorescent setting—something we usually find in plenty on other cameras.
Though the presets may be paltry, the G2 does offer manual control over white balance. There are two manual white balance slots, so readings can be saved for later use, and clear on-screen prompts make the process fast and simple.
You can also tweak the white balance directly in degrees Kelvin. On other cameras, this is often a bit beyond the use of ordinary photographers, but the G2's Live View display updates to reflect each degree as you make the shift. You can also adjust preset and custom white balance settings along the green-magenta and amber-blue axes—also with a live on-screen preview.
Finally, there's a white balance bracketing feature available. This uses the WB fine adjustment system to set the bracketing increments. Three versions of the shot are taken with the single press of the shutter button.
Long Exposure
{{section_header}}{{section.name}}{{/section_header}}
In our long exposure test, which analyzes color accuracy and image noise over a range of shutter speeds, Panasonic has once again improved performance, granting the G2 less noise and more accurate colors than either of its previous G-system cameras. In general, however, Micro Four Thirds cameras do very poorly in this test compared to traditional DSLRs. The best mirrorless, interchangeable lens cameras for long exposure seem to be from Samsung, whose NX10 performed as well as any SLR we've tested. More on how we test long exposure.
Color accuracy worsened significantly at shutter speeds of 5 seconds or longer.
The Panasonic G2 has a special 'Long Shutter NR' feature, which is designed to lower noise with longer exposures.The feature did improve color accuracy slightly (see above chart), but it actually seemed to make matters worse in the noise department. Long exposure noise reduction works by taking a second exposure with the shutter closed, then digitally removing the noise that appears in the second image from the first image. Unfortunately, in the case of the Panasonic G2, this digital noise reduction simply doesn't work very well for long exposures.
As seen in the chart below, the G2 produces average results for a Micro Four Thirds camera. It performed better than the GF1, but not as well as the exceptional NX10. Compared to SLRs with APS-C format sensors, however, the G2 underperforms significantly.
{{comparison_bars title="Long Exposure Score Comparison", attribute="Long Exposure Score", xLabel="Long Exposure Score"}}
Noise Reduction
{{section_header}}{{section.name}}{{/section_header}}
On the G2, there is no simple setting to turn high-ISO noise reduction off, so we tweaked the options for custom Film Modes to select varying levels of noise reduction. (-1, +1, +2, and 0). The results you'll see in the chart below are far less dramatic than those of last year's G-series models from Panasonic, which measured up to nearly 5% noise at some settings. The G2 manages to keep noise under 2%, even at ISO 3200 with noise reduction set to -1.
At the lower ISOs, there's a big difference between blue and green noise, but at 800 and above, it's pretty much all the same. More on how we test noise.
ISO Options
{{section_header}}{{section.name}}{{/section_header}}
The G2 offers settings from ISO 100-6400. If you prefer finer control, you can set ISO increments to 1/3 stop in the recording menu.
You can set the ISO manually or choose from two different automatic ISO settings: standard Auto ISO (based on the scene's light level) and Intelligent ISO (factors in subject movement to boost ISO and shutter speed when needed). There is also an ISO limit set, which allows the user to cap ISO at 200, 400, 600, 800, or 1600. The limit can be used in conjunction with either Auto ISO or Intelligent ISO.
The following same-size crops are taken from photos of our standard still life, taken in aperture-priority mode with automatic white balance.
Dynamic Range
{{section_header}}{{section.name}}{{/section_header}}
The Panasonic G2 turned in slightly above average dynamic range results for a Micro Four Thirds camera. Historically, the competition from Olympus has not done well in this test, so those low scores were no surprise. We were pleased to find that the G2 boasted an improvement over the GF1, though it did not do nearly as well as the considerably more expensive GH1. The good news is that dynamic range wasn't severely limited until we reached ISO 800, which means that you should get sufficient detail in both shadows and highlights if you shoot at the lower ISOs. More on how we test dynamic range.
The following chart compares the dynamic range results for each of our comparison cameras at ISO 200. As you can see, the Sony NEX-5 proves the winner here, with an impressive range. The G2, however, is not far behind. (Nor, incidentally, is the G2 far behind the Canon T2i or Nikon D5000.)
{{comparison_bars title="Dynamic Range Score Comparison", attribute="Dynamic Range Score", xLabel="Dynamic Range Score"}}
Noise Reduction
{{section_header}}{{section.name}}{{/section_header}}
On the G2, there is no simple setting to turn high-ISO noise reduction off, so we tweaked the options for custom Film Modes to select varying levels of noise reduction. (-1, +1, +2, and 0). The results you'll see in the chart below are far less dramatic than those of last year's G-series models from Panasonic, which measured up to nearly 5% noise at some settings. The G2 manages to keep noise under 2%, even at ISO 3200 with noise reduction set to -1.
At the lower ISOs, there's a big difference between blue and green noise, but at 800 and above, it's pretty much all the same. More on how we test noise.
ISO Options
{{section_header}}{{section.name}}{{/section_header}}
The G2 offers settings from ISO 100-6400. If you prefer finer control, you can set ISO increments to 1/3 stop in the recording menu.
You can set the ISO manually or choose from two different automatic ISO settings: standard Auto ISO (based on the scene's light level) and Intelligent ISO (factors in subject movement to boost ISO and shutter speed when needed). There is also an ISO limit set, which allows the user to cap ISO at 200, 400, 600, 800, or 1600. The limit can be used in conjunction with either Auto ISO or Intelligent ISO.
The following same-size crops are taken from photos of our standard still life, taken in aperture-priority mode with automatic white balance.
Focus Performance
{{section_header}}{{section.name}}{{/section_header}}
Autofocus performance has been a key strength of the Lumix G series from the start, and this continues with the G2. The Live View autofocus on most digital SLRs is too slow to be practical when shooting moving subjects. Panasonic, though, has figured out how to make contrast detect autofocus nearly as fast as the standard SLR phase detect system, and certainly workable for all but the most sports-oriented photography. This is an area where the G2 has a clear advantage over the Olympus E-P1, which suffers from pokey autofocus speeds.
The continuous autofocus in video mode pioneered on the GH1 is also implemented on the G2. The autofocus system supports four modes, which may be selected via a dedicated dial on the top of the camera:
Beneath the Focus Modes dial is a secondary dial, which allows you to select between AF-S (autofocus single), AF-C (continuous), and MF (manual focus). AF-S focuses when you press the shutter halfway and maintains that setting, even if you move the camera. AF-C keeps refocusing as necessary while you hold the shutter down, even if your subject moves, or you move the camera. Yet another set of autofocus options are prefocus settings, available through the custom settings menu. Here you can choose from Q-AF (Quick Autofocus), which tries to autofocus whenever the camera is held still, and C-AF (Continuous Autofocus), which attempts to maintain focus at all times, even if the camera is moving and your finger is nowhere near the shutter button, with compatible lenses. Confusing terminology rules here: having both Autofocus Continuous and Continuous Autofocus as distinct choices isn't playing fair.
There's a bright red autofocus assist lamp on the front left, which does a nice job when the lights are low. However, the positioning isn't perfect. It's very easy to cover up the lamp with your right middle finger while shooting, especially if you have large hands. It's also slightly off-center, so your subject won't be evenly illuminated if s/he is in the center of the frame.
Panasonic continues with its odd variant to face detection, which it calls face recognition. You can register up to six faces in the camera's built-in memory, complete with name, birthday and a priority rating if you choose. Then, when the feature is turned on during shooting, those registered faces will be given preferential treatment when focusing and setting exposure. The name can even be displayed on screen, for no apparent reason. The face recognition concept does have some interesting benefits, though. When taking group photos (at a school concert, for example), it will help make sure your little darling is in focus rather than some random kid. And during playback, it's possible to view only images which include recognized faces.
Long Exposure
{{section_header}}{{section.name}}{{/section_header}}
In our long exposure test, which analyzes color accuracy and image noise over a range of shutter speeds, Panasonic has once again improved performance, granting the G2 less noise and more accurate colors than either of its previous G-system cameras. In general, however, Micro Four Thirds cameras do very poorly in this test compared to traditional DSLRs. The best mirrorless, interchangeable lens cameras for long exposure seem to be from Samsung, whose NX10 performed as well as any SLR we've tested. More on how we test long exposure.
Color accuracy worsened significantly at shutter speeds of 5 seconds or longer.
The Panasonic G2 has a special 'Long Shutter NR' feature, which is designed to lower noise with longer exposures.The feature did improve color accuracy slightly (see above chart), but it actually seemed to make matters worse in the noise department. Long exposure noise reduction works by taking a second exposure with the shutter closed, then digitally removing the noise that appears in the second image from the first image. Unfortunately, in the case of the Panasonic G2, this digital noise reduction simply doesn't work very well for long exposures.
As seen in the chart below, the G2 produces average results for a Micro Four Thirds camera. It performed better than the GF1, but not as well as the exceptional NX10. Compared to SLRs with APS-C format sensors, however, the G2 underperforms significantly.
{{comparison_bars title="Long Exposure Score Comparison", attribute="Long Exposure Score", xLabel="Long Exposure Score"}}
Video: Low Light Sensitivity
{{section_header}}{{section.name}}{{/section_header}}
The G2 needed 24 lux of light to record an image that registered 50 IRE on our waveform monitor. This isn't a great showing for the camera, but it matches up with what we saw from the other models in this set. Only the Samsung NX10 was able to produce the same IRE levels with less than 20 lux of light (it needed 19 lux to reach 50 IRE). What does this all mean? Well, it means that none of these models are top-notch performers when it comes to low light sensitivity, so the Panasonic G2's performance isn't all that bad in comparison. We should also note that there was no difference in the low light sensitivity on the Panasonic G2 when we shot using the camera's MJPEG compression mode in comparison to its AVCHD setting.
Chromatic Aberration
{{section_header}}{{section.name}}{{/section_header}}
Our image analysis software found only minor traces of color fringing when shooting at the full telephoto distance. When viewed with the naked eye, you would be hard-pressed to locate these chromatic abnormalities at all.
Most people probably won't even be able to tell the different between the crops taken at the widest focal length (14mm) and those from halfway through the focal range (28mm). Once again, sharpness is excellent and chromatic aberration is nearly invisible.
If you look closely at the crops from 42mm, you can definitely see some discernible softness, especially with the lens stopped all the way down to f/22. Even here, the results are better than what we see on most cameras.
Distortion
{{section_header}}{{section.name}}{{/section_header}}
We found that the 14–42mm kits lens caused very little distortion, even at the widest angle.
Motion
{{section_header}}{{section.name}}{{/section_header}}
The Panasonic G2 captures motion differently depending on which compression system you shoot with. The MJPEG mode utilizes a 30p frame rate, while the AVCHD Lite mode uses a 60p frame rate (but the sensor output is still 30p). Just as we saw previously on the Panasonic GF1, the clips recorded by the G2 in its AVCHD Lite mode played back at double speed on our computer. We think this playback problem has something to do with compatibility issues with the AVCHD Lite compressions system. We never run into this problem with cameras or camcorders that use regular AVCHD compression. More on how CamcorderInfo tests motion.
So, if you're planning on viewing clips on your computer (or uploading to the internet), you may want to avoid the complications of AVCHD Lite and use the MJPEG setting on the G2. Unfortunately, shooting with the MJPEG setting resulted in more artifacting than the camera's AVCHD Lite option. The MJPEG mode did produce a smoother image, however, and it had less trailing. We had no speed problems with the AVCHD Lite footage when we played it back wit the G2 connected to an HDTV.
In both its MJPEG and AVCHD Lite modes, the G2 had a significant problem with a rolling shutter. Rolling shutters are caused by the camera not being able to reproduce a full image quickly enough, so when you do any fast panning with the camera certain portions of the screen appear to wobble (some describe it as looking like Jell-O). We've seen this problem before, but it is more commonly found on true DSLR cameras that record video—not Micro Four Thirds models like the G2.
The Panasonic GF1 has the same recording options as the Panasonic G2 and it produced the same playback problems with its AVCHD Lite mode. Like the G2, the GF1 also showed some significant artifacting in its MJPEG mode, while its AVCHD Lite setting produced video that looked rather choppy at times.
The Olympus E-PL1 also records 720p video using a 30p frame rate. Its video in our motion test looked fairly smooth, but it had more artifacting than the competition. There was also some noticeable blur and trailing in the RGB pinwheel during our test.
The Samsung NX10 was very good in terms of artifacting in our motion test, but its video had plenty of trailing, blur, and it wasn't very smooth either. The NX10 also had a big problem with its rolling shutter, which we also saw on the Panasonic G2.
Video Sharpness
{{section_header}}{{section.name}}{{/section_header}}
The Panasonic G2 measured a horizontal sharpness of 575 lw/ph and a vertical sharpness of 550 lw/ph in our video testing. These numbers are very similar to what we saw from the Panasonic GF1 and Olympus E-PL1, but they are just a tad lower than what the Samsung NX10 was capable of. Since all of these models record at a maximum video resolution of just 1280 x 720, none of them are amongst the elite video-capable DSLRs when it comes to video sharpness. These numbers are also significantly lower than what a high-end or a very good mid-range HD camcorder is capable of achieving. More on how CamcorderInfo tests video sharpness.
{{comparison_bars title="Video Sharpness Score Comparison", attribute="Video Sharpness Score", comps="video", xLabel="Video Sharpness Score"}}
Low Light Sensitivity
{{section_header}}{{section.name}}{{/section_header}}
The G2 needed 24 lux of light to record an image that registered 50 IRE on our waveform monitor. This isn't a great showing for the camera, but it matches up with what we saw from the other models in this set. Only the Samsung NX10 was able to produce the same IRE levels with less than 20 lux of light (it needed 19 lux to reach 50 IRE). What does this all mean? Well, it means that none of these models are top-notch performers when it comes to low light sensitivity, so the Panasonic G2's performance isn't all that bad in comparison. We should also note that there was no difference in the low light sensitivity on the Panasonic G2 when we shot using the camera's MJPEG compression mode in comparison to its AVCHD setting.
Usability
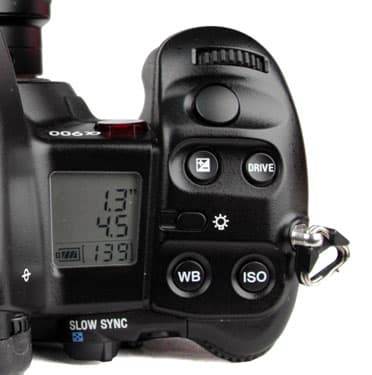
Buttons & Dials
{{section_header}}{{section.name}}{{/section_header}}
Shooting with the original G1, we found the control dial was too sensitive, leading us to click it accidentally and change the exposure compensation settings. In the new model, there seems to be more resistance, which has resulted in the problem being erased entirely. We were also relieved to find that the video record button remains on the top of the camera, out of harm's way, where it was directly above the thumb rest on last year's GH1. We strongly prefer this design.
Effects, Filters, and Scene Modes
{{section_header}}{{section.name}}{{/section_header}}
The G2 offers nine preset film modes, six in color and three in black and white. For color, these include Standard, Dynamic, Nature, Smooth, Nostalgic and Vibrant; for black and white there is Standard, Dynamic and Smooth. We have samples of the same scene shot in each of these modes in the Sample Photos section, under Film Mode Examples.
Each color preset mode can be adjusted for contrast, sharpness, saturation and noise reduction, with five steps for each setting. The black and white modes work the same way, except there is no saturation control. Having noise reduction as a film mode setting rather than an overall camera setting is an odd choice, making changes less convenient than the more typical procedure. You're also prevented from turning off noise reduction completely, as we often do when trying to tease out as much image detail as possible.
Multi Film bracketing is an interesting feature that lets you select two or three different Film Mode settings and take shots in each one consecutively. Unlike white balance bracketing, you don't take a single shot and have it saved in different versions: in this case, you'd have to press the shutter repeatedly or set the camera to burst mode.
Menu
{{section_header}}{{section.name}}{{/section_header}}
The G2 offers direct access to several key shooting controls, including ISO, white balance and focus mode, via buttons on the back of the camera. Most of the other frequently changed settings in record mode, including film mode, image size and flash control, are a single button-press away, via the Quick Menu system (which has its own dedicated button). The Quick Menu system makes the information overlay on the Live View screen interactive, navigable with the control dial or four-way controller. To change a setting, you press the Menu/Set button.
For the remaining settings, there's a typical multi-part menu system. The menus are easy enough to read, color coded for quick identification, and settings include both icons and legible text, so you're never stuck guessing what a line item controls. However, each menu can run up to five screens deep, meaning a lot of scrolling and searching before you find what you're after.
Instruction Manual
{{section_header}}{{section.name}}{{/section_header}}
The 220-page Operating Instructions manual isn't bad, but there are some peculiarities. It's certainly not a book intended to be read cover-to-cover, as some of the early information is a bit obscure for beginners. The index and table of contents, however, don't list everything you would expect. Movie and video is referred to as 'motion picture' and some things just aren't present. If you come across an option in the camera that you don't understand, it's very easy to look this up. If, however, you just want to know how to do something but you don't know Panasonic's term for it, you might be in trouble.
On the plus side, there are lots of illustrations and every specific setting is explained in excellent detail. You can download a pdf of the manual here.
Handling
{{section_header}}{{section.name}}{{/section_header}}
The Micro Four Thirds format certainly offers a more compact design than many traditional SLRs, but it is far from the compact shooting experience you might expect from a true compact camera. The most significant difference between an SLR and a Micro Four Thirds camera is in the depth. Removing the SLR mirror mechanism cuts the depth of the G2 nearly in half, compared to many SLRs currently on the market. Of course, if you choose to attach a large lens to the front of the camera, and inch or so of depth doesn't make much of a difference. So, in this case, size doesn't really matter.
What is good on the G2 is the overall balance and comfort. The form factor is very similar to that of the GH1 and G1. It feels substantial in your hands, with enough weight to sit comfortably. If you have larger hands, you might be disappointed in the depth of the grip; wrapping your fingers all the way around the grip causes your index finger to be out of alignment with the shutter button. We also wouldn't have minded some extra texture on the grip. The surface of the camera is highly resilient to greasy fingerprinting and scratches, but it can get a bit sweaty on long, hot photoshoots.
Perhaps the greatest advantage to the G2 is its pivoting LCD panel, which lets you shoot easily from a number of different angles.
Buttons & Dials
{{section_header}}{{section.name}}{{/section_header}}
Shooting with the original G1, we found the control dial was too sensitive, leading us to click it accidentally and change the exposure compensation settings. In the new model, there seems to be more resistance, which has resulted in the problem being erased entirely. We were also relieved to find that the video record button remains on the top of the camera, out of harm's way, where it was directly above the thumb rest on last year's GH1. We strongly prefer this design.
Display(s)
{{section_header}}{{section.name}}{{/section_header}}
The LCD on the Panasonic G2 is the same as the 3-inch, 460,000-pixel screen that appeared on last year's GF1. The big improvement this year is that the LCD is articulated, allowing the user to turn it around for safe storage (or when you're using the LCD) or bring it out from the camera body and rotate it for more viewing angles. This is extremely useful if you're doing any self-recording or trying to grab a high or low vantage point for shooting.
The image on the LCD looked fine when shooting in most lighting conditions, but the refresh rate did slow down in lower lighting. In those cases, or when glare on the LCD becomes a problem, it might be easier to use the built-in viewfinder.
There are two optional modes for adjusting screen brightness to fit the shooting environment: Auto Power LCD and Power LCD. The former reacts to detected light levels, while the latter turns brightness to full blast—very handy when shooting in bright outdoor lighting.
Secondary Display
The small monochrome LCD often found on the top of higher-end traditional SLRs to display camera settings is not present on the G2—as is to be expected. The compact body doesn't offer enough real estate for this feature.
The mono LCD display is small and disappointing.
Viewfinder
{{section_header}}{{section.name}}{{/section_header}}
Unlike last year's Micro Four Thirds cameras from Panasonic, the G2 is equipped with a viewfinder. The Gf1 was compatible with on optional EVF, but that meant dropping $200 on yet another accessory for your camera—an unnecessary expense, even though the detachable viewfinder was pretty awesome.
The color LCD viewfinder on the G2 has a resolution of approximately 1,440,000 dots with a field ratio of approximately 100%. On the side of the viewfinder is a diopter adjuster with a range of -4 to +4. To the right is a sensor, which automatically turns off the LCD when you put your eye up to the viewfinder.
Image Stabilization
{{section_header}}{{section.name}}{{/section_header}}
Image stabilization on the Panasonic G2 was very poor, boasting only minor improvements at a couple of shutter speeds and having a negative impact on sharpness under most conditions. Both the GF1 and the GH1 turned in superior performance in this test—as did every other Micro Four Thirds camera we've tested.
Shooting Modes
{{section_header}}{{section.name}}{{/section_header}}
The regular shooting modes on the G2 are nearly identical to those offered on the G1, GH1, and GF1. It also carries over the same Custom Settings capability on those earlier models. Unfortunately, the G2 does not possess the secondary dial position for custom settings that the GF1 had. The G2 (like the G1 and GH1) has a single dial position for you custom settings.
Focus
{{section_header}}{{section.name}}{{/section_header}}
Autofocus performance has been a key strength of the Lumix G series from the start, and this continues with the G2. The Live View autofocus on most digital SLRs is too slow to be practical when shooting moving subjects. Panasonic, though, has figured out how to make contrast detect autofocus nearly as fast as the standard SLR phase detect system, and certainly workable for all but the most sports-oriented photography. This is an area where the G2 has a clear advantage over the Olympus E-P1, which suffers from pokey autofocus speeds.
The continuous autofocus in video mode pioneered on the GH1 is also implemented on the G2. The autofocus system supports four modes, which may be selected via a dedicated dial on the top of the camera:
Beneath the Focus Modes dial is a secondary dial, which allows you to select between AF-S (autofocus single), AF-C (continuous), and MF (manual focus). AF-S focuses when you press the shutter halfway and maintains that setting, even if you move the camera. AF-C keeps refocusing as necessary while you hold the shutter down, even if your subject moves, or you move the camera. Yet another set of autofocus options are prefocus settings, available through the custom settings menu. Here you can choose from Q-AF (Quick Autofocus), which tries to autofocus whenever the camera is held still, and C-AF (Continuous Autofocus), which attempts to maintain focus at all times, even if the camera is moving and your finger is nowhere near the shutter button, with compatible lenses. Confusing terminology rules here: having both Autofocus Continuous and Continuous Autofocus as distinct choices isn't playing fair.
There's a bright red autofocus assist lamp on the front left, which does a nice job when the lights are low. However, the positioning isn't perfect. It's very easy to cover up the lamp with your right middle finger while shooting, especially if you have large hands. It's also slightly off-center, so your subject won't be evenly illuminated if s/he is in the center of the frame.
Panasonic continues with its odd variant to face detection, which it calls face recognition. You can register up to six faces in the camera's built-in memory, complete with name, birthday and a priority rating if you choose. Then, when the feature is turned on during shooting, those registered faces will be given preferential treatment when focusing and setting exposure. The name can even be displayed on screen, for no apparent reason. The face recognition concept does have some interesting benefits, though. When taking group photos (at a school concert, for example), it will help make sure your little darling is in focus rather than some random kid. And during playback, it's possible to view only images which include recognized faces.
Of course, there's also a manual focus mode, chosen via secondary focus dial up top. By default, a zoomed-in view of the scene (up to 10x magnification) appears when you start focusing manually, returning to normal view when you depress the shutter button halfway. In certain circumstances (when shooting on a tripod, for example) we found this useful, though having the rest of the screen disappear while trying to manually focus on a moving subject is less practical. You can also set the camera to allow fine manual focus adjustment after the autofocus system has done its business.
Recording Options
{{section_header}}{{section.name}}{{/section_header}}
The G2 offers a healthy range of options for picture quality and size. There are four aspect ratio options, each with three resolution settings. There are two compression settings for JPEG images: fine and standard. You can also shoot in RAW, either independently or with an attached fine/standard JPEG image.
Other Controls
{{section_header}}{{section.name}}{{/section_header}}
Audio Recording
The mic can be used to record 5 seconds of audio along with a photo. This is a useful feature when you want to make a note about the shooting situation without fumbling for a pen and paper. Audio annotations can also be added during image playback.
Speed and Timing
{{section_header}}{{section.name}}{{/section_header}}
The G2 supports three burst mode settings: High, Medium, and Low. The medium speed captures photos at approximately 2.6 fps, while the low speed achieves about 2.0 fps. When the camera is set to AFC mode, the camera will adjust focus between shots, cutting the burst rate.
Panasonic claims that the camera can achieve a top burst rate of 3.2 shots per second. Our lab tests showed just about the same results. The G2 shot an average of 3.43 fps in our burst test.
In addition to the basic 10-second and 2-second shutter delay options, you can also choose to have three consecutive shots taken after a 10-second delay, handy if you're racing to get into the photo.
A wired remote, the DMW-RSL1, is available for about $20. The port for the wired remote is hidden in a separate compartment on the left side of the camera. The G2 doesn't support a wireless remote control.
Focus Speed
{{section_header}}{{section.name}}{{/section_header}}
Autofocus performance has been a key strength of the Lumix G series from the start, and this continues with the G2. The Live View autofocus on most digital SLRs is too slow to be practical when shooting moving subjects. Panasonic, though, has figured out how to make contrast detect autofocus nearly as fast as the standard SLR phase detect system, and certainly workable for all but the most sports-oriented photography. This is an area where the G2 has a clear advantage over the Olympus E-P1, which suffers from pokey autofocus speeds.
The continuous autofocus in video mode pioneered on the GH1 is also implemented on the G2. The autofocus system supports four modes, which may be selected via a dedicated dial on the top of the camera:
Beneath the Focus Modes dial is a secondary dial, which allows you to select between AF-S (autofocus single), AF-C (continuous), and MF (manual focus). AF-S focuses when you press the shutter halfway and maintains that setting, even if you move the camera. AF-C keeps refocusing as necessary while you hold the shutter down, even if your subject moves, or you move the camera. Yet another set of autofocus options are prefocus settings, available through the custom settings menu. Here you can choose from Q-AF (Quick Autofocus), which tries to autofocus whenever the camera is held still, and C-AF (Continuous Autofocus), which attempts to maintain focus at all times, even if the camera is moving and your finger is nowhere near the shutter button, with compatible lenses. Confusing terminology rules here: having both Autofocus Continuous and Continuous Autofocus as distinct choices isn't playing fair.
There's a bright red autofocus assist lamp on the front left, which does a nice job when the lights are low. However, the positioning isn't perfect. It's very easy to cover up the lamp with your right middle finger while shooting, especially if you have large hands. It's also slightly off-center, so your subject won't be evenly illuminated if s/he is in the center of the frame.
Panasonic continues with its odd variant to face detection, which it calls face recognition. You can register up to six faces in the camera's built-in memory, complete with name, birthday and a priority rating if you choose. Then, when the feature is turned on during shooting, those registered faces will be given preferential treatment when focusing and setting exposure. The name can even be displayed on screen, for no apparent reason. The face recognition concept does have some interesting benefits, though. When taking group photos (at a school concert, for example), it will help make sure your little darling is in focus rather than some random kid. And during playback, it's possible to view only images which include recognized faces.
Of course, there's also a manual focus mode, chosen via secondary focus dial up top. By default, a zoomed-in view of the scene (up to 10x magnification) appears when you start focusing manually, returning to normal view when you depress the shutter button halfway. In certain circumstances (when shooting on a tripod, for example) we found this useful, though having the rest of the screen disappear while trying to manually focus on a moving subject is less practical. You can also set the camera to allow fine manual focus adjustment after the autofocus system has done its business.
Features
Effects, Filters, and Scene Modes
{{section_header}}{{section.name}}{{/section_header}}
The G2 offers nine preset film modes, six in color and three in black and white. For color, these include Standard, Dynamic, Nature, Smooth, Nostalgic and Vibrant; for black and white there is Standard, Dynamic and Smooth. We have samples of the same scene shot in each of these modes in the Sample Photos section, under Film Mode Examples.
Each color preset mode can be adjusted for contrast, sharpness, saturation and noise reduction, with five steps for each setting. The black and white modes work the same way, except there is no saturation control. Having noise reduction as a film mode setting rather than an overall camera setting is an odd choice, making changes less convenient than the more typical procedure. You're also prevented from turning off noise reduction completely, as we often do when trying to tease out as much image detail as possible.
Multi Film bracketing is an interesting feature that lets you select two or three different Film Mode settings and take shots in each one consecutively. Unlike white balance bracketing, you don't take a single shot and have it saved in different versions: in this case, you'd have to press the shutter repeatedly or set the camera to burst mode.
Recording Options
{{section_header}}{{section.name}}{{/section_header}}
Like the Panasonic GF1 and GH1 before it, the G2 offers two compression options for recording HD video: AVCHD Lite and Motion JPEG (MJPEG). These two options are identical to what Panasonic included on the GF1. The AVCHD Lite compression is essentially the same as regular AVCHD compression, which is popular on consumer HD camcorders. We did, however, run into some compatibility issues with the AVCHD Lite compression system. When we played back AVCHD Lite clips on our computer, the videos played at double speed, which we think is a problem associated with the 60p frame rate the camera uses in AVCHD Lite mode (the sensor output is 30 frames per second). AVCHD Lite clips played back on a television looked fine, though, so this issue only came about after we imported the video clips to a computer.
If you want to avoid the problems with the AVCHD Lite compression, you can record video using the G2's Motion JPEG compression option. We found the MJPEG videos to have a bit more artifacting than the AVCHD Lite videos, but color accuracy, noise levels, and low light sensitivity all came out nearly identical with the two modes.
Video Controls
{{section_header}}{{section.name}}{{/section_header}}
Auto Controls
The Panasonic G2 does have a continual autofocus system, which is something that is becoming more common to find on video-capable DSLRs (especially on Micro Four Thirds models). The autofocus doesn't work nearly as fast as it does on most consumer camcorders, but it does produce accurate results and smooth focus transitions. If you're looking for snap-like focus changes, however, then you will be disappointed with the G2. Of the video-capable DSLRs we've tested, the Sony NEX-5 had the best autofocus system.
Auto exposure also works smoothly and accurately, although it only does this during recording. Prior to pressing the record button the camera will quickly change exposure levels when moving from light to dark scenes (or vice versa). This may be a problem if you are trying to plan out a shot with exposure changes. The other auto controls on the camera, particularly the auto white balance, all seem to work without any glaring weaknesses.
Zoom
Zoom is controlled by using the zoom ring on the G2's attached lens. The amount of zoom offered is entirely dependent on what lens you have connected, but the kit lens is a 14 - 42mm lens, which translates to a 3x optical zoom.
The camcorder also has an extended optical zoom setting that can be turned on in video mode. What this does is it bumps up the magnification right off the bat (before you start recording or zooming with the zoom ring). This setting increases the amount of zoom possible with the camera to 9.4x. There are also two digital zoom options on the camera that allow you to increase zoom by 2x or 4x. According to Panasonic there should be no deterioration in image quality when using the extended optical zoom feature, but the digital zoom options will degrade picture quality.
Focus
As we stated above, the G2 does have a live autofocus function. You can also set focus manually using the lens ring, or you can activate an autofocus by pressing the shutter halfway down. Since the autofocus sometimes works slowly, you may want to use manual focus if you're recording a planned-out shot.
Exposure Controls
Exposure can be set on the camera quite easily, and it can be done so during recording (always a good thing). When you set the exposure manually, it does take the camera a bit of a moment to adjust the levels. There isn't too much of a delay, it's just that the levels don't change instantaneously.
There is no manual shutter speed control on the camera in video mode, but aperture can be set using what Panasonic calls 'peripheral defocus' control. This feature can only be set in movie mode and you don't actually see the f-stop values you are setting the camera to. All you see is a little bar that shows depth of field. While this simplified system may be helpful for some users, we find it a bit odd. We wish Panasonic would include regular aperture control (with f-stop values) in addition to the 'peripheral defocus' option.
Other Controls
There's no manual ISO control in video mode, but you can set white balance manually or select a specific Kelvin color temperature. The full set of color controls (called film modes) are also available when recording video. You can see examples of these color modes in the Video: Color section of this review.
Other controls that work in video include a stabilization setting, three levels of intelligent exposure (low, medium, and high), and three exposure metering modes (spot, center weighted, or multi).
Audio Features
{{section_header}}{{section.name}}{{/section_header}}
While the built-in microphone on the Panasonic G2 isn't anything to write home about, the fact that the camera has an external microphone input is something rather unique for a camera of its class. The built-in mic on the G2 records mono audio and it picks up tons of extraneous operational sounds during recording. If you want to capture stereo audio, however, you can purchase the optional DMW-MS1 microphone that attaches to the G2's accessory shoe and via a cable into the camera's external mic input. It is unclear as to whether a third-party microphone is compatible with the camcorder, but the external mic input is not the normal 3.5mm size (it is a smaller, 2.5mm jack).
In addition to the external mic jack, the Panasonic G2 also has a wind cut feature that can be turned on to reduce wind noise. You can read a complete list of audio features in the table below.
In the Box
{{section_header}}{{section.name}}{{/section_header}}
- Panasonic DMC-G2 camera body
- with body cap
- with body cap
- Interchangeable lens (LUMIX G VARIO 14–42mm, F3.5-5.6)
- with detachable lens hood, lens cap, lens rear cap, and lens storage bag
- with detachable lens hood, lens cap, lens rear cap, and lens storage bag
- Battery pack (DMW-BLB13PP)
- Battery charger / AC adapter
- AC cable
- AV cable
- USB connection cable
- CD-ROM
- Shoulder strap
- Stylus pen
Meet the tester

Vice President of Editorial Management, Kaitlyn oversees the editorial departments of Reviewed.com’s various sites. She has been writing about technology since the turn of the century. Outside of her Reviewed.com home, Kaitlyn is also a theatre director and avid gamer.
Checking our work.
Our team is here to help you buy the best stuff and love what you own. Our writers, editors, and experts obsess over the products we cover to make sure you're confident and satisfied. Have a different opinion about something we recommend? Email us and we'll compare notes.
Shoot us an email