Pros
Cons
Introduction
Design
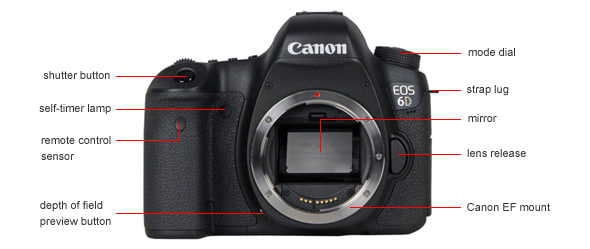
Front
{{section_header}}{{section.name}}{{/section_header}}
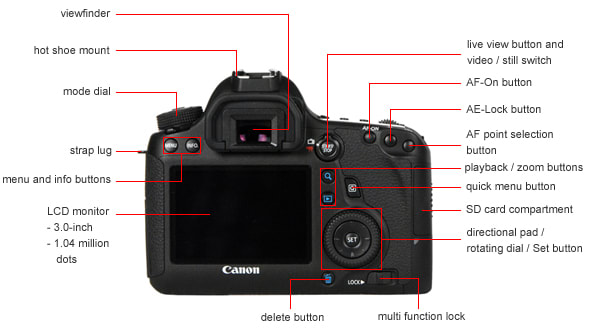
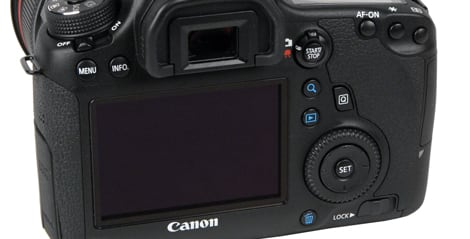
Back
{{section_header}}{{section.name}}{{/section_header}}
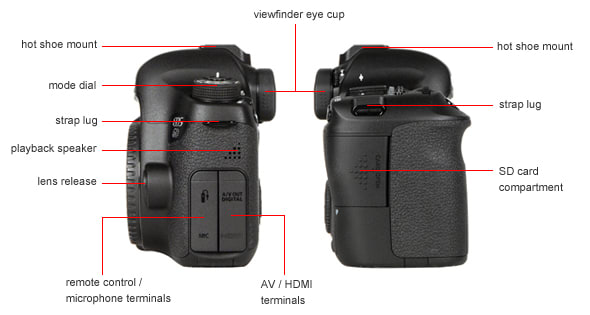
Sides
{{section_header}}{{section.name}}{{/section_header}}
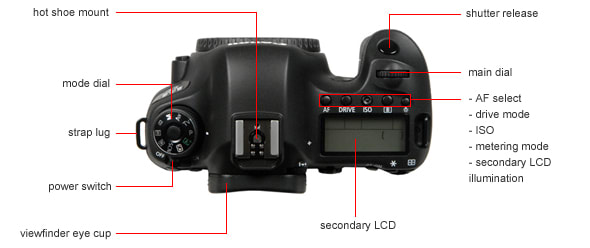
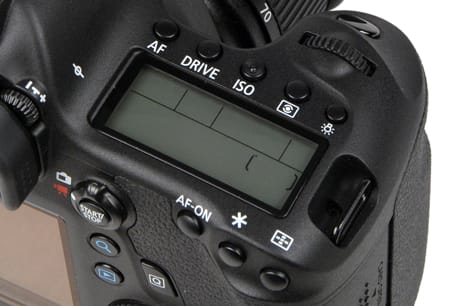
Top
{{section_header}}{{section.name}}{{/section_header}}
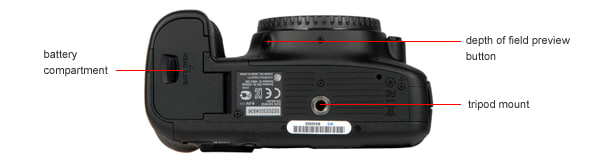
Bottom
{{section_header}}{{section.name}}{{/section_header}}
In the Box
{{section_header}}{{section.name}}{{/section_header}}
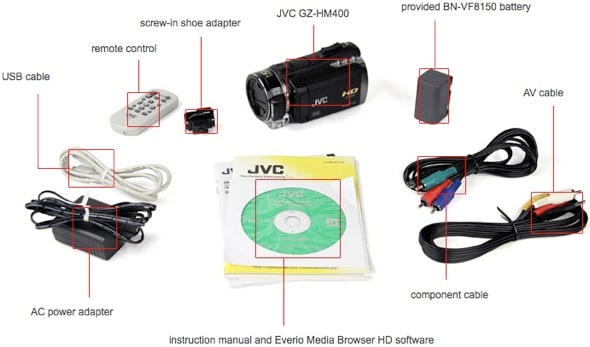
In addition to the camera, you get:
- Neck strap
- BC-VM10 battery charger
- USB cable
- Lens & body caps
Lens & Sensor
{{section_header}}{{section.name}}{{/section_header}}
Our review model of the A560 was supplied with a 24-105mm zoom: it is not clear if this will be the one supplied as a kit lens when the camera becomes available.
The A560 uses an APS-C CMOS sensor with a total resolution of 14.6 megapixels. 14.2 of these are used to capture images. The sensor sits behind a mirror that flips up when the camera is in Live View mode or is taking photos. The mirror has to be down for the camera to focus: the focus sensors are located in the viewfinder assembly and use this light to focus the camera
Viewfinder
{{section_header}}{{section.name}}{{/section_header}}
The A560 offers an optical viewfinder, located above the screen. Unlike many other recently launched cameras, this is a true optical viewfinder: the image you see is through the lens, with a mirror in front of the sensor that bounces the light up into the viewfinder. A switch next to the viewfinder switches between the optical viewfinder (Sony calls this OVF) and the live view mode, where the image on the screen is captured from the image sensor. When this is set to Live View, the viewfinder is blanked out. Unlike the distant cousin of this camera the SLT-A55, there is no way to show the live view image in the viewfinder, which can make using the live view mode in bright sunlight difficult: the screen is not particularly visible in bright light.
A small diopter adjustment wheel by the viewfinder allows you to adjust the focus of the viewfinder. We found the viewfinder somewhat awkward to use: you have to hold the eye very close to see the entire frame, and the LCD screen pushes against your nose. The rubber eyecup around the viewfinder helps to block out light, but it also makes it uncomfortable to use with spectacles or shades: you have to push right against the eyecup to stand any chance of seeing the whole image, and that causes smudges on the glasses. Below the viewfinder is a sensor that detects your face and disables the LCD screen so you aren't distracted by the light.
Display(s)
{{section_header}}{{section.name}}{{/section_header}}
The LCD screen of the A560 is located on the back of the camera body. It is a 3-inch screen with an impressive 921k pixel resolution, which means that the images look clear and sharp. We did find that it was rather difficult to see in bright direct sunlight, though, so you might want to use the optical viewfinder instead when shooting outdoors. The LCD panel of this camera is on an articualted arm that allows it to flip up or down, so you can shoot while holding the camera above or below your eye. The screen does not rotate, though, so you cannot rotate it around so you can see it from in front of the camera.
The hinged arrangement of the screen does make it a little awkward to use, as you have to pull on both the top and bottom of the camera to angle it to the position shown in the second photo below. This hinge arrangement also does not allow the camera to rotate around, which is something that similar screens on cameras such as the Pentax DMC-G2 and the Canon 60D can do.
The A560 is missing the LCD panel on the top of the camera body that is present on some other SLRs, instead using the main LCD to show shooting information when the camera is in optical viewfinder mode.
Flash
{{section_header}}{{section.name}}{{/section_header}}
There are two flash options with this camera: a flash built into the viewfinder housing, an a hot shoe for an external flash. the built in one pop up when the small flash button on the side of the viewfinder housing is pressed. We found it to be reasonably powerful, penetrating total darkness out to about 10-12 feet, and having a pretty even flash pattern. The built-in flash can sync with shutter speed of up to 1/160 of a second: useful for capturing fast moving objects.
The hot shoe is a proprietary one that only works with flashes sold by Sony: it will not work with standard flashes.

The flash emitter pops up from the top of the body via a mechanical release.
Connectivity
{{section_header}}{{section.name}}{{/section_header}}
On the left side of the camera are two port covers. Under the cover closest to the front of the camera is a connector for a wired remote and a microphone input. This input supports microphones that require phantom power to work. Under the second port cover near the back of the camera is a mini HDMI port and a USB port. Unusually for Sony, this USB port works with any mini USB cable, so you won't need to spend a fortune on a proprietary cable if you loose the one that comes with it.
On the right side of the camera body is a cover for another socket: an optional power supply.
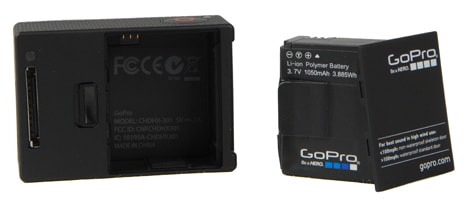
Battery
{{section_header}}{{section.name}}{{/section_header}}
The power source of the A560 is a small 1600mAh battery that fits into a cavity in the camera grip. This battery (model NP-FM500) is recharged with the included charger: it cannot be recharged in the camera body. Sony quotes a battery life of 1050 images, which feels pretty accurate: we found that the battery lasted well during several days of intense shooting. A spare battery will cost you about $45.
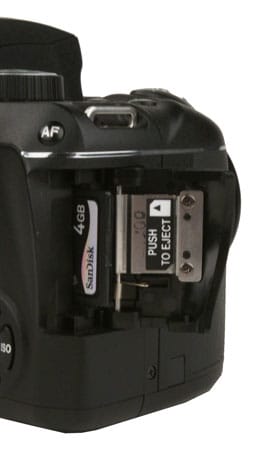
Memory
{{section_header}}{{section.name}}{{/section_header}}
Images and video are stored on either a Memory Stick card or an SD/SDHC/SDXC card. You can't use both cards at once, though: you have to switch between them with a switch located above the card slots.
The K2000 accepts inexpensive, easy to find SD cards.
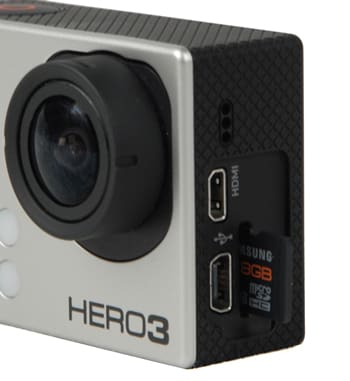
Photo Gallery
{{photo_gallery "Front Photo", "Back Photo", "Sides Photo", "Top Photo", "Bottom Photo", "Viewfinder Photo 1", "Viewfinder Photo 2", "Display Photo 1", "Display Photo 2", "Secondary Display Photo", "Flash Photo", "Lens Mount Photo", "Lens Photo 1", "Lens Photo 2", "Battery Photo", "Memory Photo", "Ports Photo 1", "Ports Photo 2", "Ports Photo 3", "Ports Photo 4", "Ports Photo 5", "Ports Photo 6", "Modes Photo", "Handling Photo 1", "Handling Photo 2", "Handling Photo 3", "Buttons Photo 1", "Buttons Photo 2", "Mic Photo", "Box Photo"}}
Image Quality
Sharpness
{{section_header}}{{section.name}}{{/section_header}}
We were impressed with the sharpness that the A560 managed overall, but there are some issues. We found that the edges of the frame were extremely soft at the widest aperture (f/3.5 to f/4.5), but were much sharper at the middle and smallest apertures More on how we test sharpness.
Color
{{section_header}}{{section.name}}{{/section_header}}
Our color accuracy test looks at how accurately a camera can capture the 24 colors on our test chart, which represents a range of real-world colors. We found that the A560 did well in this test, but struggled with some colors: the blues, reds and yellows on our test chart were a little oversaturated, producing a color that was somewhat brighter than the more subtle original. More on how we test color.
We found that the most accurate color mode was the Standard creative style. Examples of the other color modes are below this chart.
NOTE: Because of the way computer monitors reproduce colors, the images above do not exactly match the originals found on the chart or in the captured images. The chart should be used to judge the relative color shift, not the absolute captured colors.
{{comparison_bars title="Color Score Comparison", attribute="Color Score", xLabel="Color Score"}}
Color Modes
{{section_header}}{{section.name}}{{/section_header}}
The A560 offers 6 creative styles, all of which have an impact on the captured color. The styles are called Standard, Vivid, Portrait, Landscape, Sunset and Black & White. These modes involve more than just color shifts: they also affect the sharpness of the image. Examples of the color shifts these involve on our color chart are shown below.
White Balance
{{section_header}}{{section.name}}{{/section_header}}
Cameras have to judge the color of the light that they capture in order to capture accurate colors. This is called the white balance, and we test this by illuminating a color test chart with three different types of light: simulated daylight, incandescent light and a fluorescent tube. We found that the A560 did a good job when it was in the auto white balance mode, but the custom white balance setting was a little bit more inaccurate than we like to see.
Automatic White Balance ({{product.raw_scores['Auto White Balance Score']}})
We found that the A560 had no problems correctly judging the fluorescent and simulated daylight in our test, but it struggled with the incandescent light source, producing images with a distinct color cast. However, this is not uncommon in our tests: most cameras struggle to judge this light correctly.
If we look at the performance of our comparison cameras with the simulated daylight, you can see that all did a reasonable job here, although the Panasonic G2 had some issues. However, all of the cameras struggled with our incandescent light source, consistently judging the light wrongly and producing images with a distinct color cast. The errors with fluorescent light were much smaller across all of the cameras.
Custom White Balance ({{product.raw_scores['Custom White Balance Score']}})
We found that the A560 didn't do that well in our tests using the custom white balance. Using this involves taking a photo of a white object (we use a white card) which the camera then uses to judge the white balance. The A560 had a consistent significant error here. While this error wasn't huge, it was larger than we like to see with a custom white balance: we expect the results here to be far more accurate than the auto white balance.
White Balance Options
{{section_header}}{{section.name}}{{/section_header}}
A good selection of white balance settings are on offer, with 6 presets, all of which can be tweaked up or down to three steps (each step represents 10 Mired). You can also enter a color temperature directly, or use the custom setting to measure a white object, or just let the camera decide in the full auto mode. A single memory spot is also available if you are able to visit a location before shooting and check the lighting to create a custom reading. The color filter option allows you to set the white balance by manipulating a green/magenta compensation graph.
Long Exposure
{{section_header}}{{section.name}}{{/section_header}}
Our next test looks at how well the camera performs when taking long exposures of between 1 and 30 seconds with the long exposure noise reduction on and off. We found that the A560 performed well in these tests, with the noise remaining at moderate levels through the range of exposure times. More on how we test long exposure.
Our first test looks at the color accuracy of the captured images. We saw a consistent patter between 1 and 15 seconds, with the color accuracy being slightly worse with the noise reduction on. At the longest exposure, the color accuracy took a turn for the worse, though.
Looking at noise, we found that the long exposure noise reduction did some good, lowering the noise level slightly at all of the exposure times. However, something odd happened with the 30 second exposure: the noise was much lower than the 15 second exposure.
{{comparison_bars title="Long Exposure Score Comparison", attribute="Long Exposure Score", xLabel="Long Exposure Score"}}
Noise Reduction
{{section_header}}{{section.name}}{{/section_header}}
In our tests there was very little difference between the two levels: the NR Weak setting was slightly noisier than the NR Auto, but only by a very small amount.
If we look at the amount of noise in the different color channels of captured noise, we see a pretty consistent pattern, with no one color having much more noise than the others. More on how we test noise.
ISO Options
{{section_header}}{{section.name}}{{/section_header}}
The A560 offers a very wide ISO range, from a minimum of 100 right up to a highest setting of 12800, all at the full resolution of the camera. If you are looking to take photos in really dark places, the A560 offers a special mode called Multi Frame Noise Reduction that takes 6 shots for each shutter press and combines the captured images together to form a single image. This can widen the effective ISO range to 100 to an incredible 25600. However, moving objects can confuse the camera: see our Sample Photos for an example. All of the images below were shot in the standard, single shot mode.
Dynamic Range
{{section_header}}{{section.name}}{{/section_header}}
Dynamic range is a measure of the range of shades that a camera can capture: the wider the dynamic range, the more shades and the more shadow and highlight detail the camera will capture. Basically, the wider the dynamic range, the more realistic the image will look. We found that the A560 had a very wide dynamic range, managing an impressive maximum of 7.81 stops at ISO200. The dynamic range did fall off as the ISO increased, as the shadow details became lost in the increasing noise. However, the A560 still managed to keep a very decent dynamic range up to ISO 3200. More on how we test dynamic range.
If we compare the A560 with other cameras, we can see that it performed better than most, with only the Sony SLT-A55 getting comparable results. There is also only a small difference between the A560 and the Canon T2i.
{{comparison_bars title="Dynamic Range Score Comparison", attribute="Dynamic Range Score", xLabel="Dynamic Range Score"}}
Noise Reduction
{{section_header}}{{section.name}}{{/section_header}}
In our tests there was very little difference between the two levels: the NR Weak setting was slightly noisier than the NR Auto, but only by a very small amount.
If we look at the amount of noise in the different color channels of captured noise, we see a pretty consistent pattern, with no one color having much more noise than the others. More on how we test noise.
ISO Options
{{section_header}}{{section.name}}{{/section_header}}
The A560 offers a very wide ISO range, from a minimum of 100 right up to a highest setting of 12800, all at the full resolution of the camera. If you are looking to take photos in really dark places, the A560 offers a special mode called Multi Frame Noise Reduction that takes 6 shots for each shutter press and combines the captured images together to form a single image. This can widen the effective ISO range to 100 to an incredible 25600. However, moving objects can confuse the camera: see our Sample Photos for an example. All of the images below were shot in the standard, single shot mode.
Focus Performance
{{section_header}}{{section.name}}{{/section_header}}
When shooting in the normal mode using the optical viewfinder, we found that the A560 focuses quickly. It has 15 focus points, 3 of which are the cross type that focus better in low light. When in live view mode, the camera has two focusing modes. The first is a contrast detection method (rather like a point and shoot camera) that uses the image sensor. This mode is slow, often taking a second or two to focus in, but the live view remains active while it is working.The second mode uses the viewfinder sensors: tapping the Focus Check button flips the mirror down, focuses the camera and then flips the mirror back up again. That takes less than a second, but it does involve the screen going blank for this time, which is rather disorientating.
In the viewfinder mode, the camera offers three modes for how these focus points are used: Wide allows the camera to choose, while Spot uses the center group of 7 and Local allows you to choose an individual spot. There are also three options for how the camera focuses: AF-S, AF-A and AF-C.
Long Exposure
{{section_header}}{{section.name}}{{/section_header}}
Our next test looks at how well the camera performs when taking long exposures of between 1 and 30 seconds with the long exposure noise reduction on and off. We found that the A560 performed well in these tests, with the noise remaining at moderate levels through the range of exposure times. More on how we test long exposure.
Our first test looks at the color accuracy of the captured images. We saw a consistent patter between 1 and 15 seconds, with the color accuracy being slightly worse with the noise reduction on. At the longest exposure, the color accuracy took a turn for the worse, though.
Looking at noise, we found that the long exposure noise reduction did some good, lowering the noise level slightly at all of the exposure times. However, something odd happened with the 30 second exposure: the noise was much lower than the 15 second exposure.
{{comparison_bars title="Long Exposure Score Comparison", attribute="Long Exposure Score", xLabel="Long Exposure Score"}}
Video: Low Light Sensitivity
{{section_header}}{{section.name}}{{/section_header}}
The Sony A560 needed 14 lux of light to pass our low light sensitivity test, which is an average performance for a video-capable DSLR. The Sony SLT-A55V and Canon T2i both required slightly less light (11 lux each) to reach the same levels on our waveform monitor.
Chromatic Aberration
{{section_header}}{{section.name}}{{/section_header}}
The A560 has mixed results in our tests for chromatic aberration (CA), where the different colors of light are refracted differently by the lens elements, creating a color fringe in the captured image. We found very low CA in the middle of the zoom range, but some quite significant CA at the wide and telephoto ends of the zoom range, especially closer to the edges of the image. This CA was also present at all apertures at the wide and telephoto zoom settings.
Shooting at the wide end of the zoom range, we found that the A560 produced rather soft images with the widest aperture. Although the images were very sharp at the centre of the frame, they were very soft at the edge. Performance in the middle of the aperture range was better, but the edges got a little soft at the smallest aperture.
The same pattern was evident in the middle of the zoom range, with soft edges at the widest and smallest apertures.
At the longest zoom setting, the edge softness was even more evident, and was mixed up with some chromatic aberration, which produces the color fringes on the edges of our test chart.
Distortion
{{section_header}}{{section.name}}{{/section_header}}
We also found that the 24-105mm (equivalent to a 36 - 157mm zoom on a 35mm film camera) did produce some distortion in images. At the wide end of the zoom range, there was significant barrel distortion, but this switched to pincushion distortion in the middle and at the telephoto ends of the zoom range. The distortion at the widest zoom setting was the most noticeable, as the examples below show.
Motion
{{section_header}}{{section.name}}{{/section_header}}
The Sony A560 outputs all recorded video with a progressive 30p frame rate, although the camera's AVCHD setting does record using a 60i frame rate (the difference between the two isn't really noticeable). The A560's motion video benefited from having low artifacting and good smoothness, but the video was blurry overall and there was some significant interference in our rotating pinwheels. More on how CamcorderInfo tests motion.
The rolling shutter on the A560, which is a problem that plagues many video-capable DSLRs, wasn't a huge problem here, which surprised us. Often we see a strong wobble effect when we pan with cameras while they record video (this is the rolling shutter), but the A560's wobble wasn't too intense.
We liked the way the SLT-A55V captured motion a bit more than the Sony A560, despite the fact that the two cameras offer similar record modes and frame rates. We simply saw a bit less artifacting and not as much blur from the A55V, but the two cameras were close in terms of motion quality.
The Canon T2i ranks in the upper echelon of video-capable DSLRs when it comes to motion rendering. The camera offers 24p or 30p frame rates and it captures smooth motion with limited amounts of artifacting. The only drawback is that it lacks a 60i or 60p frame rate and we noticed a rolling shutter effect.
The Panasonic G2 has a variety of recording modes that allow you to record 60p or 30p video. We ran into a number of compatibility issues with the camera's AVCHD Lite codec, but in the end, we weren't that impressed with the camcorder's motion rendering. There was a significant rolling shutter effect that created intense wobble whenever we panned the camera and there was always the presence of artifacting.
Video Sharpness
{{section_header}}{{section.name}}{{/section_header}}
The Sony A560 disappointed in our sharpness test as the camera earned a horizontal sharpness of 600 lw/ph and a vertical sharpness of 550 lw/ph. This is far worse than the numbers we got from the Sony SLT-A55V and they are only marginally better than the 720p Panasonic G2 earned. During our testing, we noticed that the A560 recorded a much sharper image when the camera was held still, but when moved, which is how we perform our test, the camera's image blurred significantly and showed a lot of interference (hence the low sharpness scores). More on how CamcorderInfo tests video sharpness.
{{comparison_bars title="Video Sharpness Score Comparison", attribute="Video Sharpness Score", comps="video", xLabel="Video Sharpness Score"}}
Low Light Sensitivity
{{section_header}}{{section.name}}{{/section_header}}
The Sony A560 needed 14 lux of light to pass our low light sensitivity test, which is an average performance for a video-capable DSLR. The Sony SLT-A55V and Canon T2i both required slightly less light (11 lux each) to reach the same levels on our waveform monitor.
Usability
Buttons & Dials
{{section_header}}{{section.name}}{{/section_header}}
There are plenty of buttons on the camera body: we counted 18 buttons, one dial and two switch. That is a lot of buttons that could intimidate a novice user, but it does put the controls that a serious shooter needs close to hand. This means that it is easy to do things such as lock the exposure, access the function menu or set the ISO quickly and wiothout looking away from the viewfinder.
Menu
{{section_header}}{{section.name}}{{/section_header}}
The menu of the A560 is divided into two parts: the function menu and the main on-screen menu.
The function menu provides access to the features most often used while shooting: drive, flash, autofocus, AF, ISO, metering, flash, white balance, DRO/HDR and creative style. Navigation is done with the directional pad, and the center button is used to select the option required. This means that changing options requires quite a lot of button pressing to scroll around and find the required setting.
The main menu contains all of these functions, and every other option divided up into 11 tabbed screens. Again, navigating this screen involves a lot of scrolling and button pressing to navigate.
Instruction Manual
{{section_header}}{{section.name}}{{/section_header}}
Our review model was supplied without documentation, but we were able to review a PDF version of the instruction manual, which covers both the A560 and its sibling the A580. We found this manual to be well written and generally easy to use, with plenty of illustrations. Some aspects of the camera are not discussed in any detail, though: the image stabilization features of the camera only get a single page.
Handling
{{section_header}}{{section.name}}{{/section_header}}
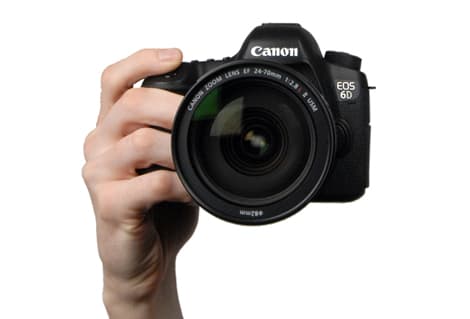
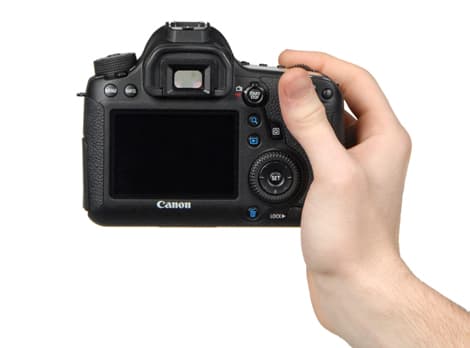
The A560 is a rather large SLR, with the body of the camera measuring 1.89 inches at the thinnest part and a chunky 2.95 inches at the grip. This makes it a bit too thick to be comfortable for those with small hands or shorter fingers, but it feels comfortable in the hand for those with medium and large hands. The textured covering of the grip makes for a firm handhold, even with slightly sweaty hands. On the back of the camera body is a small raised ridge at the back that provides a place for the thumb to rest, and another textured covering that provides for another grip.
Buttons & Dials
{{section_header}}{{section.name}}{{/section_header}}
There are plenty of buttons on the camera body: we counted 18 buttons, one dial and two switch. That is a lot of buttons that could intimidate a novice user, but it does put the controls that a serious shooter needs close to hand. This means that it is easy to do things such as lock the exposure, access the function menu or set the ISO quickly and wiothout looking away from the viewfinder.
Display(s)
{{section_header}}{{section.name}}{{/section_header}}
The LCD screen of the A560 is located on the back of the camera body. It is a 3-inch screen with an impressive 921k pixel resolution, which means that the images look clear and sharp. We did find that it was rather difficult to see in bright direct sunlight, though, so you might want to use the optical viewfinder instead when shooting outdoors. The LCD panel of this camera is on an articualted arm that allows it to flip up or down, so you can shoot while holding the camera above or below your eye. The screen does not rotate, though, so you cannot rotate it around so you can see it from in front of the camera.
The hinged arrangement of the screen does make it a little awkward to use, as you have to pull on both the top and bottom of the camera to angle it to the position shown in the second photo below. This hinge arrangement also does not allow the camera to rotate around, which is something that similar screens on cameras such as the Pentax DMC-G2 and the Canon 60D can do.
The A560 is missing the LCD panel on the top of the camera body that is present on some other SLRs, instead using the main LCD to show shooting information when the camera is in optical viewfinder mode.
Viewfinder
{{section_header}}{{section.name}}{{/section_header}}
The A560 offers an optical viewfinder, located above the screen. Unlike many other recently launched cameras, this is a true optical viewfinder: the image you see is through the lens, with a mirror in front of the sensor that bounces the light up into the viewfinder. A switch next to the viewfinder switches between the optical viewfinder (Sony calls this OVF) and the live view mode, where the image on the screen is captured from the image sensor. When this is set to Live View, the viewfinder is blanked out. Unlike the distant cousin of this camera the SLT-A55, there is no way to show the live view image in the viewfinder, which can make using the live view mode in bright sunlight difficult: the screen is not particularly visible in bright light.
A small diopter adjustment wheel by the viewfinder allows you to adjust the focus of the viewfinder. We found the viewfinder somewhat awkward to use: you have to hold the eye very close to see the entire frame, and the LCD screen pushes against your nose. The rubber eyecup around the viewfinder helps to block out light, but it also makes it uncomfortable to use with spectacles or shades: you have to push right against the eyecup to stand any chance of seeing the whole image, and that causes smudges on the glasses. Below the viewfinder is a sensor that detects your face and disables the LCD screen so you aren't distracted by the light.
Shooting Modes
{{section_header}}{{section.name}}{{/section_header}}
The A560 has a 9-position mode dial on the top of the camera body, which offers access to several shooting modes, including aperture priority, shutter priority, panorama, and the scene modes.
Focus
{{section_header}}{{section.name}}{{/section_header}}
When shooting in the normal mode using the optical viewfinder, we found that the A560 focuses quickly. It has 15 focus points, 3 of which are the cross type that focus better in low light. When in live view mode, the camera has two focusing modes. The first is a contrast detection method (rather like a point and shoot camera) that uses the image sensor. This mode is slow, often taking a second or two to focus in, but the live view remains active while it is working.The second mode uses the viewfinder sensors: tapping the Focus Check button flips the mirror down, focuses the camera and then flips the mirror back up again. That takes less than a second, but it does involve the screen going blank for this time, which is rather disorientating.
In the viewfinder mode, the camera offers three modes for how these focus points are used: Wide allows the camera to choose, while Spot uses the center group of 7 and Local allows you to choose an individual spot. There are also three options for how the camera focuses: AF-S, AF-A and AF-C.
Recording Options
{{section_header}}{{section.name}}{{/section_header}}
The A560 offers a reasonable number of options for the size of images and their quality, especially when you include the panorama modes and two aspect ratios (3:2 and 16:9) on offer. There are only three sizes for standard, still photos, though: L, M and S.
In addition, there are two options for the JPEG compression (Fine and Standard), plus the ability to capture RAW and JPEG files simultaneously. The last two options slow the camera down considerably, though, and use a lot of storage space for images.
Other Controls
{{section_header}}{{section.name}}{{/section_header}}
The A560 offers a number of special shooting modes:
3D Panorama
The A560 can also capture 3D panoramas, which can be played back on a 3D HDTV. We were not able to test this function at the time of publication.
Dynamic Range Optimizer (DRO)
In this mode, the camera processes a single captured image to show a wider dynamic range by tweaking the gamma curve of the image processing. Although this can bring out shadow details, it does not widen the dynamic range of the sensor or the captured image. For examples of images shot in this mode, see our sample photos section of this review.
Auto HDR
The camera takes 3 images at different exposure settings, then processes them down into one image, producing an image with more dynamic range than any single image the camera can capture. This can be set to auto, or 1, 2, 3, 4, 5, or 6 stop differences between the images. For examples of this mode, see our sample photos section.
Multi-frame noise reduction
In this special ISO setting, the camera takes 3 images and then combines the results, with the theory being that the combined images will have lower noise than one single shot. It also allows for higher ISO settings: up to 25600. In practice, it does seem to make a significant difference, with less noise appearing in images, but it only works with still or slow-moving objects: if anything moves in the frame (or the camera moves), the image becomes blurred. Samples are shown in the Sample Photo section of this review.
Speed and Timing
{{section_header}}{{section.name}}{{/section_header}}
There are three modes for shooting bursts of images: the Hi mode (which was used in the test above and shoots at about 4.4fps) and the Lo mode, which drops the speed to about 2.6 frames per second, but which is able to shoot continuously. There is also a mo
Shooting in the continuous Hi mode, we measured the speed of the A560 at about 4.4 frames per second(fps). It was able to keep this speed for between 10 and 12 shots, which means a burst of about 3-4 seconds. After this, the speed fell to about 1 fps, as the camera wrote out the captured images to memory. This test was done with a 4G SDHC card. That puts it in the middle of the range in shooting speed: the Sony SLT-A55 was much faster (at 10 fps), but the A560 shoots faster than our other comparison cameras.
The usual options are available for taking delayed images: a 2 and 10 second delay, plus a smile detect mode that only takes the photo when it detects a smile. In addition, the SLT-A55 supports an optional IR remote, which can be used to take photos. No pricing is currently available for this remote control.
Focus Speed
{{section_header}}{{section.name}}{{/section_header}}
When shooting in the normal mode using the optical viewfinder, we found that the A560 focuses quickly. It has 15 focus points, 3 of which are the cross type that focus better in low light. When in live view mode, the camera has two focusing modes. The first is a contrast detection method (rather like a point and shoot camera) that uses the image sensor. This mode is slow, often taking a second or two to focus in, but the live view remains active while it is working.The second mode uses the viewfinder sensors: tapping the Focus Check button flips the mirror down, focuses the camera and then flips the mirror back up again. That takes less than a second, but it does involve the screen going blank for this time, which is rather disorientating.
In the viewfinder mode, the camera offers three modes for how these focus points are used: Wide allows the camera to choose, while Spot uses the center group of 7 and Local allows you to choose an individual spot. There are also three options for how the camera focuses: AF-S, AF-A and AF-C.
Features
Recording Options
{{section_header}}{{section.name}}{{/section_header}}
Like many video-capable DSLRs, the Sony A560 offers two compression options for recording video. There's the AVCHD mode, which allows for Full HD recording at a 1920 x 1080 resolution, and there's two MP4 settings (one at a 1440 x 1080 resolution and one standard definition 640 x 480 option).
We usually got the best results when using the AVCHD setting as it does record video at the highest resolution and bitrate on the camera, but the MP4 setting may produce videos that are more compatible with certain video software (and the standard definition mode is great for videos you want to upload to the internet or share with friends). All video modes on the A560 output using a 30p frame rate, but the AVCHD mode records at 60i (the sensor output is still 30p, though).
Video Controls
{{section_header}}{{section.name}}{{/section_header}}
The Sony A560 doesn't let you control much in video mode. Most functions are automated, like shutter speed and aperture control, but you can set white balance, adjust exposure, and utilize the camera's variety of color controls in video mode.
Auto Controls
Shockingly, we could not find a way to set autofocus manually while recording video with the A560. The camera has no continual autofocus system like you see on all consumer camcorders, and it doesn't allow you to press the autofocus button during recording. Prior to recording you can focus, however, but you do so in the same manner as you would when taking photographs (press the shutter button down half way or press the AF button).
Zoom
Zoom is controlled by rotating the lens ring on the camera, but the amount of zoom you have to work with entirely depends on what lens is attached. The kit lens, which we used for our testing, is a 24 - 105mm lens. That translates to a roughly 4.5x optical zoom.
Focus
The only way to adjust focus on the A560 while recording video is to do so manually using the lens ring. To do this, you must first unlock the lens ring by switching to manual focus mode (a switch on the left side of the camera). The benefit of adjusting focus manually is that it is quieter than an autofocus system, so that should help keep the audio cleaner on your video recording.
Exposure Controls
Exposure is the only control of the above three that can be set manually in video mode. You can set it prior to recording or during video recording and the adjustment range is -2 to +2 in 1/3 EV increments. Sony confuses the user by allowing you to adjust aperture and shutter speed prior to recording, while simply canceling any adjustments you've made once you start recording. We've seen this before on a couple of other video-capable DSLRs, though, so we knew what was going on.
Other Controls
Like aperture and shutter speed, ISO can't be set manually for video on the A560. There are some other controls that do work with video recording, however. The steady shot function will help stabilize your video image, and there are plenty of color controls that can be set in video mode.
Audio Features
{{section_header}}{{section.name}}{{/section_header}}
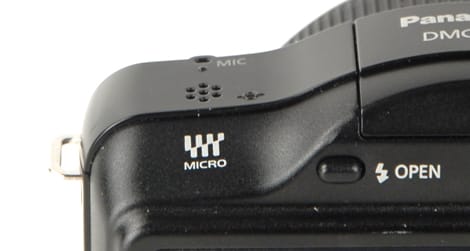
The Sony A560 has a built-in stereo microphone and a 3.5mm external mic jack, but that's about it as far as audio features are concerned. You can't adjust audio levels manually, nor is there a wind cut feature. We do like the location of the built-in mic, however, as it is on top of the camera rather than in the front where it can be accidentally covered by your hands.
In the Box
{{section_header}}{{section.name}}{{/section_header}}
In addition to the camera, you get:
- Neck strap
- BC-VM10 battery charger
- USB cable
- Lens & body caps
Meet the tester

Richard Baguley is a veteran writer who has written about technology ranging from Alphabet to Zip file utilities. He has contributed to pretty much every major tech publication, including Amiga Format Magazine, PC World, Wired, CNET, Toms Guide, Forbes, and many others. He lives in the Boston metro area with his wife, dog, and an indeterminate number of cats.
Checking our work.
Our team is here to help you buy the best stuff and love what you own. Our writers, editors, and experts obsess over the products we cover to make sure you're confident and satisfied. Have a different opinion about something we recommend? Email us and we'll compare notes.
Shoot us an email