Products are chosen independently by our editors. Purchases made through our links may earn us a commission.
Sitting around a fire in the backyard can be a relaxing way to end the evening or the week. Building a backyard fire pit is a good way to keep the fire contained and safe. While you can buy a fire pit, it’s surprisingly easy to learn how to build a fire pit.
The most basic DIY fire pit is a shallow hole with some stones laid around it in a circle. But to ensure a safe and structurally sound pit, here’s what you need to know about building a fire pit.
What to know about how to build a fire pit
When it comes to crafting a DIY fire pit, the most basic construction is a circle of concrete blocks you can purchase from a home improvement store surrounding a hole that’s a few inches deep. However, if you already have a brick patio built, you can install yours over the existing bricks.
You can also have features like fire pit rings or bowls, cooking grills, or even experiment with ways to improve airflow to reduce smoke.
However, you don’t need any of that to enjoy a fire in your yard. Just collect some pavers, pick up a few helpful tools and materials, and set aside an afternoon. You’ll be toasting marshmallows over the open flame in no time.
Tools you’ll need
- A shovel
- Dirt compactor
- A 2 or 4-foot level
- A rubber mallet
Materials you’ll need
How to build a fire pit with brick pavers
Step 1: Plan your fire pit
Before laying a single brick or digging any holes, put together a plan. The first step is to determine location. Your location should be relatively level, have space around it for seating, and most important, be a good distance away from structures and trees.
Ten feet is often considered a minimum distance, but more than 20-feet is safer.
Also check with your town and state building and zoning codes—there may well be specific regulations you need to follow regarding fire pits.
Once you have a location for your fire pit area, decide on a shape and size. The shape determines whether you need to use rectangular or angled bricks, and the size determines how big those bricks should be. Most fire pits are around 36 inches in diameter.
When you’ve nailed down the size and shape of the pit, you can actually go out and buy your pavers.
Step 2: Dig out an area for your fire pit
If you’re putting the fire pit on the ground, you’ll need to prep the area. Start by digging all of the grass and organic matter out of the area when the fire pit will go. You’ll likely need to go down at least 3 inches deep, but may need to go deeper.
It’s a good idea to call 811 to get in touch with your local Dig Safe organization to mark any underground wires or pipes before digging.
Step 3: Level and compact the hole
Once you have the area cleaned out, level the bottom of the hole as best as you can. Lay your level across the bottom of the hole along the edges and multiple diameters of the hole.
Fill in or dig out the area as needed to level it. The closer you get the bottom of the hole to level now, the easier future steps will be.
When you’re satisfied with the hole, compact it. The best way to do this is with a hand tamper. However, if you don’t have one, you can walk around in the hole, pressing down with each step, until the ground stops sinking.
If you don’t compact the dirt now, your fire pit may settle later, throwing it out of level.
Step 4: Fill the hole with leveling sand
Pour about an inch of sand into the hole and then level it out. You can push the sand around with a shovel, with your hand, or with your level, but the best tool for this is actually a short piece of two-by-four, 18 inches to 24 inches long.
As before, check the sand for level multiple times. Once it’s level, compact the sand the same way that you did the dirt. You may need to level the sand again after compacting.
Step 5: Lay the first row of bricks
Place your first row of bricks into position, keeping them tight with little-to-no gap in between them. Push each one down into the sand just a bit.
Once all of the bricks are in place, take out your level again and check that they are all on the same plane. Use a rubber mallet to hammer high bricks down. If a brick is low, pick it up and put a bit more sand beneath it.
Again, taking your time now to create a level first row will make subsequent rows fit better.
Step 6: Lay and adhere the subsequent rows of bricks
When laying the next row of brick pavers, make sure that you stagger the bricks so that the seams don’t line up with the seams of the row below. This both looks better and is more structurally sound.
Put all of the bricks into place to make sure they fit as you expect. Once you’re satisfied with each row’s placement, lift one brick at a time, apply construction adhesive to the bottom, and then put it back into place.
Keep the adhesive an inch or so away from the edges of the brick so that it doesn’t squeeze out—it’s a pain to clean up.
By lifting and gluing down one brick at a time, you ensure that you won’t mess up the positioning and create odd gaps or angles as you close the circle.
Repeat with additional rows until the pit is the height you want.
Step 7: Pour lava rocks into the base of the pit
This is another step that isn’t strictly necessary—you can just build your fire on the bare dirt at the bottom of your fire pit.
However, lava rocks are a great addition to a fire pit for several reasons. First, they look great. They also help air to circulate in and around the fire, keeping it burning longer and cleaner. Finally, they help water drain away from the fire area, so the bottom of your pit stays dry.
The one drawback is that the rocks can make it a bit difficult to clean out the ash. You may need to periodically remove some or all of the rocks to dig out coals and debris if you want to keep your fire pit looking fresh.
If that periodic cleanup doesn’t sound appealing, then skip the rocks.
Step 8: Build a fire and make s’mores!
Like most other backyard projects, the final step is to kick back and enjoy your finished DIY project. There’s nothing better than enjoying your DIY fire pit with friends and family.
Put your feet up. After all that work, you’ve earned it.
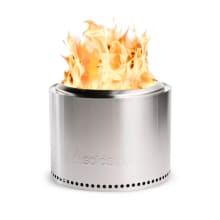
If all of this sounds like too much, you can always buy a fire pit, like the best fire pit we've tested, the Solo Stove Bonfire 2.0.

The Solo Stove Bonfire 2.0 is the best fire pit we've ever tested.


