How to properly wire a light switch into your wall
You don't need to call an electrician for this simple task.

Products are chosen independently by our editors. Purchases made through our links may earn us a commission.
Related content
-

The Best Smart Light Switches of 2025 best-right-now
-


Step 1: Turn the power off
In your home's circuit breaker box, find the breaker that the light switch you're working on is connected to, and flip the switch to off. You can verify the power is truly off by flicking the existing light switch on and touching a voltage detector to it.
If the wires are no longer live, the voltage detector shouldn't beep. If it does, you may have turned off the wrong breaker—try another switch until you find the right one.
Step 2: Remove the cover
The panel covering a light switch is generally secured by two screws. Remove both, and lift the panel off. If it's been painted, you may need to cut the paint around the edge of the panel to get it off.
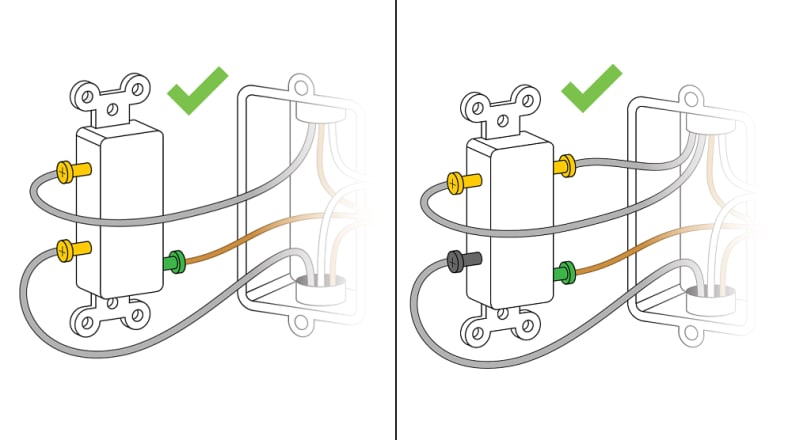
A simple single-pole switch (left) usually has three screw terminals: two for the load and one ground. A more complex double-pole or three-way switch (right) usually has four screw terminals: one load, two travelers, and one ground. Always consult an electrician if you're not certain how to proceed.
Step 3: Remove the old light switch
The light switch itself is secured by two more screws, one above and below the switch. Unscrew them and carefully pull the switch out until it is hanging from the loose wires.
Step 4: Note where the wires are connected
To connect the wires of the new light switch correctly, you need to be able to identify them. In most light switches, there will be three connections: two for the live circuit and a ground. The ground connection will be a bare wire with no covering, while the live circuit will be two wires covered in black shielding. The black indicates that this is the live part of the circuit, which carries the power to the light socket.
If there are more than three wires or they're different colors, then you're probably looking at a dimmer or a two-pole switch. These setups are a bit more complicated, and you'll want to search for an appropriate how-to guide for that specific task.
Step 5: Disconnect the old light switch
Assuming you have a single-pole wiring, continue by loosening the wires from the old switch by removing the screws holding them in place. Pull the wires out, then repeat until all of the wires are loose.
Step 6: Connect the new light switch
Loosen the screw terminals on the new light switch by unscrewing them. Starting with the bare ground cable, push each wire into the same terminal that it was connected to on the old switch. On most new switches, you'll push the wire into a hole behind the screw—check the documentation that came with the switch if you're not sure. Tighten the screw, fixing the cable in place, and tug gently on the wire to make sure it's secure.
With the two live wires, you should be able to push the wire in until the bare end of the wire is all the way into the terminal. If the bare end of the cable is too long, use the wire cutters to trim off the end to the right length. This ensures there are no bare wires exposed, so they won’t touch each other (or something else) and short out the switch when you reinstall them.
Step 7: Reinstall the light switch
Push the wires back into the box, and use the two screws on the switch to secure it in place.
Step 8: Test the light switch
Reset the circuit breaker to restore the flow of power to the light switch. If the circuit breaker immediately trips off, go back to the switch, check that the power is off, and check that the wires are all properly installed.
If the circuit breaker doesn't trip, go back to the light switch and turn it on. If the light works, you’ve done it!
Step 9: Replace the cover
Once you've verified that your handiwork was successful, you can install the new cover by putting it in place and tightening the two screws that hold the panel onto the light switch. Congrats—you're now well-versed in the fine art of light switch installation.
Related content
-
The Best Smart Light Switches of 2025
best-right-now
-