Products are chosen independently by our editors. Purchases made through our links may earn us a commission.
Credit:
Reviewed.com / TJ Donegan
Why trust Reviewed?
Reviewed's mission is to help you buy the best stuff and get the most out of what you already own. Our team of product experts thoroughly vet every product we recommend to help you cut through the clutter and find what you need.
These cameras offer high-quality images and videos, greater control over settings like shutter speed and aperture, and support interchangeable lenses for creative freedom.
Before purchasing, consider your intended use and budget to narrow down options and find a camera that perfectly fits your specific needs.
Digital cameras come in various sizes, prices, and capabilities, giving you near-endless options. That makes finding the right one feel overwhelming. Are you looking for a camera to take on vacation? Or do you want something more serious for sports and wildlife?
Before you shop, you must pinpoint how you’ll use your camera and how much you’re willing to spend. Starting there will help you narrow your search and find the one that fits your needs. Our guide rounds up the finest cameras available if you’re still unsure what to buy.
These cameras can produce high-quality images and videos and give you greater control over settings like shutter speed and aperture. They also support swapping lenses, giving you more creative freedom as a photographer.
Want a powerful full-frame camera? Or an advanced point-and-shoot? Here’s our list of the best cameras for photography today.
If you're looking for a real-time deep dive into the best deals on cameras, photography, and video gear an accessories, you can keep an eye on our resident expert's live Cyber Monday video and photo deal tracking.
Editor's Note:
The recommendations in this guide are based on thorough product and market research by our team of expert product reviewers. The picks are based on examining user reviews, product specifications, and, in some limited cases, our experience with the specific products named.
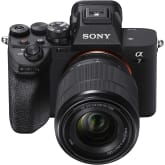
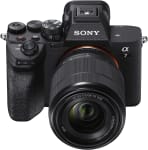
Sony a7 IV
The Sony a7 IV highlights why Sony is such a powerhouse in the mirrorless space. The camera features a 33MP full-frame sensor and an incredible 759-point autofocus system for comprehensive coverage. It also supports a real-time eye-tracking feature, giving you a powerful tool for taking portraits of family and friends. It also includes a 5-axis image stabilization system to keep your images and videos blur-free.
The most impressive thing about the Sony a7 IV is its hybrid capabilities. While its main strength is producing detailed images, it can also record 10-bit video at 4K 60p. The camera’s high performance is thanks to the Sony Bionz XR engine, which is powerful enough for any creator. Sony’s long been a leader among full-frame mirrorless cameras; the a7 IV is a prime example of why.
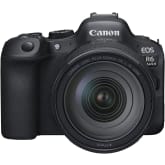
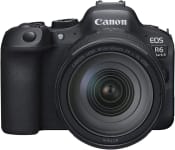
By far the most impressive thing about the Canon EOS R6 Mark II is its support for 1,053 selectable focusing points. That covers 100% of the 24.2MP CMOS sensor. This gives you a powerful autofocus experience that can find your subject no matter where it is in the frame.
The autofocus experience can also differentiate between subjects like animals, people, and vehicles. The powerful autofocus experience pairs perfectly with the Canon EOS R6 Mark II’s ability to shoot up to 12fps. You can push this to 40fps if you use the electronic shutter. The camera can also record 10-bit video at 4K 60p or Full HD 120p.
There’s also a 5-axis stabilization system, ensuring your images and videos are blur-free. Finally, the camera body features intuitive handling, with a mode dial, a switch for stills and video, and much more.
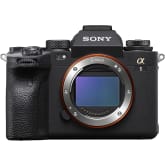
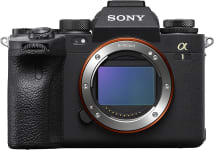
The Sony a1 is a flagship camera in every sense of the word.
It’s fast, durable, and adept at handling high-resolution images and videos. It features a 50MP full-frame sensor that produces incredibly detailed images and a high dynamic range. And its superior autofocus and subject tracking give it an edge for quick action. The Sony a1 can also shoot up to 30fps, making it an excellent choice for sports and wildlife photography.
The camera can record 8K 30p or 4K 120p video, giving you more creative flexibility over other hybrid options. Like the pictures it produces, the quality of the video it records is outstanding. Overall, the Sony a1 is the most powerful option on our list, but it’s also the most expensive. But the camera’s capabilities justify the price, from its incredible speed and image quality to its 8K video recording.
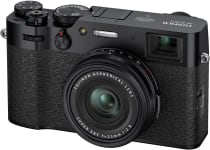
The Fujifilm X100V is a powerful point-and-shoot that's easy to use and carry. Its portability gives it an edge over some of the competition, but that’s not the only reason we love it. The camera makes an immediate impression thanks to its rangefinder-like design and retro dials, giving users a more tactical experience. It also features a compact 35mm equivalent lens with an f/2 aperture and support for various film simulations.
The Fujifilm X100V doesn’t just impress with its looks. The camera also features dust and splash protection, ensuring it can withstand the elements. Even though it’s on the smaller side, the autofocus can still compete with more robust mirrorless options.
There’s also support for 4K video and 11fps bursts. Despite its fixed lens, the compact body, retro design, and powerful performance make the X100V a perfect camera for everyday use.
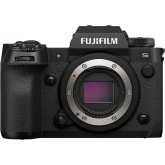
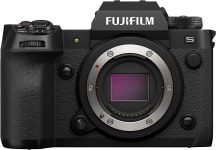
The Fujifilm X-H2S is capable of producing incredible stills and videos, making it another excellent option for hybrid creators. The camera features a powerful 26MP APS-C stacked sensor, 425-point hybrid autofocus, and subject detection. So it can track everything from people and vehicles to fast-moving animals.
You also get improved 7-stop, in-body image stabilization, and an impressive 40fps continuous shooting with full autofocus. These features make Fujifilm’s camera an excellent choice for action photography. The Fujifilm X-H2S can also record high-speed 4K 120p or Full HD 240p, letting you slow down subjects in motion.
The camera’s X-Processor 5 chip allows recording up to 6.2K, with support for Apple ProRes codecs. (Which can streamline your workflow when shooting and editing videos.) Overall, the Fujifilm X-H2S is a powerful APS-C camera with incredible color science and the ability to take stunning images.
Prices were accurate at the time this article was published but may change over time.
The product experts at Reviewed
have all your shopping needs covered.
Follow Reviewed on Facebook,
Twitter,
Instagram,
TikTok,
or Flipboard for the latest deals, product reviews, and more.
Meet the writer
Brandon Russell
Contributor
Brandon Russell is a valued contributor to the Reviewed.com family of sites.
Our team is here to help you buy the best stuff and love what you own. Our writers, editors, and experts obsess over the products we cover to make sure you're confident and satisfied. Have a different opinion about something we recommend? Email us and we'll compare notes.