Products are chosen independently by our editors. Purchases made through our links may earn us a commission.
Whether you’re a doctor, an engineer, or a handyman, it’s always best to have the right tool for your job. When you’re a homeowner, there are a lot of literal tools that you should have in your tool set, from a hammer to a jigsaw. Unfortunately, acquiring such a breadth of tools is expensive and takes up a lot of space you may not have.
If and when a fix-it project pops up at home, and you just don’t have the item you need in your tool box, don’t stress. Many tools can perform double or triple duty in a pinch.
Here are some tricks you can use to fake the right tool for some common tasks.
1. A flathead screwdriver can turn most screws
Screw heads come in all shapes and sizes—flatheads, Phillips head, square drive, star, hexagonal, and more. It can be hard to keep track of all of the types of drivers for these different types of screws.
If you’re trying to take out a screw that you don’t have a driver for, or if the screw is stripped, reach for a flathead screwdriver. If it’s the right size, you should be able to jam it into one of the grooves, or corner to corner. If the flathead doesn’t fit perfectly into the grooves, tilt the screwdriver a bit until it does.
You can also make it fit by hammering the flathead gently into the screw head, though this can dull your screwdriver over time.
Turn slowly with heavy downward pressure. The screw should come out a bit at a time. Once the screw is sticking up enough, switch to a pair of pliers to twist it the rest of the way out.
For very small screws, sometimes the blade of a pocket knife works better.
This trick will almost certainly ruin the screw, but it should come out.
2. Wood blocks make great mallets
If you’re trying to hammer something together or apart but don’t want to damage the face and don’t have a rubber mallet, grab a scrap piece of wood. Hold it flat against the face of your work piece and then hit the scrap with a hammer.
The scrap wood will take the damage from the hammer and will distribute the force of the blow across more surface area, reducing the chances of spitting or denting the surface you’re trying to save
You can provide even more protection if you wrap that scrap of wood in cloth.
Scrap wood can also protect your workpiece when trying to remove nails or prying pieces apart. Instead of levering against the face of whatever you’re removing the nail from, slip a piece of scrap beneath the hammer or pry bar and lever against that.
3. There are several ways to improvise a wrench

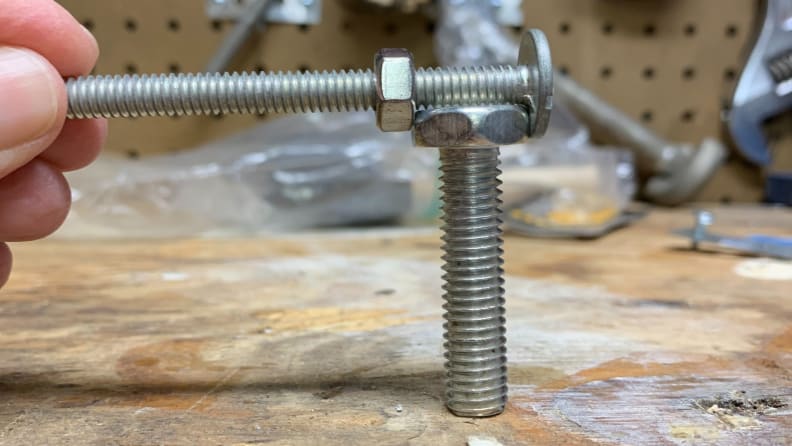
You can create a makeshift adjustable wrench with a nut and a long bolt.
Nothing is more frustrating than not having the right size wrench when you need to loosen a nut. I always keep adjustable wrenches and pliers on hand for just that sort of emergency, but if you don’t have those, try one of these tricks instead.
If you have a wrench that’s too big, slip a piece of metal into the gap. Coins can work, as can a flathead screwdriver or the blade of a pocket knife. The wrench is likely to slip as you do this, so turn slowly and carefully.
If you don’t have a wrench at all, turn to the original “in a pinch” tool—duct tape. Wrap a long strip of tape counterclockwise around the nut or bolt head. Leave a 6- or 8-inch tail as a handle to pull. The tape should be strong enough to loosen the nut.
You can use zip ties the same way. Tighten a zip tie around the nut and pull. The bolt should loosen right up.
You can also create a makeshift adjustable wrench with a nut and a long bolt. Thread the nut onto the bolt until there is a gap between the nut and bolt head about the width of the nut you’re trying to loosen. Put the nut you’re trying to loosen into that gap, and then tighten down the wrench nut. Now turn the bolt, loosening the nut.
4. Use household items to make a clamp
For a woodworker, you can never have too many clamps. If you don’t have a wall of clamps of all shapes and sizes, here are a few alternate ways to hold pieces together while glue dries.
The first is to use a ratchet strap. Wrap the strap tight against whatever it is that you’re trying to clamp and then ratchet it down.
Don’t over-tighten or you might crack or dent your workpiece. Also protect your surfaces by putting a piece of scrap wood beneath the ratchet itself.
You can do the same thing with a rubber band if your piece is too small for a ratchet strap to be practical. Tape is also another great option, though it won’t provide as much clamping pressure as a strap.
If you’re clamping with tape, you want to use a low adhesive tape like painter’s tape. Duct tape and other very sticky tapes leave behind a lot of goo that is difficult to remove.
5. Break a bolt loose if you don’t have a long enough wrench

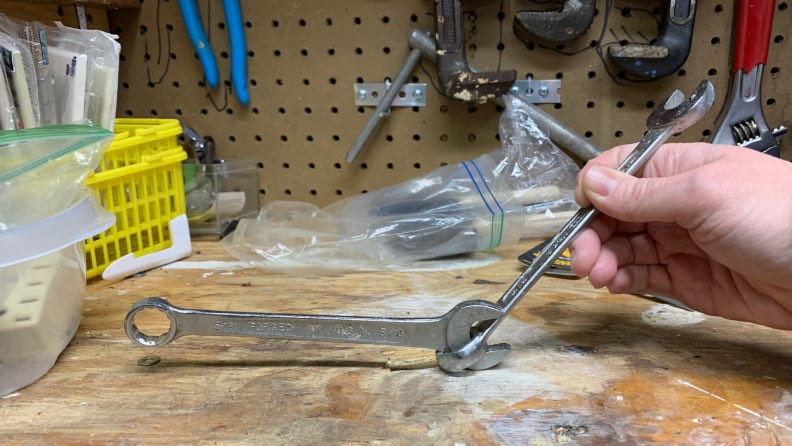
When trying to break a bolt loose, gain leverage is by linking combination wrenches.
Sometimes you can’t break a bolt loose with the tools that you have, no matter how much WD40 you spray on the threads. But, there are a few ways to gain extra leverage when you need it.
The simplest is to attach the wrench to the bolt, slip the wrench inside a long piece of pipe, and use that pipe as the handle to turn the bolt. The longer the pipe, the more leverage you’ll be able to generate to break the bolt loose.
Not everyone has a three-foot piece of pipe laying around, however.
Another way to gain leverage is by linking wrenches. This works best with combination wrenches, which have a closed end and an open end. Put the closed end of one wrench on the bolt, with the open end toward you. Then slip the closed end of the second wrench over one of the prongs on the open end of the first wrench. Which prong depends on whether you’re tightening or loosening.
You’ll probably have to adjust and twist the second wrench a bit, but there is a position where the shaft of the second wrench locks against the prong of the first. Once the two wrenches are locked in place, start loosening. This extra leverage should break the bolt free.
You can do something similar with a pair of locking vice grips. Clamp the vice grips as tight as you can onto the shaft of the wrench, making sure that they lock together, and push.
Doubled-up wrenches tend to slip, so be careful and make sure that there’s nothing you’ll slam your hands into if you do slip.
6. Use a circular saw to make long, straight cuts
If you need to rip down a piece of plywood, the edge of a door, or make another long cut, a track saw or a table saw are the easiest tools to use. If you don’t have either, you can still create long, straight cuts with a circular saw, a straight edge, and careful measurement.
A long level can make an excellent straight edge. If you need to cut something longer than that, then rip a 2- to 4-inch-wide strip off of the edge of a piece of brand new plywood. The factory edge should be perfectly straight. As long as you keep track of which edge is the factory edge after you’ve cut it, you now have an 8-foot-long straight edge.
Now all you have to do is clamp your straight edge to the board you want to cut and press the plate of the circular saw against it as you cut.
The trick is in measuring correctly. Measure the distance from the riding edge of your plate to the circular saw blade itself. When you’re marking where to put the straight edge, you need to add that saw distance to your measurement. That way when you position your saw against the straight edge, your blade aligns to the cut line.
Just to double check myself, I always mark two lines—where the actual cut will be and where the clamp needs to go. That way I can clamp the straight edge in place and make sure the saw blade is riding where I need.
Once your straight edge is secure, make your cut, keeping the circular saw plate tight to the straight edge the whole way.
The product experts at Reviewed have all your shopping needs covered. Follow Reviewed on Facebook, Twitter, and Instagram for the latest deals, product reviews, and more.
Prices were accurate at the time this article was published but may change over time.


